

Invisible, Bar, and Bead Settings
Stone Setting Primer, Part 3
Three settings with multiple stones and a clean look.
By Shawna Kulpa
(Originally Published by MJSA September, 2025)
Note: The first and second installments in this series on setting styles appeared in the January 2025 (prong, bezel, channel) and June 2025 (pavé, flush, tension) issues of MJSA Journal. Digital copies of those articles are available to MJSA members in the online library on MJSA.org. PDF copies can be ordered by contacting JA Membership Sales & Service, members@jewelers.org. PDFs are free to MJSA and JA members and $25 for nonmembers.
Every stone setting technique serves a dual purpose: it secures the gemstone and defines how the finished piece looks, feels, and wears. The choice of setting has a major impact on a design’s success, and understanding how each one functions—and when it is the right choice—can help jewelers produce stronger, more wearable results.
In this third and final installment of our stone setting primer, we turn our attention to invisible, bar, and bead settings. For each, we’ll examine how it’s constructed, how it performs over time, and the factors jewelers should consider before adding it to their repertoire.
Invisible Settings
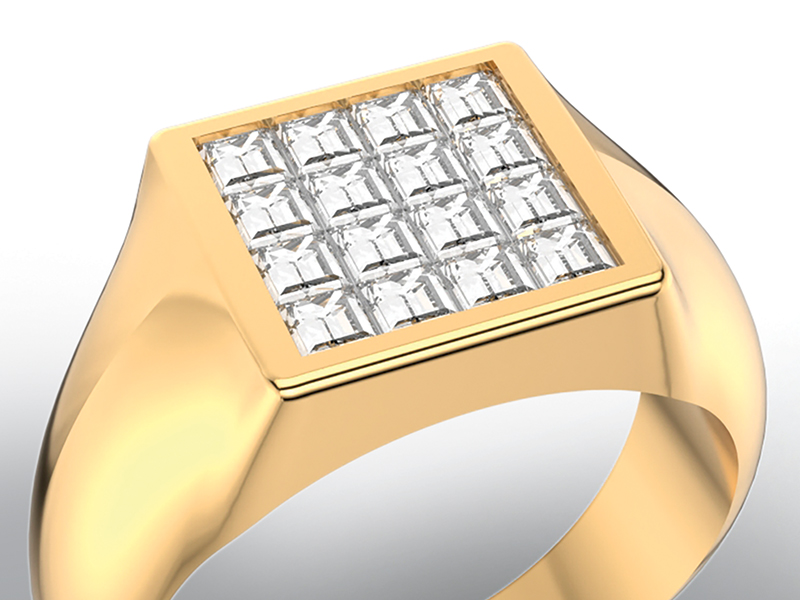
Invisible settings create the illusion of a surface made entirely of gemstones. The result is often a sleek appearance that conceals the mechanics beneath the stones.
Overview & Basics
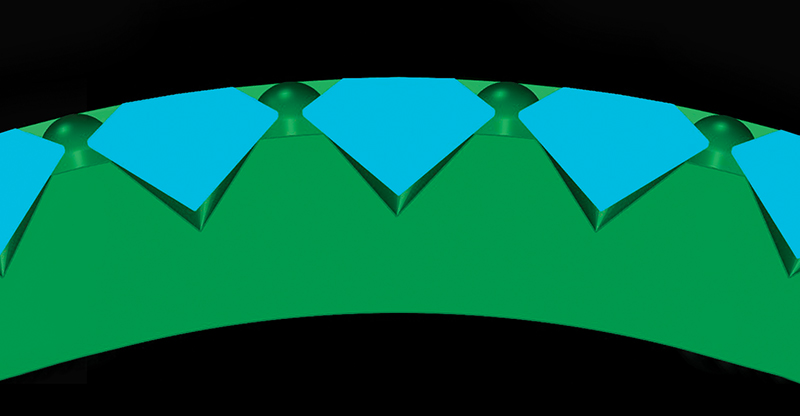
Invisible settings secure stones side by side with no prongs or visible metal separating them. The stones appear to float across the surface; metal typically can be seen only around the outer edge of the setting. Each stone is precision-cut with small grooves along its lower pavilion, allowing it to lock into a hidden metal wire gallery underneath.
Because the metal is completely concealed, this setting offers maximum surface coverage and a seamless look that’s visually distinct from other styles. However, it can be used with only square or rectangular stones (typically princess-cut or baguette shapes) that can fit together tightly.
Harder gemstones such as diamonds, rubies, and sapphires are best suited for invisible settings. Softer stones such as emeralds are generally avoided, as the setting process involves hammering that can easily crack or damage delicate materials.
Creation Process
Invisible setting is one of the most difficult techniques to master, with a difficulty rating of 10 out of a scale of 1 to 10. Precision is critical: the stones must be cut with consistent size and shape, the grooves must be accurately placed, and the underlying gallery must be laid out with exact alignment.
Tools required include a hammer and punch, gravers, burs, and pneumatic engraving tools, such as those from GRS or Lindsay. Success depends on having strong layout skills, clean castings, and advanced stone setting ability. Even a slight misalignment can result in loose stones or visible gaps.
Durability & Maintenance
Although invisible settings can be relatively secure when done well, they are not always ideal for everyday wear. If the piece is bumped or dropped and a stone falls out, it can be extremely difficult to repair. Replacement stones must match the original cuts exactly—something not all jewelers can source or reset.
In fact, many jewelers won’t even resize rings with invisible settings due to the risk of loosening the framework. Customers should be aware that, in the event of damage, the piece may need to be returned to the original manufacturer for repair.

Beneath the surface of an invisible setting, hidden metalwork grips each grooved stone with exacting precision, creating the illusion of a continuous expanse of gemstones.
Advantages
Invisible settings offer extensive gemstone coverage with minimal metal interference, maximizing sparkle and creating a high-impact look. They’re ideal for designs focused on visual drama and uninterrupted brilliance.
Challenges
This style requires perfectly calibrated stones, flawless layout, and high-level technical skills. Repairs are difficult, and not all jewelers will attempt them. They’re unsuitable for softer gemstones or pieces that require future resizing.
Practical Considerations
• Clarify with customers that resizing and repairs can be limited or impossible; managing expectations early prevents frustration later.
• Best suited for designs that don’t require frequent resizing or structural adjustment.
• Ideal for statement pieces that don’t undergo frequent wear, resizing, or repair.
• Plan for redundancy and keep matching spare stones on hand during production in case replacements are needed.
Bead Settings
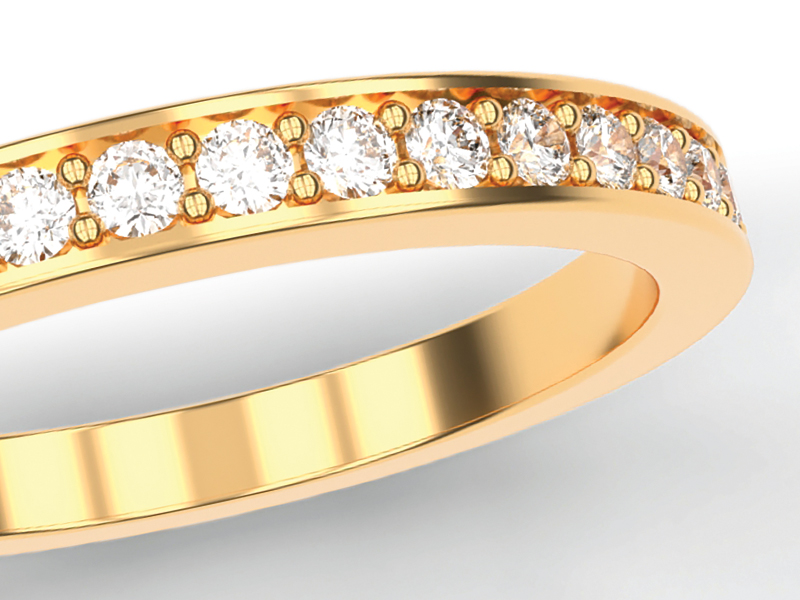
Providing a compact, low-profile option, bead settings offer a secure and decorative way to set small stones. This technique is a cornerstone of pavé and similar styles where multiple stones are closely set in intricate patterns.
Overview & Basics
Bead setting involves using a graver to drive into the surface of the metal, which raises a small bur or bead next to a pre-cut seat. Once the stone is seated, the raised metal is bent over the stone’s edge to hold it in place. The bead is then shaped and smoothed using a beading tool, forming a rounded prong-like cap over the stone.
The stones are typically set flush or just below the surface, with the beads securing them from above. This creates a very secure setting style that visually blends the metal and stones into a cohesive surface. Variations include pavé, French pavé, and castle settings, each offering a slightly different look depending on the arrangement and finishing.
Bead settings are best suited for small stones. Although any stone can technically be bead set, the pressure used when forming the bead could damage softer gems, such as emeralds. Round stones are generally easier to work with, but stones of various shapes and sizes can be successfully bead set.
Creation Process
Bead setting is considered one of the easier setting styles, with a difficulty rating of between 3 and 4 on a scale of 1 to 10. It requires basic bench skills and attention to detail but doesn’t demand advanced training.
Essential tools include a flex-shaft or micromotor, stone setting burs, hart burs, silicon polishers, magnification (such as a microscope or Optivisor), and a secure holding mechanism (such as those found in a GRS Benchmate system). A solid, well-lit workspace is key. While no specialized techniques are required beyond standard setting procedures, precision and a steady hand will yield better results.
Durability & Maintenance
When performed properly, bead settings are very secure. The small stones are locked into the metal and unlikely to move under normal conditions. With proper care, the stones can remain in place for a lifetime.
Bead settings should be regularly inspected, since the beads can wear down over time, especially in rings and other high-contact pieces. An annual checkup is recommended to ensure that all beads remain intact and that the stones are still held firmly in place.
Small beads of metal, raised and shaped with precision, hold each stone securely in a bead setting, producing a refined, low-profile look that protects and enhances.
Advantages
Bead setting is quick, effective, and visually appealing. It allows jewelers to secure multiple small stones across a piece without the need for individual prongs, resulting in a refined and cohesive look. Stones are well protected, and the technique works across a variety of design styles.
Challenges
There are few challenges with bead setting, but care must be taken when working with softer stones or metals. Consistency in bead formation and placement is key to achieving a polished result.
Practical Considerations
• Gold is ideal for bead settings, although some white gold alloys can be too hard to raise clean beads easily.
• Best suited for small stones, especially round cuts. Stones with corners can also be used but may benefit from additional protection, such as chevron-style tips.
• No special care instructions are needed, though regular professional inspections are recommended.
• Works well for side stones on rings or designs with multiple stones of different sizes set in decorative patterns.
Bar Settings
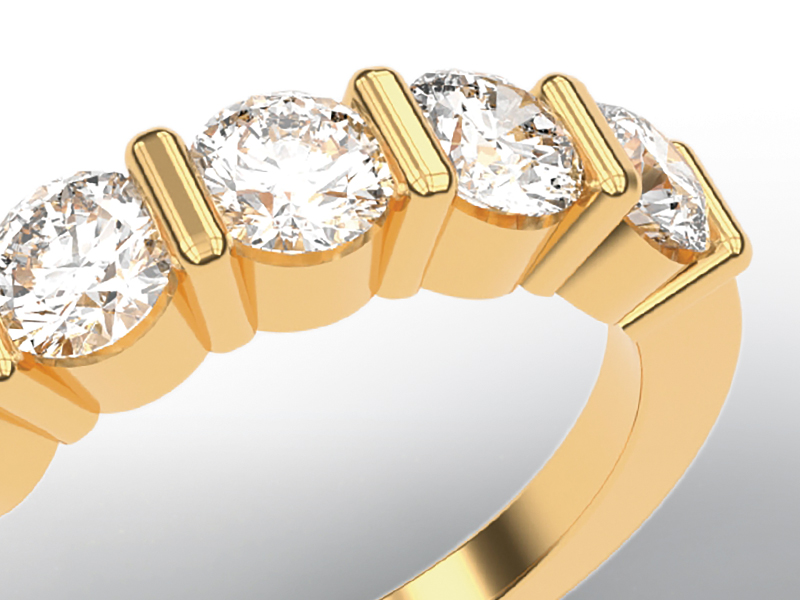
Holding gems securely between two vertical metal bars, a bar setting offers a clean, contemporary way to showcase stones in a row. This style strikes a balance between openness and security, allowing plenty of light to reach the stones while maintaining a sleek, architectural appearance.
Overview & Basics
The gemstones are typically arranged in a straight line and secured by two parallel bars; when viewed horizontally, the top and bottom edges of each stone are exposed. This creates a clean, modern look that showcases the gems individually while allowing light to enter from multiple angles.
The effect is more open than a channel setting, which encloses stones on both sides with continuous walls, and more structured than shared prong settings. Bar settings are commonly used for rings, bracelets, and earrings.
Round stones are commonly used due to their consistent girdle shape, but other shapes, such as princess or baguette, can work if properly supported by the bars.
Creation Process
Bar settings have a difficulty rating between 6 and 7 on a scale of 1 to 10. While they don’t require advanced setting techniques such as those required by pavé, they do require precision during fabrication, especially in aligning the bars so they’re spaced evenly. (Often, jewelers will use cast or fabricated settings with pre-cut slots.)
After attaching the bars, the setters must cut the seats to each specific stone’s dimensions, ensuring a snug fit. The bars are then bent or tightened over the edges of the stones to hold them securely in place.
Tools required include setting burs, polished flat or onglette gravers, burnishers, a flex-shaft or micromotor, and magnification. Careful stone handling is also essential, especially since the sides of the stones remain exposed and can chip if the seating isn’t precise.
Durability & Maintenance
When well made, bar settings are secure and offer decent protection to the sides of the stones. However, since portions of the stones are exposed, they’re slightly more vulnerable to impact than in a channel setting.
Maintenance is relatively simple: check the bars for signs of loosening or wear over time. If a bar becomes damaged or bent, it can sometimes be reshaped. In more serious cases, a laser welder or partial rebuild may be required.

Small beads of metal, raised and shaped with precision, hold each stone securely in a bead setting, producing a refined, low-profile look that protects and enhances.
Advantages
Bar settings provide a striking, contemporary look and allow significant light exposure to the gemstones. When done right, the setting’s construction enables clean alignment of the stones across a row.
Challenges
This setting style requires careful layout and clean fabrication or casting. Bars must be perfectly aligned and seated to maintain visual consistency and stone security.
Practical Considerations
• Best for round or uniformly shaped stones to simplify seat cutting and ensure secure fits.
• Avoid sharp-cornered stones unless the bars are thick enough to provide adequate protection.
• Prefabricated settings can reduce bench time but still require precise stone matching and alignment.
• Works well for eternity bands, inline earrings, and bracelets where visibility of the gems and light return are especially important.
MJSA Journal would like to thank Phillip Scott of Rio Grande in Albuquerque, New Mexico, and Scott Bradford of Gesswein in Bridgeport, Connecticut, for their help with the article.