

Expanding The Horizons of Steel with Gold
From Crass to Class
Exploring techniques for bonding gold to steel
By Bette Barnett
(Originally Published by MJSA July 2023)
Editor’s Note: This article is excerpted from “Steel Jewelry—Expanding the Horizons of Steel with Gold,” a paper by Bette Barnett that was published in the proceedings of the 2022 Santa Fe Symposium on Jewelry Manufacturing Technology.
Despite its humble reputation, steel offers a rich opportunity for jewelry artists. It invites exploration of a grittier aspect to jewelry creation, a chance to take the most common materials and by applying vision, design, and execution, elevate it to art.
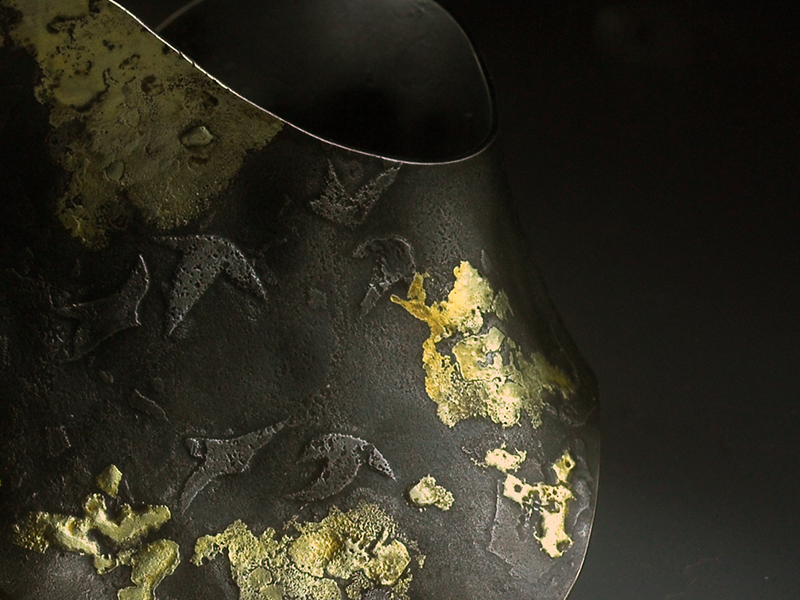
Steel offers practical advantages, too. It is strong, malleable, and ductile, making it workable and durable. It is also lightweight, making larger pieces comfortable. One of the biggest advantages of steel for jewelers, however, is its high melting temperature—approximately 2,600°F (1,427°C). This characteristic makes steel ideal for fusing other metals to it because the vast majority have lower melting temperatures. Fusing gold, in particular, to steel takes the metal to another level entirely.
Gold can be bonded to steel in many different ways, giving the jewelry artist versatility that elevates the executional possibilities and increases the cache of the resulting work. I like to say that adding gold to steel takes it from “crass” to “class.”
Basics of Mild Steel
According to the World Steel Association, there are more than 3,500 grades of steel. Mild steel, which contains between 0.05 percent and 0.3 percent carbon, is the best option for jewelry because it is soft enough to be worked while retaining durability. In addition, bright mild steel is cold-rolled, resulting in a smoother appearance, greater durability, and tighter tolerances than standard hot-rolled mild steel.
Mild steel is readily available from metal suppliers and comes in a wide range of thicknesses. It’s worth noting that ferrous and non-ferrous metals of the same gauge have different thicknesses, and different gauge tools are used to measure them. Gauges for steel are slightly thicker than the same gauges used for non-ferrous metals.
I most commonly use 18 or 20 gauge for my steel work, occasionally 16 gauge for pieces that require more heft and 22 gauge for earrings and other designs that need to be lighter or for layered pieces. When selecting the thickness of metal, keep in mind that mild steel weighs about 25 percent less than silver, offering opportunities for creating larger pieces that remain comfortable to wear.
Fusing Gold to Mild Steel
Many metals and their alloys can be fused to steel. Gold, with its rich yellow color and high value, is the most popular. When selecting gold alloys for fusing to steel, three factors should be considered: karat, color, and melting temperature.
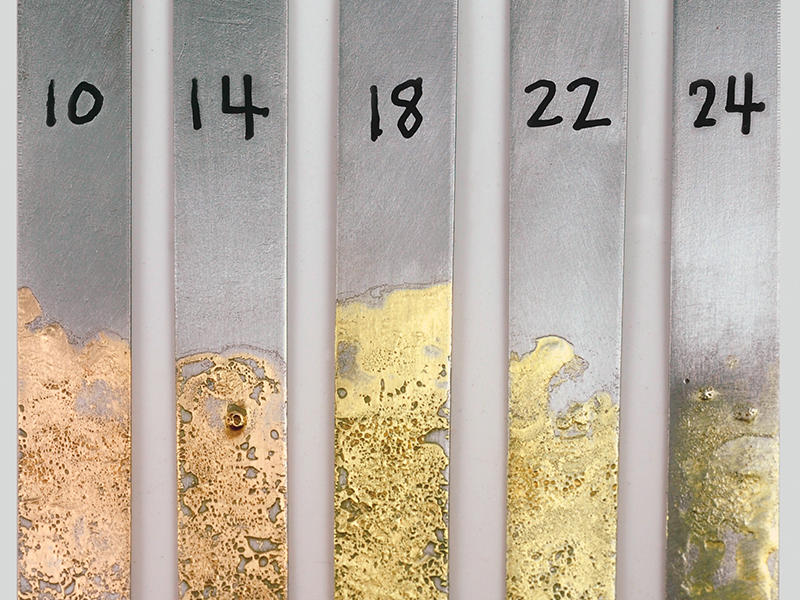
Sample tiles showing various karats of gold that have been fused to steel.
• When it comes to karat, I have found that the higher the karat of the gold alloy, the more it will spread and flow evenly when fused to steel. Lower karat alloys tend to consolidate on the surface of the steel and produce a more mottled flow, which can be quite attractive.
• 24k gold is a beautiful buttery yellow. When other alloying metals are added, a range of colors can be produced. Copper moves the alloy toward a rose or reddish color. Silver moves the alloy toward a greenish color. Zinc produces a bleached appearance. Nickel and palladium whiten the alloy. At each karat the color varies based on the amount of alloying metal added. A wider range of colors can be achieved as the karat is lowered.
• 24k gold melts at 1,948°F (1,064°C). Gold alloys melt over a range of temperatures, which decrease as the karat is lowered. This factor is important when layering different gold alloys with each other or other metals because fusing should occur in the order of descending melting temperatures.
A piece can be formed either before or after fusing. I prefer to fuse gold to steel before it is formed, either as a blank or a larger sheet that will be used as stock. Also, since fusing gold to steel requires high temperatures, most soldering should be done after the fusing process.
To prepare the gold for fusing, the metal should be forged until it is flat enough to roll through a rolling mill. It should then be rolled to about 30 gauge (0.25 mm), annealing it as it becomes springy. Once the metal is approximately 30 gauge, cut it into 5 to 6 mm pallions using the same technique as cutting sheet solder (cut a fringe and then cross-cut into the small pallions).
The fusing process is relatively simple. The goal is to melt the gold alloy or other metal across the surface of the steel before a buildup of oxidation and scale interfere. Before beginning the process, ensure that the steel is thoroughly cleaned using pumice cleaner, followed by a mesh scrubbing pad or fine sandpaper to slightly roughen the surface. Sandblasting is also an ideal method for preparing the surface. As a final step, clean the steel with a metal degreaser or alcohol (denatured or isopropyl). Do not use acetone as it has an additive that leaves a residue on the metal.
The fusing process will differ slightly depending on the type of gas you’re using. Here’s a breakdown:
Fusing with Dual Gas
For a dual gas torch, heat from beneath the steel to minimize oxidation on the top surface. This will also make it is easier to see the gold melt and flow across the steel. Support the metal on firebricks, charcoal blocks, or in a third hand. Avoid using a metal grate because it acts as a heat sink and causes uneven heat application. Be sure to allow enough room beneath the metal to direct the flame evenly across the entire surface of the back.
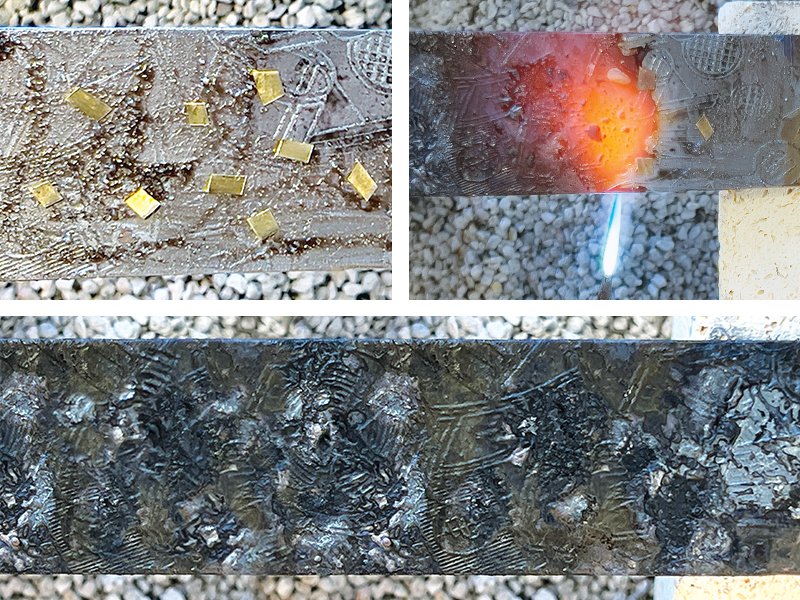
Top Left: Flux has been melted and pallions placed before fusing. Top Right: Fusing with dual gas: Using an oxidizing flame from below, melt the pallions, moving from one end to the other. Bottom Image: Fusing with propane/oxygen torch can result in extensive oxidation and scale, which will be removed in an acid bath.
If you’re using a propane/oxygen torch, apply a thin layer of flux to the top and bottom surfaces of the steel in the area where the gold will be fused. Using a low reducing flame, heat the steel from below until the flux dries and turns glassy. With pointed tweezers, pick up each pallion, dip it in flux, and place it on the steel. The spacing of the pallions depends on the desired coverage, although other factors can affect coverage, too. If you want a translucent layer of gold, where sections of steel show through, space the pallions further apart. For a heavier, more consistent layer of fused gold, place the pallions closer together.
Using a large torch tip with a neutral flame from beneath the metal, warm the metal until the pallions stop moving and are firmly anchored in the flux. Then, with a hot oxidizing flame from below, concentrate the tip of the flame directly beneath one of the pallions. Although the steel will turn red from the heat, it is in no danger of melting and the flame should remain focused until the pallion melts. When it does, move to the next pallion and continue in this manner until all of the pallions have melted. It is difficult to see exactly where the melted gold flows. The overall effect is similar to a lava lamp. Over time, the ability to sense the movement of the molten gold across the surface will become more intuitive.
Fusing with an Acetylene/Air Torch
For an acetylene/air torch, heating from above the steel is more effective because it helps avoid oxidation until sufficient heat is reached to melt the gold. Flux is not required using this method.
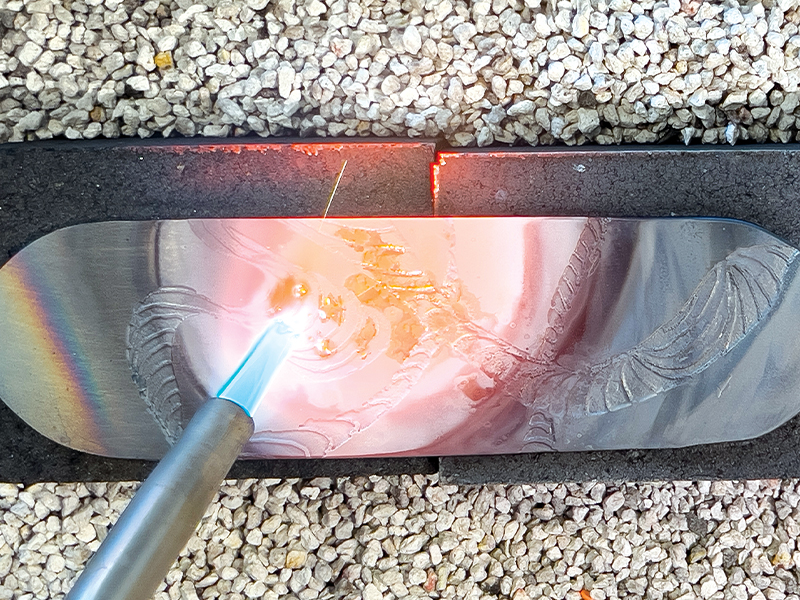
Fusing with acetylene/air: Using a very hot flame, aim the torch directly at the surface; pallions will melt after the metal reaches the right temperature.
Place the cleaned steel on a firebrick, soldering pad, or charcoal block. Using pointed tweezers, pick up each pallion and place it on the steel. With a large torch tip and an extremely hot flame, aim the torch directly down on the gold pallions. Hold the flame in place until one or a few of the pallions ball up. Once a pallion or two flow, the others should quickly follow. Although it is difficult to follow the progress of the melted metal across the steel, a slight outline as it melts will be discernable.
Fusing with a MAPP Gas Torch
Apply flux to the surface of the steel and heat it with a reducing flame until the flux is glassy. Place each pallion after dipping it in the flux. MAPP gas seems to work better if the heat is applied from the top. Once the pallions are set, use a maximum flame to fuse them. A MAPP torch takes quite a bit of time before the gold will melt, even longer than an acetylene/air torch. Just be patient and continue to hold the flame on the metal even after the steel turns bright orange.
Controlling the Flow
During the fusing process, the gold will flow randomly across the steel. Many factors affect where the metal flows, including the type of torch used, flux, amount of heat, surface tension of the metals/alloys, and gravity.
Several techniques can be used to help restrict the flow of gold alloys to desired areas. Yellow ochre or a masking mud is helpful in that regard. Simply paint a thin coat of the mask in areas where the gold flow is not wanted, allow it to dry thoroughly, and then proceed with the fusing process. The flow will be somewhat limited to the desired areas, but it is not possible to achieve an exact demarcation of borders.
Another technique is to use a hot torch to draw the melting metal across the surface, similar to the way solder can be drawn by heat. Adding gravity to the mix is also helpful. Simply use the shape of a piece or tilt it at an angle to allow the gold to flow downward.
Quenching & Pickling
Mild steel sheet can be quenched immediately after fusing because it does not contain enough carbon to become hard and brittle. However, steel wire can become brittle if quenched immediately so it should be allowed to cool before quenching.
Because steel oxidizes heavily and can build up considerable scale, it requires more time to be cleaned in pickle than non-ferrous metals. It is not unusual to require an hour or even longer to remove the surface oxidation and scale from steel that has been fused with gold. I check it every 20 to 30 minutes, give it a good scrub with a metal brush and pumice cleaner, and then place it back in the pickle until it is clean.
Sometimes, scale will be so deeply embedded that the acid will not remove it completely. In this case, an abrasive wheel can be used to selectively abrade off the oxidation without removing the fused gold.
Also, remember that a separate pickle container must be used for ferrous metals. Despite this precaution, it is fairly common for copper plating to occur if an alloy containing copper has been used for fusing. Usually, the copper layer can be scrubbed off with a brass brush. If necessary, simply mix up some super pickle to remove the plating by adding a heavy slug of peroxide to a small amount of regular pickle.
Finishing Steel Jewelry
There are two critical steps that must be taken once the fused sheet has been formed into jewelry: patinating and sealing the work.
Mild steel offers many opportunities for different types and colors of patinas. Reactive colors include black, brown, yellow, orange, red, violet, and blue. The deep black that can be achieved on steel is particularly attractive as a backdrop for fused gold alloys. Even a rust-like surface can be achieved as a stable patina on steel.
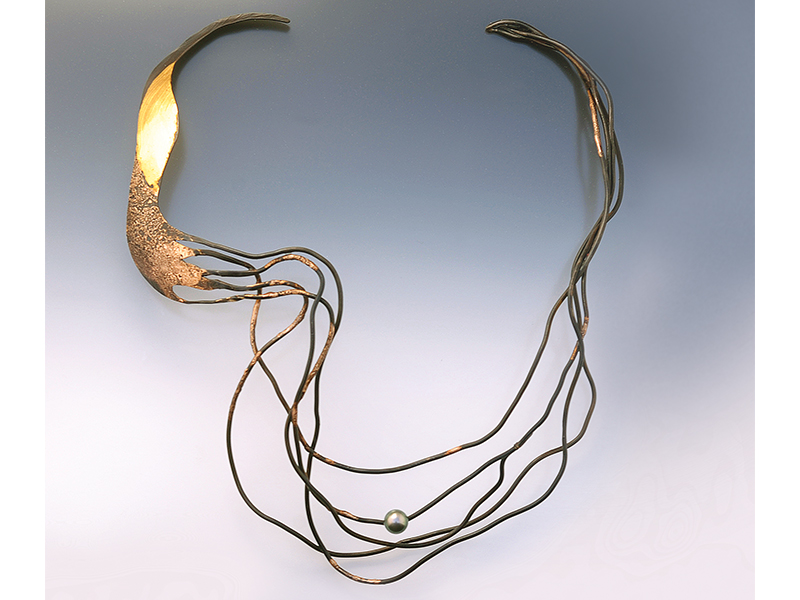
Fluvial neckpiece with wire fused with 20k soft green gold
Both heat and chemical patinas are effective on steel that has been fused with gold. Before applying a patina, the steel must be wiped with alcohol. For a chemical patina, matte or rougher surfaces will absorb a patina better than highly polished ones. I often use a sandblaster with low-grit media to achieve a matte finish early in the process in anticipation of the patina application.
Heat Patina
Heating steel evenly using a torch, kiln, hotplate, or even a gas stove burner will produce colors throughout the entire tempering range—from light straw to dark gray. A constant source of heat, such as a kiln or hotplate, will make it easier to achieve an even heat patina. Simply remove the metal from the heat source immediately when the desired color is reached.
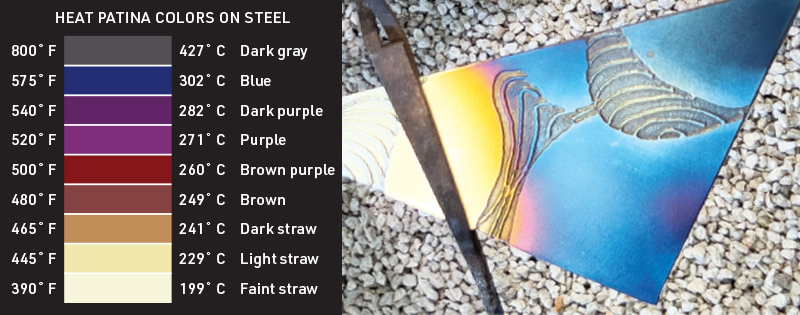
Royal blue heat patina
Because the patina will continue to develop after the metal is removed from the heat, it should be quenched immediately. To use a torch for a heat patina, keep the flame at a very low reducing level. By heating from beneath the metal, I can monitor the color as it develops and stay slightly ahead of it to avoid overheating.
Oil Patina
Quenching hot steel in a light cooking oil, such as olive, peanut, or sunflower oil, will produce a deep near-black patina that has the added advantage of being rust resistant. Heat the steel until it turns a dull red and quickly and carefully submerge it into the oil. It is best to do this outdoors or in an area with good ventilation because of the fumes. Swirl the piece around in the oil until it cools completely to avoid the danger of an oil fire. This process can be repeated three or four times until the desired color is reached.
Chemical Patina
Many chemical patinas are available to create a multitude of single and multi-color effects. In addition, colorant formulas can be mixed using chemicals and household ingredients to achieve different patinas.
Branded patinas for steel are available from a number of sources. It is important to follow the instructions for application of chemical patinas, particularly the safety precautions. Always wear gloves and ensure appropriate ventilation (or wear a mask). Patinas can cause skin irritation and staining, and the fumes can cause headaches and respiratory problems.
The effectiveness of chemical patinas can be enhanced by warming the metal to approximately 180°F to 200°F (82°C to 93°C). I use a heat gun for this purpose. The patina can be sprayed or air brushed; however, I prefer to dip the piece into the patina or brush it onto the surface to minimize the mess. If brushing the patina, use a soft paintbrush and apply it in light, even strokes. Sometimes I have found it helpful to apply a bit of pressure and extra patina in any areas that don’t seem to readily absorb the color.
After applying a coat of the patina, rinse the metal in clean water. I rub the surface gently with my gloved thumbs until I can no longer feel the slippery residue from the chemical on the surface. For a deep jet-black, repeat the process up to two more times until the patina is dense and even. After three coats, if the patina is not covering evenly, it should be removed by placing the piece in pickle and then reapplied to the cleaned metal.
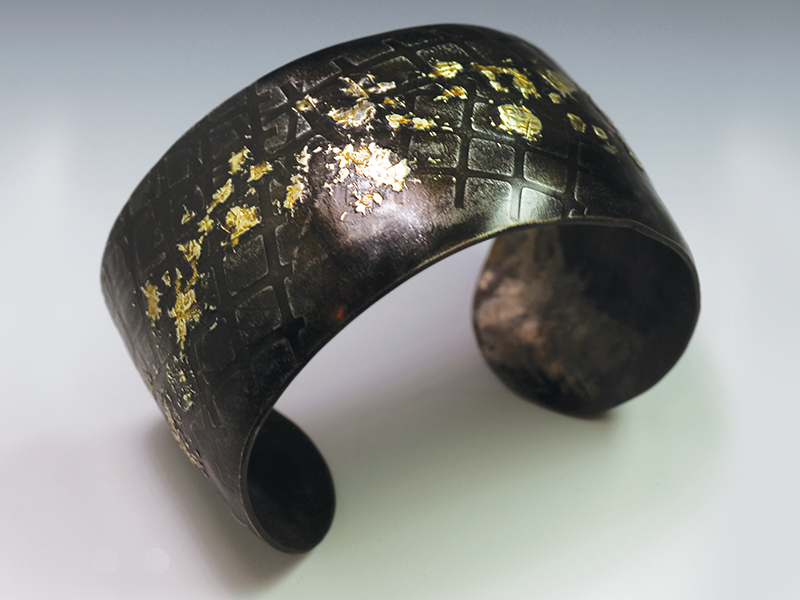
Coastal cuff with black chemical patina
After the final rinse, place the piece in a neutralizing bath of baking soda and water to stop the chemical action of the patina. Chemical patinas contain acids and if they are not thoroughly neutralized, they will continue to act on the metal, quickly promoting rust.
To allow highlights of the steel to show through the patina, use very fine sandpaper, steel wool, polishing paper, or mesh scrub to remove some of the patina.
To protect steel jewelry from rust, it must be sealed immediately after applying a patina. Before sealing, always wipe the surface with alcohol. Modern products for sealing metals have advanced dramatically and provide a durable and long-lived finish. The three best options for sealing steel jewelry are metal oil, metal wax, and liquid sealer.
Metal oil adheres well to the surface of cold metal and helps wick moisture from it. The metal oil also contains rust inhibitors and UV protection as an added plus. Apply a very thin layer of oil with a rag, buff it into the surface with the rag, and then allow it to dry and set for three days. It can then be left as is or coated with a lacquer for extra protection.
A wax finish will provide years of protection. However, the microcrystalline wax typically used by many jewelers to protect silver and gold jewelry is not hard or thick enough for steel. Instead, I prefer a heavier wax containing hardeners and made specifically to protect patinas and metal finishes. Waxes that contain UV inhibitors are also helpful to guard against corrosion.
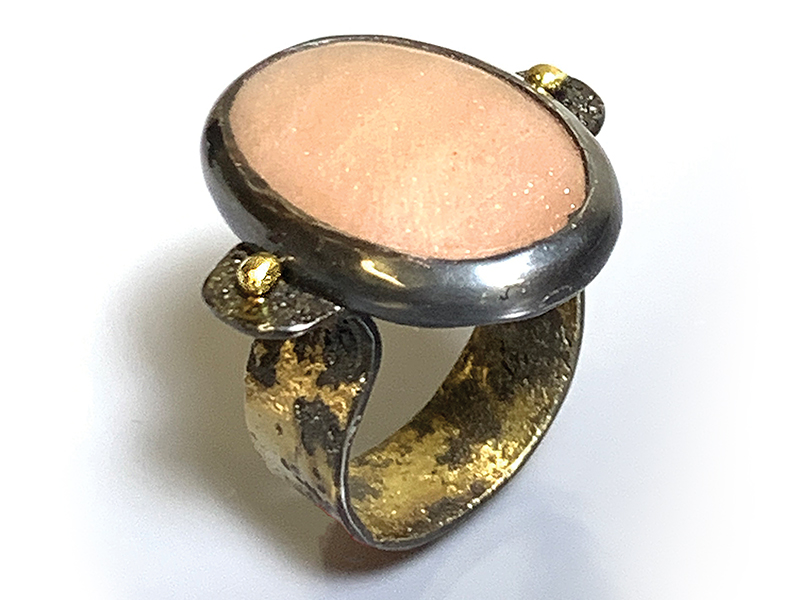
Embolden Ring, Shank fused inside and out with gold to help protect against rust.
Before applying wax it’s a good idea to warm the metal slightly to about 200°F (93°C) to ensure that it is completely dry. I use a cotton swab to apply the wax. The wax can be applied to cold metal, but warming it helps the wax soak into the surface, cover evenly, and reach into tight spaces. Allow the wax to dry for about 5 to 10 minutes or until it is cloudy and no oil can be felt on the surface. Then buff it briskly with cheesecloth or a paper towel to remove any stickiness. After the final coat of wax, vigorously buff the surface to a hard shine using a soft cloth or a horsehair shoe brush. Up to three coats of wax can be applied, but one or two are usually sufficient.
The third option, liquid coating for steel, is available either as synthetic polyethylene or acrylic resins, which may or may not be dissolved in a solvent to allow spraying. Some artists feel that lacquer coatings cause the jewelry to take on a plastic-like appearance. However, I have found that solvent-based lacquers avoid this problem and provide an attractive and durable protection. One advantage of liquid coatings is that they come in a variety of finishes—gloss, satin, and matte—allowing the artist to choose a finish that complements the aesthetics of the jewelry.
Liquid sealers can be applied by spraying, dipping, or brushing, ideally outdoors to avoid exposure to the fumes. Always wear a breathing mask and gloves. If spraying, use light, even coats. If brushing, a cheap foam paintbrush works well to minimize brush marks. Lacquers usually dry to the touch after an hour or two and a second coat can be applied. The lacquer can be cured in a warm oven for a few hours, but it will also cure at room temperature over a few days. If desired, a wax coating can be applied over lacquer for additional protection.
Choosing a sealer is largely a matter of practicality and aesthetics. In humid climates, a combination of sealers—oil/liquid or liquid/wax—might be a wise choice. For aesthetic considerations, a wax offers a deep satin finish while a matte lacquer provides a more urban look.
Caring for Steel Jewelry
If properly cared for, steel jewelry is unlikely to rust or corrode. However, for ring shanks, I take extra protection by lining a steel shank with a non-corrosive metal. Another alternative is to fuse gold to the inside of a ring shank to help minimize the risk for rust.
Buyers should be made aware of the proper care of steel jewelry. I provide customers the following care instructions: “Although unlikely, it is possible that steel jewelry can rust is exposed to moisture or chemicals. Store the jewelry in a dry place and do not submerge it in water such as in swimming pools, hot tubs, or baths. Avoid exposure to perfumes, lotions, and sunscreens. If the jewelry gets wet, dry it thoroughly. Occasionally rub a small amount of light oil—such as mineral or olive oil—into the surface and rub with a soft cloth.”
I also offer to refinish the jewelry at no cost if it rusts or corrodes for any reason other than improper care. I have only had two pieces returned to me for refinishing. In one case the owner had worn the jewelry repeatedly in a hot tub and the other had worn it in a mineral spring. In both cases, I refinished the pieces and returned them with an emphatic reminder of proper care.
Bette Barnett is the author of the upcoming book Creating Steel Jewelry, which is scheduled to be published by Artisan Ideas later this year.