

A Cure for the Blues
Julie Lamb’s mirror-cut aquamarine ring
By Tina Snyder
(Originally published May 2019.)
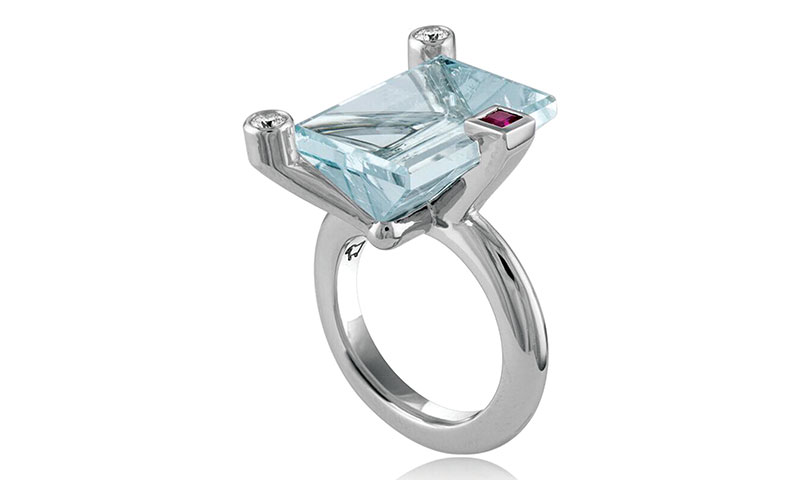
Feeling blue that she wasn’t able to make the trek to Tucson for the annual gem shows in 2018, designer Julie Lamb of New York City sought comfort in the collection of gemstones she’d amassed in years past. It was while sorting through her treasure box that she encountered a 12 carat mirror-cut aquamarine that immediately cheered her up.
Little did she know, it would also teach her a valuable lesson.
Lamb grabbed her sketchpad and got to work, drawing inspiration from her bi-setting technique of clasping a stone at just two points with diamond-set prongs. “All of my bi-set pieces are made by hand, fabricated with just two prongs and a line of metal across the culet,” she explains.
For this ring, though, Lamb decided to do things a bit differently. Since the aquamarine was so angular and featured a deep V at the bottom, Lamb knew she needed more metal support for the stone than her bi-setting technique offers. At the same time, she didn’t want to sacrifice the look of showcasing the stone itself by adding too much metal. She found the answer in CAD.
Having had these one-of-a-kind pieces previously forged by hand, Lamb sought out a CAD modeler who would involve her in every step of the process. “I knew in order to achieve the precision and symmetry I desired for this ring, I had to build it in CAD,” she explains. “But I would only do so with a CAD modeler who would literally let me sit in during the building process, with my handmade pieces in front of us so the original designs could dictate the 3-D model.”
Lamb wanted to make sure the curves looked natural, not forced. “When you’re working by hand, you can draw wire, and flatten and file, but in CAD, you can literally make any shape you want, and blend any cross-sections,” she says. “It opens up so many possibilities, but you have to be careful in how you are blending and connecting. It’s very easy for your CAD de-sign to end up looking like a bunch of pieces just stuck together.”
For the aquamarine, Lamb knew that in addition to the two diamond-set round prongs she was adapting from her bi-set collection, she wanted to add a third princess-cut ruby prong into the mix. “I just loved the color contrast of the super hot pink ruby to the pale icy blue, so I wanted to highlight that combination in the ring,” she adds. Due to the relative softness of the aquamarine, she protected two of the four corners with thick diamond-set prongs, and decided to set the ruby in the center for contrast.
The ring was cast in platinum and polished, and the diamonds and ruby were burnish set in place. But when it came time to set the aquamarine, the real challenge arose.
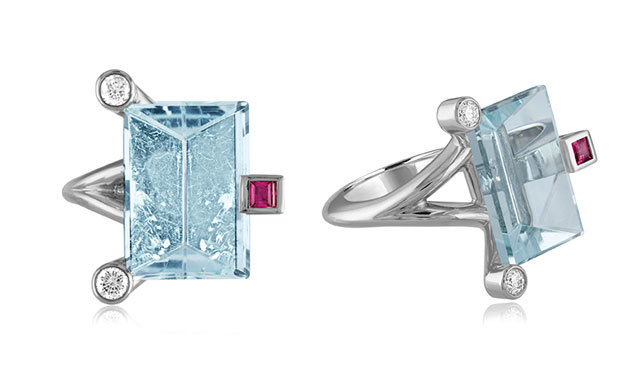
“Those thick platinum prongs couldn’t simply be pushed over the fragile aquamarine,” Lamb says. “After much contemplation, my setter and I decided we had to cut all three gem-set prongs in order to set the aqua.”
All three prongs were cut even with the aquamarine’s girdle, seats were cut into them and into the bar beneath that holds the culet, and the aqua was carefully set. Then the gem-set prong tops were laser welded back into place.
“The laser welder was the real hero of this design,” says Lamb. “Without it, we wouldn’t have achieved my vision.”
Looking back, Lamb learned a lesson from this design. “When you’re trying to pull off stunts like this, you need to carefully consider every angle,” she says. “We were able to execute a gorgeous ring in CAD that matched my vision, but it proved to be a real challenge for the setter. In the future, I might start putting a small bezel around the main stones.”
She might not have made it to Tucson, but Lamb certainly had a gemstone adventure making this aquamarine ring.