

Take Two
Modifying Award-Winning CAD Designs for Optimal Manufacturing
By Tina Wojtkielo Snyder
What do you do when you realize your virtual inventory is virtually impossible to manufacture? With so many jewelry designers turning to CAD to realize their visions, such predicaments are becoming more and more common. Those thin edges, tight settings, and tiny details look great when magnified on a computer screen, but try to translate them to cast metal and the reality of physics kicks in: After the metal has shrunk and worn away under the polishing wheel, suddenly those sharp details have become flat and lifeless—and don’t think about trying to fit a stone in what’s left of the setting.
Even award-winning designs that drop jaws as-rendered might have to go back to the drawing board if they want to come to life as real pieces. That was the case with two CAD designs that took home awards in the 2012 Johnson Matthey New York (JMNY) Sustainable Design Awards competition (jmny.com), which showcased the talent of emerging designers in two categories: Platinum Love and Palladium Expression. On the following pages, you’ll read about how these budding designers had to modify their original designs to ensure they could be successfully manufactured by Carerra Casting in New York City, which donated casting services as part of the competition’s prize package. From small tweaks to significant changes, these two designs exemplify the need to consider and understand the realities of manufacturing when working in CAD.
Clear Translation
Charlie Herner
Green Lake Jewelry Works, Seattle
When Charlie Herner of Green Lake Jewelry Works in Seattle began to work on his design for the competition, he had a clear vision of what he wanted. “I was shooting for a platinum man’s ring with a real masculine feel combined with the light and delicate touch of fine detail,” he says. “Essentially, I wanted a cast piece with a handcrafted feel.”
The design, a winner in the competition’s platinum category, features a row of cognac diamonds set in 22k yellow gold, sandwiched between two pillow-top bands of platinum with a soft satin finish. The pillow tops, framed by thin piping, have a billowy feel to them, and buttons punctutate the band as if to hold the pillows in place. Such details help to make the piece—and it was just those details that were lost when Herner first attempted to mill the design.
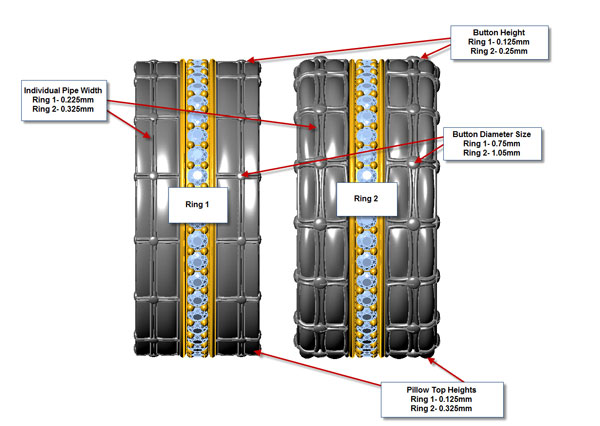
“I found that I really needed to beef up the sizes of the pillow tops, piping, and buttons in the platinum bands to get the definition that I desired in the wax and, ultimately, in the finished piece,” he explains. “While everything looked great in the design on screen, the piping was just so ridiculously small that the mill almost didn’t recognize the difference of heights between adjoining surfaces,” he explains. “And while the pillow tops were fine in terms of length and width, I realized that I didn’t build in enough height to ensure that after casting and finishing they would have the billowy effect I was hoping for. I actually had to exaggerate that in my CAD design to arrive at a satisfactory pillow in the finished piece.”
So it was back to the drawing board for Herner, as re-sizing all of the details in this piece meant re-sweeping every surface in CAD. “There is so much going on in this piece from a surface modeling standpoint…it was a royal pain to rebuild the design,” he admits.
But it was worth it. Initially, the piping was 0.225 mm wide, the pillow tops were 0.125 mm high, and the buttons were 0.125 mm high with a 0.75 mm diameter. He added a tenth of a millimeter to the width of the piping and two-tenths to the height of the pillow tops, and doubled the height of the buttons while expanding their diameter to 1.05 mm. The result: a wax model and casting with the look and feel he had originally envisioned.
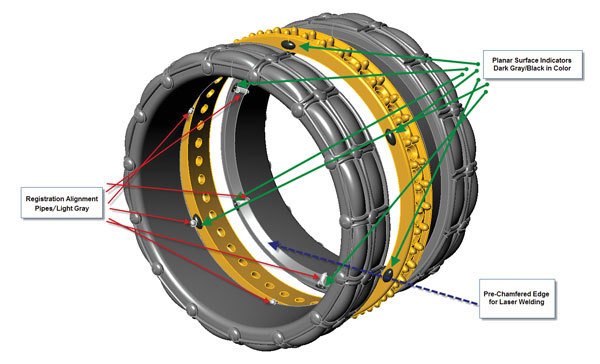
With the overall design perfected, Herner built in three key features to ensure the finished piece matched the CAD design as rendered, aiding in the assembly of the ring:
• Registration alignment pipes. Breaking down the design into three sections—the two platinum bands and the 22k band—he added registration alignment pipes on the inside chamfered edges of the platinum bands so he could precisely match them up when it came time for assembly. “It’s such a geometric piece that if anything is even slightly off you would notice it,” he says.
• Pre-chamfered edges. Once the individual sections were finished and the cognac diamonds were set, the piece would be laser welded together. To ensure the best possible weld, Herner pre-chamfered the edges of the two platinum bands in CAD. “This enables you to backfill with laser wire all the way around the ring’s circumference, giving you full depth penetration,” he says.
• Planar surface indicators. To avoid polishing away too much of the edges of the bands, thus leaving gaps between the three elements, Herner placed planar surface indicators around the band circumferences. “This is an excellent reference for when you need an exact measurement,” he says. “Once they are polished off and you have a smooth surface, you know it’s time to stop.”
Just Getting Started
Edit Simon
Edit Simon Jewelry
Vancouver, British Columbia, Canada
Recent GIA graduate, Edit Simon of Vancouver, British Columbia, Canada, had created a number of designs in CAD when she entered her Petals ring design in the palladium category of the JMNY competition. However, she had yet to see a piece through the manufacturing process. “This was such an amazing learning process for me, and it taught me how to think about designing with production issues in mind,” she says.
Inspired by her love of gardening and flowers, the Petals design features a 1.5 carat chrome tourmaline held in place by organic prongs that resemble small leaves. The perimeters of the palladium ring shank and petals are edged with 210 diamonds that graduate in size from 0.7 mm to 1.4 mm.
Going from concept to finished piece actually required having the ring cast twice to get it right, says Simon—a costly lesson had the manufacturing not been funded by the competition. The newbie designer learned the following important facts that any designer starting out should pay attention to when designing in CAD for manufacture:
• Make sure the metal is thick enough. When designing on screen using CAD, it can be difficult to put things in perspective. “Everything on your screen is so large,” says Simon. “My ring looked great with a 0.8 mm thickness around the edges of the petals and the top of the shank on screen.” However, she had left no room for metal shrinkage during casting or metal loss during polishing at the thinnest points.
“Once it was cast and finished, it was way too thin to set the diamonds,” she says. “We had to have the ring re-cast so my jeweler could set the diamonds I had purchased for the ring. I altered my CAD design to be around 1.1 mm in thickness, not 0.8 mm, around the majority of the edges, because it would end up being about 0.9 mm to 1 mm after casting and polishing.”
• Pay attention to prongs. When Simon originally designed the ring in CAD, she held the diamonds in place with 0.2 mm prongs. “When I first sent the file to Carrera Casting, they told me that the 0.2 mm prongs were too short to hold the diamonds in place after casting and finishing,” says Simon. To amend the problem, she took the caster’s advice and added 0.3 mm of length to each prong.
Before the ring was cast a second time, Simon and her jeweler took another look at the overall design and structure to see if any other areas warranted improvement. Her jeweler suggested a change to the six prongs holding the center stone, adding a bead of extra metal—what she calls a “mini prong”—just above where the seat would be cut. The extra metal piece helps to more securely hold the stone in the setting.
• Consider in how many parts the piece will be cast. When breaking apart her design for casting, Simon prepared the ring to be cast in six parts: the four petals, the shank, and the head. But when the cast parts arrived the first time from the caster, there was a problem. “While I had built in notches in all the petals to ensure that they fit perfectly with the head, somehow the shank bent a bit out of shape during casting and the head no longer sat correctly on it,” she explains.
Simon admits that her jeweler could have made it work by modifying the shank at the bench. But since the ring had to be cast again anyway, they decided to cast it in five parts, keeping the head and shank together as one component to to avoid misalignment, and casting the four petals separately.