

The New Edge in Engraving
Cut to the Point
Testing the JURA MicroGrinder
By Melissa Muir
(Originally Published by MJSA March, 2026)
Built for modern, micro-scope-centric benches, the JURA MicroGrinder brings graver sharpening back to the work position, emphasizing repeatability, efficiency, and precision.
JURA MicroGrinder
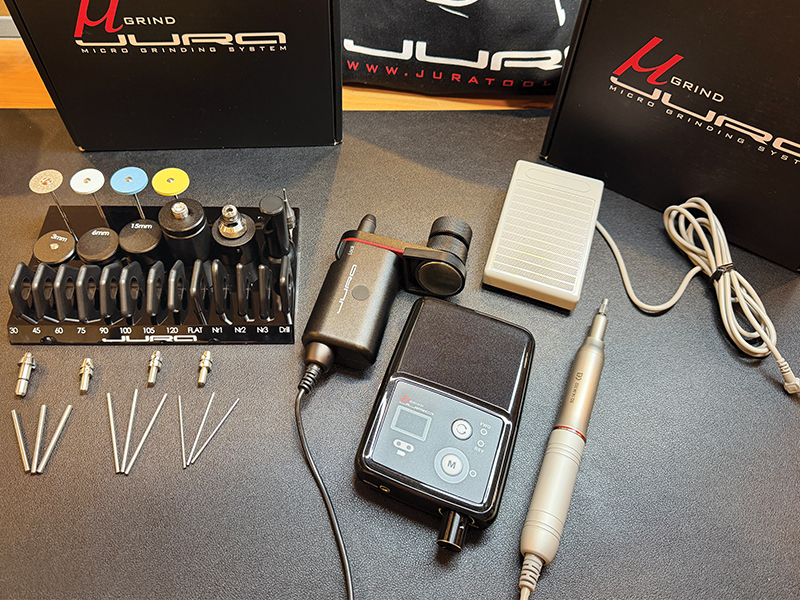
What’s Included:
• Thirteen precision templates
• Nine carbide blanks
• Diamond polishing wheels
• Portable micromotor
• Four quick-change holders
• Mini hex key
• Organizer for templates and components
• Magnetic bench organizer
Engraving is a skill many people admire, whether it appears in jewelry, firearms, knives, or decorative details on everyday objects. Beyond ornamentation, stone setting also relies heavily on properly shaped and sharpened gravers. I began my stone setting and engraving journey four or five years ago, and it is easily the most challenging skill I have taken on so far. Progress is directly tied to time at the bench; without consistent practice, improvement simply does not happen. It also became clear early on that proper graver sharpening is not optional. Without it, even a skilled hand will struggle.
Traditionally, jewelers and engravers sharpened gravers by hand, relying on feel and techniques passed down from master to apprentice. Stones were used to shape and refine cutting edges capable of moving cleanly through metal. Over time, diamond abrasives, motorized equipment, and templates were introduced to create more consistent geometries. While effective, many of these systems are bulky and require leaving the working position. For many jewelers today, that position is under a microscope. Stepping away from the bench to sharpen, then returning to inspect work under magnification, quickly adds up to lost time.
I recently spent several days with micro pavé master Jura, learning more about the sharpening systems he has developed for stone setters and engravers. Jura is a master engraver and the tool designer behind JURA Tools. He is well known in the European high-end engraving and diamond-setting community for creating microscope-centric tools focused on real bench workflow. His work is especially associated with pavé and micro pavé setting, fine bright-cut engraving, and other high-precision techniques performed under magnification.
What caught my attention most was his newest system, the JURA Micro-Grinder. Designed specifically for modern bench jewelers, it is a complete handheld graver sharpening system intended for use under the microscope. The goal is repeatability with minimal interruption to cutting or setting rhythm. The MicroGrinder set includes everything needed to sharpen gravers efficiently and consistently at the bench.
About the JURA MicroGrinder
The system includes 13 precision angle templates covering common graver angles: 30°, 45°, 60°, 75°, 90°, 100°, 105°, 120°, flat, onglette #1, #2, and #3, along with a drill-bit template. A lengthening template is also included to help maintain consistent positioning as gravers shorten over time. Together, these templates make it straightforward to set and maintain accurate angles during sharpening.
The diamond wheel and polishing set includes a diamond cutting wheel, a rough grinding wheel, and medium and fine polishing wheels, providing a complete progression from material removal through final polish. A compact, powerful micromotor handpiece drives the wheels, keeping everything contained at the bench.
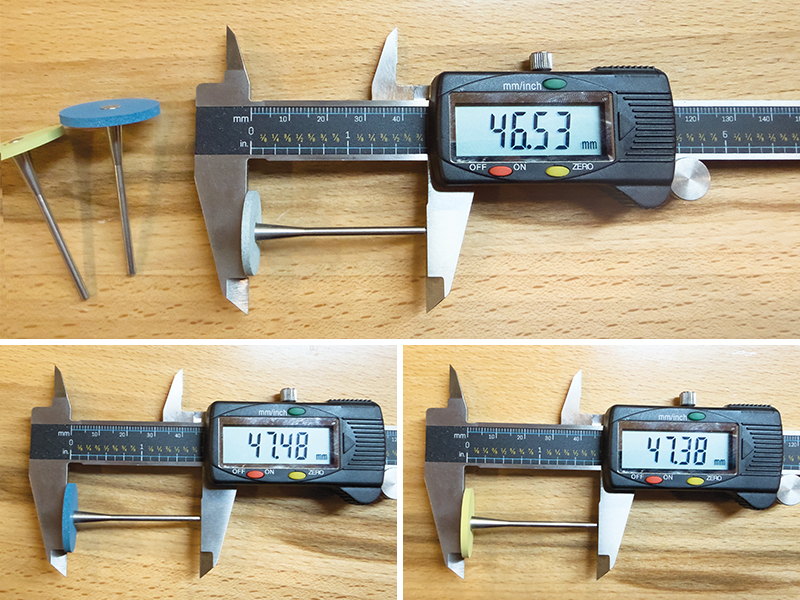
Diamond wheels should be measured and adjusted to ensure uniform height, a critical step for maintaining consistent graver geometry during sharpening.
Four quick-change graver holders with pre-shaped carbide blanks are included: JURA style 1.8 mm for micro work and fast shaping, 2.35 mm for common diamond-setting applications, 3.2 mm for deeper cuts or laser engraving, and a GRS-compatible 3.2 mm holder for those using universal quick-change tooling. Accessories include a mini hex key and an organizer tray that keeps templates, wheels, and holders clearly labeled and easy to access, helping maintain an efficient workflow.
There is a learning curve, particularly during initial setup, and some preparation is required for components such as the diamond wheels. First-time setup is especially important, as some adjustments are one-time only while others must be checked periodically as consumables wear and measurements change.
Preparing the diamond wheels is the first step. All wheels must be the same height, as differences affect graver geometry. I measured from the bottom of each mandrel to the top surface of the wheel using calipers. If a wheel was shorter, I used the diamond cutting wheel to bring the others down to match.
Next is assembling the Receiver House Assembly, which holds the template and graver during sharpening. This multi-step process is clearly explained in the downloadable manual, and additional video instruction is available.
Graver length is another critical factor. Each sharpening shortens the graver slightly, so the system includes a tool that positions the graver correctly in the Receiver House Assembly every time. Once setup is complete, sharpening can begin.
How Well Does It Work?
Multiple risers position the graver at the correct height for different facets. The process starts with the face angle, using the tallest riser. For my tests, I used a 60° template. The template makes alignment straightforward: align the flat edge for the desired facet and move the graver across the diamond wheels to grind and polish. Establishing the face first improves visibility and makes shaping the remaining facets easier. Each facet should be worked through the grinding wheel, then the medium and fine polishing wheels, ensuring all marks from the previous abrasive are removed before moving on.
Side and top facets, also known as shaping cuts, come next. This is where a round graver is transformed into the geometry required, in this case a 60° graver. A shallower angle is needed here, so the riser is changed to a 3 mm one. Following the template, the round blank is shaped into the correct profile. The lower two facets form the cutting edge, while the upper facets improve control and visibility. These upper facets are optional, but I found them helpful. Each facet follows the same progression through the three diamond wheels.
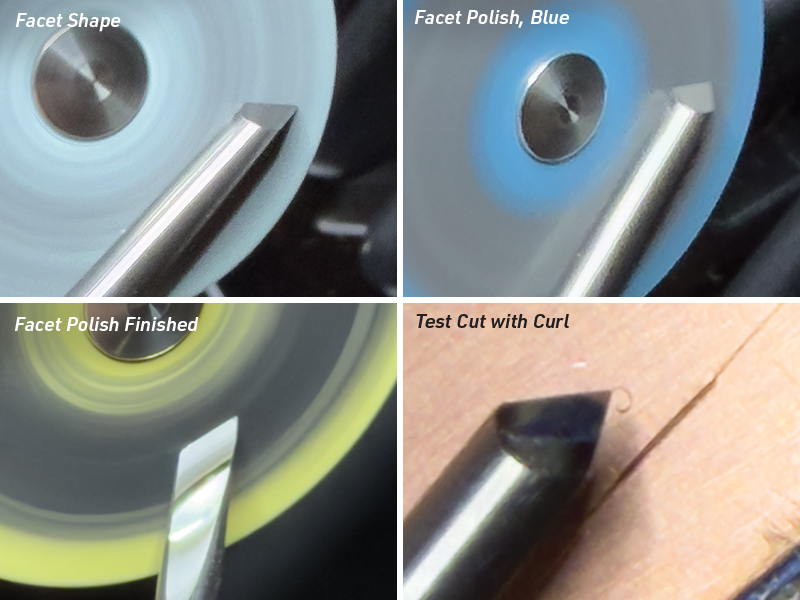
The final step is cutting the heel, which allows the graver to glide through metal smoothly rather than digging in. Depending on the work, different risers are used. For stone setting, the 3 mm riser is used, while decorative engraving typically uses the 15 mm riser. This step is done lightly and only with the fine polishing wheel.
After several repetitions, I was able to fully shape, sharpen, and polish a graver in about three to five minutes. Working under the microscope improved both speed and accuracy, and the templates made it easy to keep facets consistent in size and shape. One important note is that a vacuum system is essential to remove carbide and diamond dust, which should never be inhaled.
Although the initial setup takes time, the sharpening process itself is faster than any system I have used previously. As increased magnification has become necessary for my work as I age, sharpening under the microscope has proven far more efficient than moving back and forth between bench and scope.
The MicroGrinder also has a relatively small footprint compared to other sharpening setups in my studio. Everything is stored together, clearly labeled, and easy to access. I particularly appreciated the inclusion of onglette templates, a graver traditionally shaped by hand. Resharpening dull or broken points becomes predictable and repeatable, allowing me to recreate the same geometry and polish every time. The MicroGrinder delivers exactly what it promises: repeatability, ease of use, and significant time savings for stone setters and engravers.
MJSA would like to thank JURA Tools for providing the MicroGrinder for testing.