Sketching the Classics
Fasten This
A step-by-step guide to sketching classic cufflinks
By Rémy Rotenier
(Originally Published by MJSA February, 2026)
Cufflinks may be small, but they carry an unusual mix of function and personal expression. Designed to sit between the layers of a French cuff, they must be comfortable, secure, and easy to use—yet they also offer two distinct design surfaces: one public, one private. That duality has long made cufflinks ideal vehicles for both classic design and quiet storytelling.
In this project, we’ll sketch cufflinks with a classic east-west oval element and build the cuff around it for presentation. You will need a 2.3 mm round Mono Tombow Zero eraser, a transparent ruler, a set of Conté à Paris Paper Stumps, a sheet of 0.32 lb. white inkjet paper, and a piece of white blotting paper to rest your hand on to avoid smearing your drawing. I recommend using multiple HB mechanical pencils—0.2 or 0.3 mm for delicate work (prongs, facets, small details) and 0.5 or 0.7 mm for medium-sized areas and stronger lines.
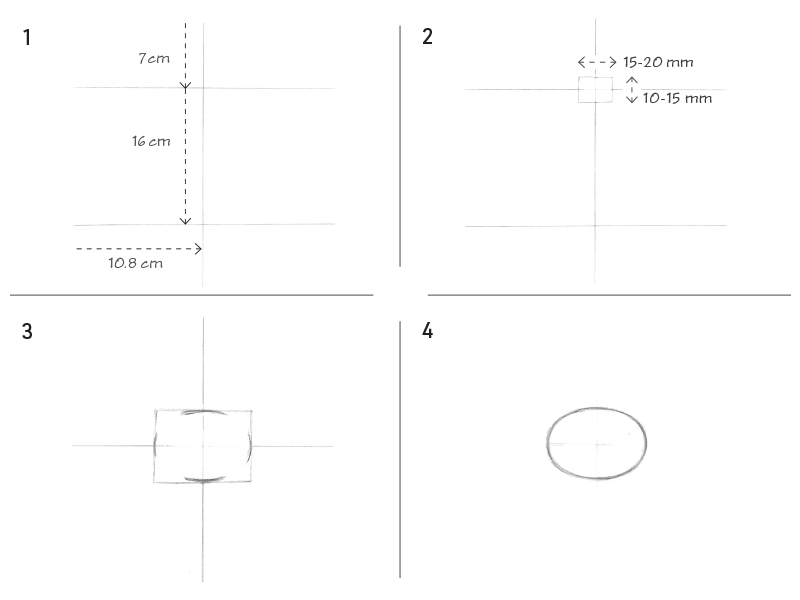
1. To begin, use a 0.3 mm pencil to draw a horizontal line 7 cm from the top of the paper and another at 16 cm. Draw a vertical line at 10.8 cm from the left side of the paper.
2. The large cufflink element (the part visible when worn) should measure between 15 to 20 mm and 10 to 15 mm in width. Draw a light gray rectangular box that will contain a 15 x 20 mm oval.
3. Add small curves at the cardinal points, indicating the limits of the stone.
4. Fill in the oval one quarter at a time. In each quarter, note the negative space between the oval and the rectangle, and aim to match all four sections. Rotate the page as you draw to keep the movement fluid. Use an eraser to refine the form, inside and out.
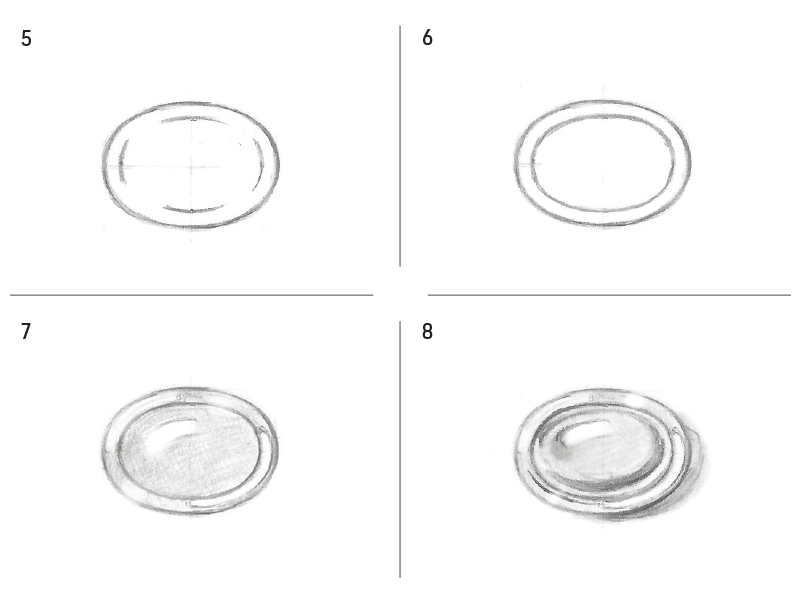
5. To prepare for an inside bezel, mark each side with a small dot at 2 mm. Draw the beginnings of the bezel’s curve.
6. Next, fill in the bezel. Erase the meridian lines inside the oval.
7. Because jewelry designers typically keep the light source coming from the left at a 45-degree angle, leave the top left and the bottom right of the bezel white and lightly gray the areas in between. Placing the light areas on a diagonal helps the bezel appear illuminated. For the center element, use a 0.5 mm pencil to preserve a curved highlight on the upper left side, and shade the rest to match the light gray of the bezel.
8. Add darker gray values to give the form volume. To keep the center element looking metallic, leave a hint of light along the edges. Draw a cast shadow that follows the contour of the element, then smooth it out with the medium-sized paper stump.
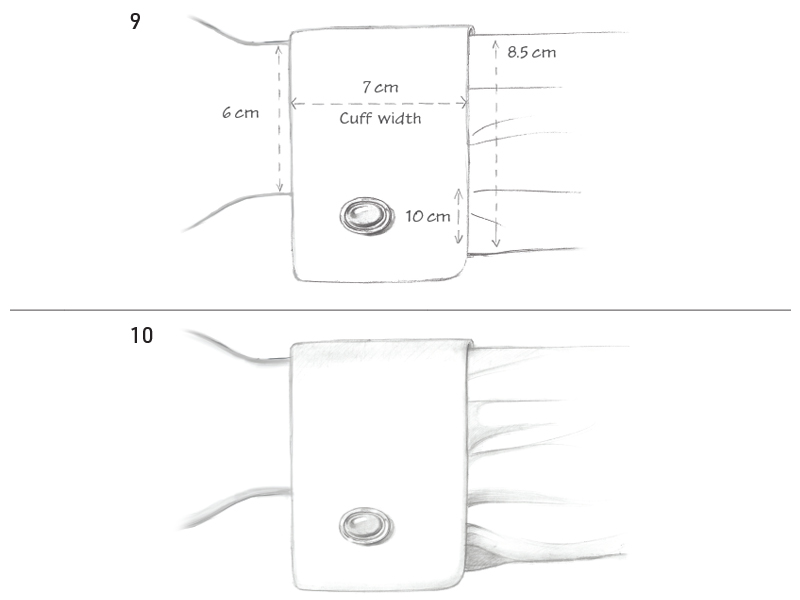
9. Next, stage the cufflink design to make it more relatable and convincing. Draw the hand and the French cuff as shown using the measurements provided.
10. A small amount of shadow adds drama to the drawing. Keep it minimal to avoid distracting from the cufflink design.
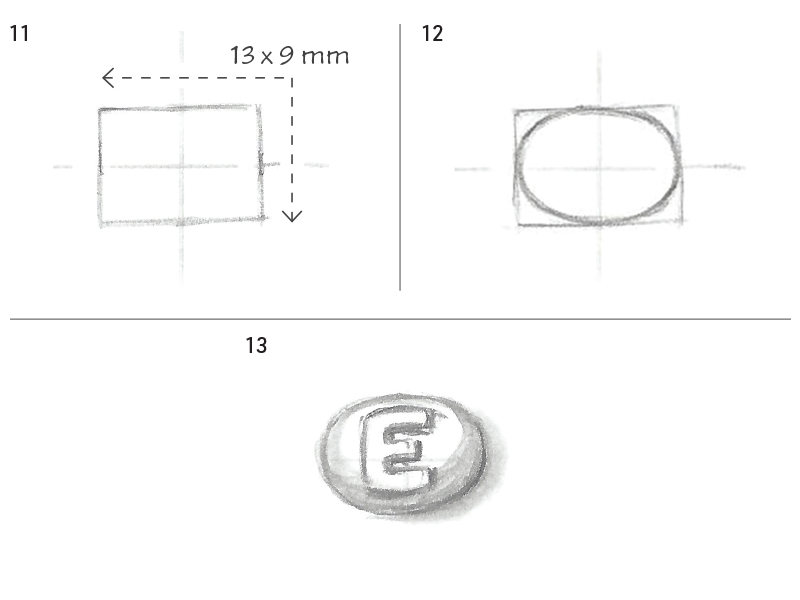
11. Now let’s work on the back design of the cufflinks. The ideal size is approximately 13 x 9 mm. For this simple design, create a smaller oval featuring the letter E. Using the horizontal line at 16 mm from the top of the paper, draw a 9 x 13 mm east-west rectangle.
12. Draw an oval within the box, one quarter at a time.
13. After removing the thin construction lines, design the E (or another letter or symbol of your choice). Add a touch of shadow along the bottom right edge of the element to give it a domed appearance. Use a smaller paper stump to smooth the shaded area.
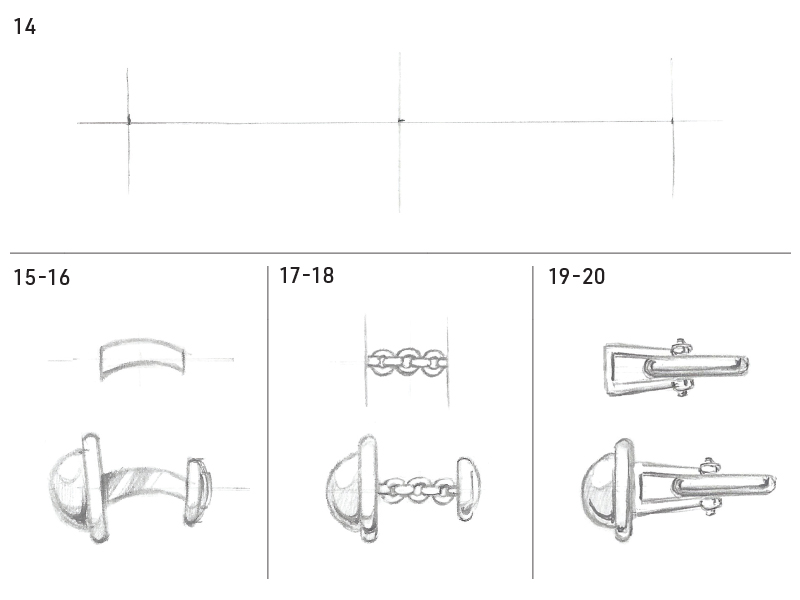
14. Next, draw a new horizontal line 20 cm from the top of the paper. Draw a short vertical line segment at 5.4 cm from the left edge and another at 16.2 cm. This creates three positions (left, middle, and right) for side views. We will explore this design using a bridge between the two elements, a short length of chain, and a swivel-back cufflink finding.
15. On the left, draw a 12 mm bridge between the two cufflinks. Make it 4 mm wide on the left, tapering to 3 mm on the right, and add a gentle curve.
16. Add a side view of both elements with the bridge connecting them, along with light shading to give the design dimension. Note the slight angle of the elements, which allows for a better fit against the shirt cuff.
17. For the next option, draw a short segment of chain between the elements. A 3 mm round cable chain works well.
18. Add the side view of the two elements on either side of the chain. Include subtle shadows to give the design volume.
19. A classic swivel-back finding eliminates the need for a back element. If desired, a secret message can be engraved on the back of the main element.
20. Finally, draw the side view of the large element and shade it. While the example shown here is quite classic, cufflinks offer designers endless possibilities.