

Designing a Linked Bracelet
Sketchy Connections
How to ensure the final design is appealing, comfortable, and durable.
By Rémy Rotenier
(Originally Published by MJSA October, 2025)
When designing a linked bracelet, it’s important to consider both the aesthetic and structural elements from the start, since the links are moving parts that must work comfortably around the wrist. This ensures that the final design is not only visually appealing, but also comfortable and durable. You’ll also need to factor in the bracelet’s total length to ensure the design elements are evenly spaced. That said, technical constraints shouldn’t limit your creativity. We’ll start by designing the links with imagination and flair—then refine the proportions to fit the bracelet’s length.
In this project, we’ll explore two looks for a 6.5 inch linked bracelet. The first is a continuous gold wave pattern with a concealed clasp to maintain a seamless look. The second uses a 12 mm lobster clasp and round links. Each will feature seven evenly spaced design elements, which I chose because seven feels poetic—like saying, “I love you every day of the week.”
For this project, you will need 0.3 and 0.5 mm mechanical pencils with HB lead, a Mono Tombow Zero 3.2 mm round mechanical eraser, a clear plastic ruler with metric measurements, a sheet of 32lb. inkjet copy paper, a piece of light tracing paper, and a 5 mm rolled paper stump (Conté à Paris offers a set that comes with a kneaded eraser).
Design 1
1. Begin by sketching freely using the 0.5 mm pencil. Don’t worry about size or precision; focus on the flow and energy of the lines. We’re aiming for a link that suggests a continuous wave. Of the three concepts shown, I’ve selected Design A for its visual rhythm and endless feel.
2. Draw a horizontal line measuring 6.5 inches (approximately 16.5 cm)—the full length of the bracelet.
3. Divide the line into seven equal segments. Each segment should measure 2.35 cm (23.5 mm).

4. Redesign Design A to fit the 23.5 mm spacing. Switch to the thinner 0.3 mm pencil for greater precision in this scaled version.
5. On a small piece of tracing paper, trace the wave design and then align the tracing next to the first sketch. For a clean meeting of the edges of each element, make sure that the edges of the left side of the design fit elegantly and seamlessly into the edge of the right side.
6. Draw three links in a row to assess the bracelet’s visual rhythm and make any necessary tweaks. Use the horizontal guideline to keep the elements aligned as you refine the design.
7. Next, draw the rest of the elements, ensuring each connects nicely to the next. Add the clasp tongue on the right and the pusher on the left.
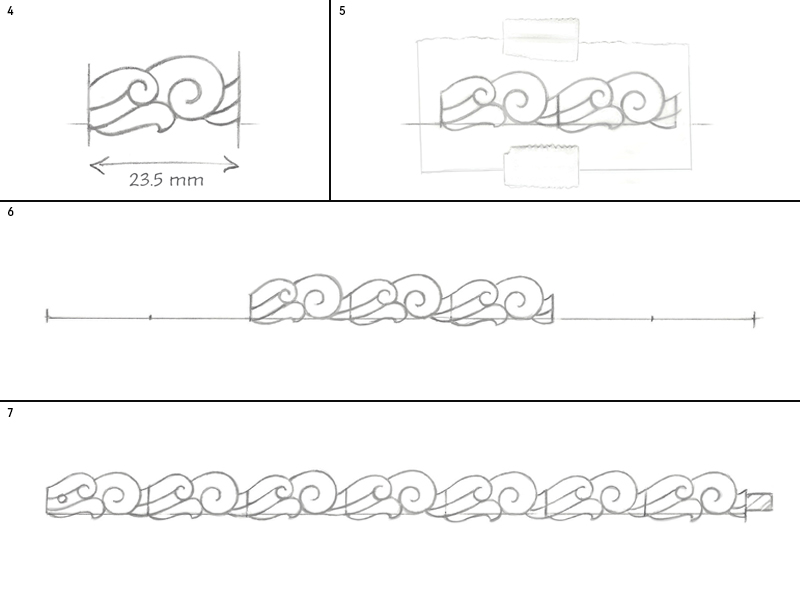
8. Erase any little bits of the original horizontal line. With the light source coming from the left at a 45-degree angle, add highlights to the highest domed areas of each link.
9. Apply a light gray base tone across the bracelet, avoiding the highlights. Blend the shading using the paper stump, pressing lightly in a single direction and lifting it between strokes. Revive your highlights with the Mono Tombow eraser.
10. Add deeper shadows to the right-hand side of each element, consistent with the light direction coming from the top left. Draw the form shadow with a darker gray. To simulate the metallic reflection of gold, leave a thin border near the edge unshaded. Use the paper stump to blend the cast shadow.

11. Use a 0.5 mm pencil to add the cast shadows to make the bracelet look more realistic. With light coming from the top left, cast shadows should fall to the lower right of each element. Voilà!
Design 2
12. Let’s sketch the second bracelet. Begin by drawing a 12 mm x 6 mm lobster clasp on the left of a 16.5 cm horizontal line. Add two 3.5 mm jump rings to the clasp for a total length of 18 mm. On the right end of the bracelet, draw a 4 mm x 6 mm ring followed by two 3.5 mm jump rings, totaling 12 mm.
13. The space for our links is 13.5 cm, and we have seven elements to fit in. Mark the line every 1.95 cm to indicate where each element will go.
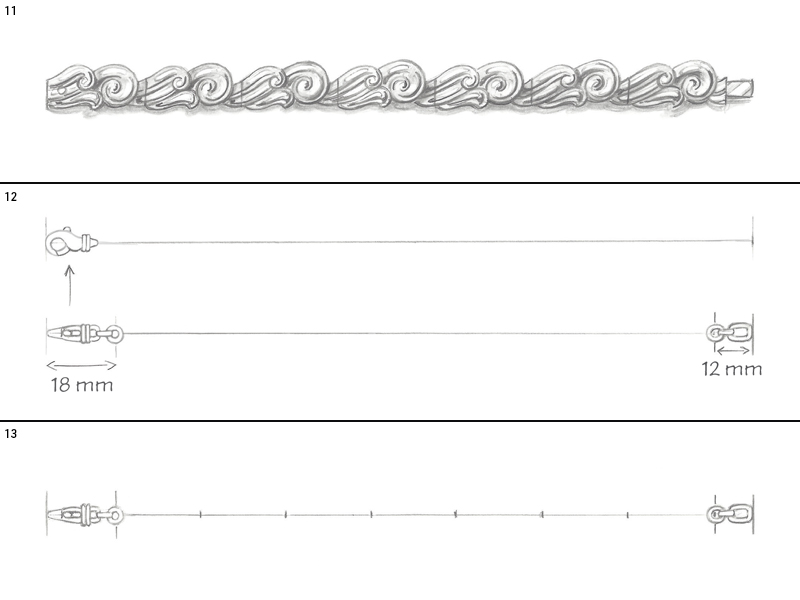
14. I haven’t finalized the design yet, but I plan to use seven bezel-set 9 mm x 7 mm oval cabochons in an east/west (horizontal) direction, each with some diamonds on either side. We’ll begin by drawing the first cabochon using the 0.3 mm pencil. Construct a 9 mm x 7 mm box and sketch the oval inside it.
15. Add a bezel around the stone to define the setting.
16. Now that you can see the space you have for the side stones, tape a small piece of tracing paper over the drawing. Sketch some design possibilities for the element on the tracing paper, with a different look each time. They don’t have to be perfect; sometimes quick imperfect drawings have a beautiful dynamic energy.
17. I have selected Design B, which features marquis diamonds on either side of each cabochon. Add 5 mm x 2.5 mm marquis stones, keeping their angles consistent by drawing a central axis line through each pair. Trace the finalized element carefully with the 0.3 mm pencil. Use small markers to help position the design during transfer. Remember to include the horizontal connecting rings, which appear as bars from the top view. Transfer all seven elements by flipping the tracing and scratching it with the back of your pencil. Make sure the line, although thin, is dark enough to transfer.
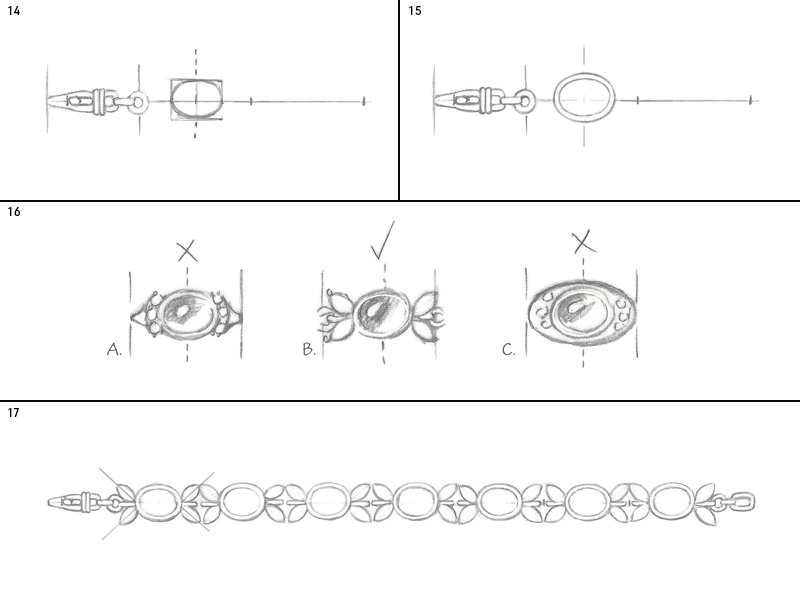
18. Draw 3 mm jump rings between the elements to improve articulation. It also takes care of the negative space between the marquis diamonds.
19. To render the cabochons, start by placing a curved highlight on the left side of each stone. Use a reversed “S” line (similar to a yin-yang symbol) to divide the stone in two. To create the illusion of transparency, shade the left side under the highlight on each stone.
20. Use the paper stump to blend the transition between light and dark areas. Deepen the line on the bottom-right edge of the cabochon for added dimension.

21. Now it’s time to give the marquis diamonds some life. Begin by sketching a small marquise shape for the table. Add curved “X” lines at the top and bottom (A), then build in additional facets (B). Shade facets with varying tones—light, medium, and dark gray—leaving a central facet as the highlight (C). Add a bead-shaped prong at each end of the stone (D).
22. Finally, draw the bracelet’s cast shadow with the 0.5 mm pencil. Voilà!
