

The Electrifying World of Electroforming
A Power Trip
Exploring the electroforming process and its possibilities for use in jewelry making
By Shawna Kulpa
How often have you seen a leaf or a seashell and thought, “I’d like to turn that into a piece of jewelry”?
Unfortunately, that’s often easier said than done. You could re-create the forms in wax or CAD and have them cast, but they’ll never be exactly like the item that inspired their creation.
Or maybe you’re someone who imagines large, bold jewelry designs only to find that those designs would be too heavy and expensive to create in precious metal. What’s a jeweler to do?
Enter electroforming.
Although the electroforming process can be a bit cumbersome and time consuming (which is perhaps why you don’t hear much about it in jewelry circles), it offers jewelers the opportunity to capture any item in metal. It also allows them to create hollow, lightweight metal forms where the sky is the limit when it comes to their size and shape.
“It’s transformative,” says Patty Lakinsmith, an art jeweler and glass bead maker in Los Gatos, California. “You can take something from nature and turn it into something that looks like cast metal. It’s a really powerful thing.”
To help explain the electroforming process and what it entails, we checked in with some electroforming veterans. They share their best tips for trying the technique and the possibilities it can offer you and your business.
What Is Electroforming?
You may have heard the term electroforming mentioned over the years (it’s an old technique) but never thought about what it actually means. Basically, the process involves taking something that’s not conductive, such as wax, glass, or organic materials, and using electricity to add metal to it.
Now, if you think this sounds a lot like electroplating, you’re not wrong. The electroforming process is similar to electroplating in that items will be suspended in a solution bath while electricity is run through both.
The main difference between the two techniques is the item being plated. If you’re working with a conductive object, you’re plating. If you’re working with anything else, you’re electroforming.
“Electroforming is done on items that are not metallic or conductive,” explains Gregg Burgard, a jewelry technical specialist at Rio Grande in Albuquerque, New Mexico.
The other main differences between the two techniques are the electricity and time required to complete the process.
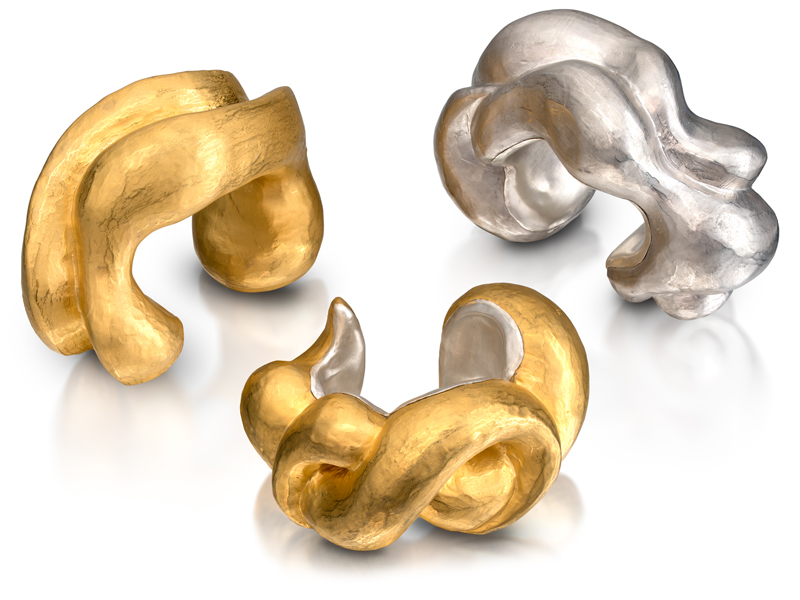
“I love the fact that you can create just about any shape in metal that you can imagine.” —Shana Kroiz
“Most times with plating, you hold the item in solution for a few seconds or a minute,” explains Burgard. “With electroforming, the electricity [being used] is lower and it’s done over a much longer period of time.” It’s normal for the electroforming process to take 24 hours or more.
Within the jewelry industry, electroforming is predominantly done with copper, although it can also be done with many other metals, including silver and gold. However, electroforming with precious metals is a more expensive process, as it requires pure forms of the metal to be used as anodes. In addition, the solutions used for electroforming silver and gold are often cyanide-based, making the process a bigger health risk. In most cases, if a silver or gold look is desired, it’s often just easier and safer to electroform the pieces with copper and then electroplate them with the desired precious metal.
What Can be Electroformed?
If you’re wondering what types of items can be electroformed, know that the sky is the limit. According to experts, just about anything can be electroformed.
“I’ve seen people electroform pretzels,” says Lakinsmith. “There’s nothing that you can’t do.”
However, the one caveat is organic materials, such as leaves and seashells, and other items that cannot withstand being submerged in a liquid for a long period of time. While those items can still be electroformed, they’ll first need to be sealed to prevent them from turning into mush in the electroforming bath. There are a variety of sealers and varnishes on the market that should work for this process.
“You need to seal it,” says Shana Kroiz, owner of Shana Kroiz Jewelry in Baltimore. “Whatever goes in the tank cannot absorb liquid.”
In addition to helping waterproof the piece, the sealer or varnish may also make it easier to apply the conductive paint that will be needed to direct the electricity (see “How Does the Process Work?” below.) “It will fill in some holes and create more of a uniform surface,” says Burgard.
This is another benefit of sealing a piece since “electroforming tends to amplify any irregularities on the surface,” says Lakinsmith.
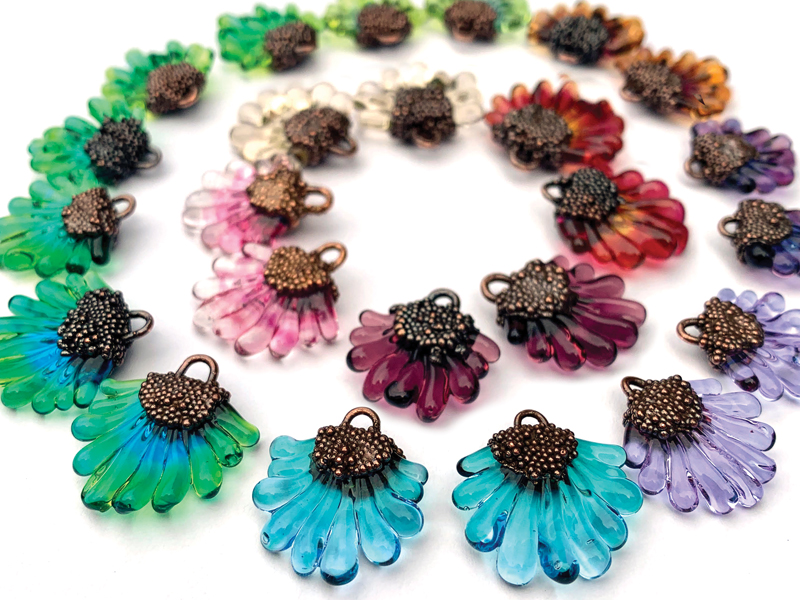
While many things can be electroformed, there are certain design features that sometimes don’t do well with the process. Burgard notes that the geometry of a piece can make the process harder, especially pieces that have deep recesses or a lot of undulations. “The metal will have a harder time covering certain areas,” he says.
It’s also difficult to make pieces electroform evenly, especially on items with sharp points (which will electroform the most) and deep undercuts (which may not electroform at all).
If you’re interested in using the technique to create large, hollow forms, Kroiz recommends creating the forms in wax. Once the piece is electroformed, you can drill a small hole in it to release the melted wax, leaving the piece hollow.
“If it’s a soft wax, you can boil it and the wax will come out,” says Kroiz. “For hard wax, you can melt it out with a torch or in a kiln.”
How Does the Process Work?
While it may be similar to plating, electroforming requires a bit of extra prep work. Since the items used for electroforming are nonconductive, they first must be coated with a conductive paint. This paint should be applied to only the areas of the item that you want to electroform. If you want the entire item electroformed, you’ll want to make sure the whole piece is covered with the paint. Any areas not covered by the paint will not be plated.
There are several types of conductive paint on the market. The most common is copper paint. However, it’s thicker than some of the other paints used and can cover fine details in a piece that you may want to remain.
Many electroform artists prefer either graphite or silver conductive paint. They’re both thinner in consistency than the copper paint and produce a smoother finish. However, the thinness of the solutions may also mean multiple paint coats may be needed. At about $110 an ounce, the silver paint is more expensive than the graphite paint (which runs around $14 an ounce), so you may want to start out with the less expensive option as you get the hang of the technique.
Kroiz prefers the smoothness offered by the silver conductive paint, and she’s also found it to be more conductive than the copper paint. While admitting that the silver paint is “astronomically more expensive,” the better results it delivers is worth it to her.

Because electroforming involves nonconductive materials, workpieces must be first covered with a conductive paint. They should then be wrapped with a hanging wire that will conduct electricity to the piece.
Once the paint has dried, you’ll need to create a hanging wire that touches the conductive paint on the item. This wire is what will conduct electricity to the piece, so it must be in contact with all the painted areas. If you’re electroforming a piece in multiple areas, but those painted areas aren’t connected, you’ll need to run the wire to each standalone section of the paint. Depending on the piece, you may even want to attach the wire directly to it with the paint to ensure it’s in contact.
“Sometimes I would drill a hole into the piece, stick the wire into it with epoxy or glue to hold it in place, and paint around it, touching the wire,” says Burgard.
Once the piece is wrapped with the wire, you’ll suspend it from something nonconductive, such as a wooden dowel or chopstick, and let it hang inside a tank or beaker filled with an electroforming solution. When inserting the workpiece, make sure it is fully submerged in the solution and that it is not in contact with the sides of the tank. Also, while you can electroform multiple pieces at the same time, make sure they’re not in contact with each other.
You’ll also need a metal anode inside the tank. Since most electroforming is done with copper, many electroformers use solid copper coil anodes, though you could also use copper sheet. When it comes to selecting an anode, Lakinsmith’s rule of thumb is that there should be “at least twice the amount of anode surface area as the area you’re trying to electroform.” Whichever type of anode you choose to use, make sure it does not come in contact with the workpieces.
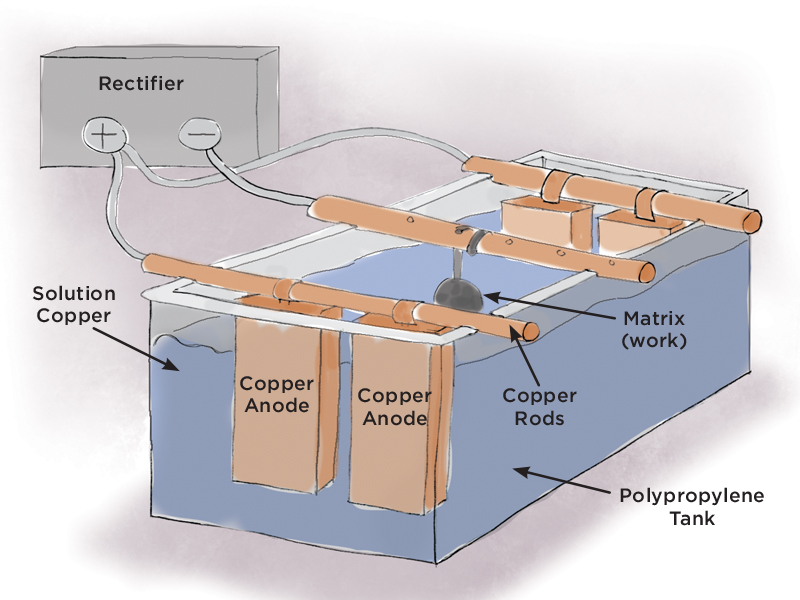
Electroforming relies on a rectifier that sends a positive charge to copper anodes and a negative charge to the item being electroformed. Copper molecules released from the anodes will be attracted to the workpiece, eventually fusing to it and building up a layer of copper.
The solution will be based on the metal that you’re trying to electroform. In most cases, it will be copper. Copper electroforming solutions contain sulphuric acid, which eats away at the copper anode, releasing copper molecules into the solution. As mentioned earlier, the solutions used for electroforming silver and gold are often cyanide-based.
To generate the electricity needed, most electroplaters use a small rectifier. The positive lead wire should be connected to the anode; this will deliver a positive charge. The negative lead will be attached to the copper wire wrapped around the piece to deliver a negative charge.
Once the electricity is turned on, copper molecules from the anode will enter the solution and be attracted to the negatively charged workpiece. “When they touch, they fuse together,” says Kroiz. “It builds a shell of metal.”
How Much Electricity Is Needed?
When electroforming, you’re going to need to think in terms of current and amperage instead of volts. Unfortunately, it’s not as easy as following a formula that says, “X amount of power for Y amount of time to create Z layer thickness.” How much electricity will be needed to successfully form the copper layer will ultimately depend on the size and shape of the piece being formed as well as the time the work spends in the bath.
However, Burgard says a good rule of thumb to use is 0.1 amp per square inch of electroformed surface. Since it could be difficult to measure the total amount of surface space of the piece, Burgard recommends keeping a nickel in mind. “A nickel is about an inch wide,” he says. Counting both sides of the nickel would be 2 inches plus the edge. “So, you’d start at 0.2 amps for something the size of a nickel.”
If you’re uncertain about the power needed, “the lower, the better,” Kroiz says.
Luckily, if you don’t get the power right initially, the electroforming process is very forgiving. Since it takes so long for the copper layer to form, you have time to tweak the current.
“Give it your best estimate on the current that you’ll need and then come back and check on it after 20 minutes,” says Burgard. You should start to see some copper forming on it by then. “If the piece is getting dark brown or has nodes on it, the electricity is too high. If it’s a pinky color, you need a little bit more current. Ideally, it should look like a bright, new penny.”
Once you find the right amount of electricity then the wait begins, as the electroforming process can be long, especially if you desire a substantial layer of copper.
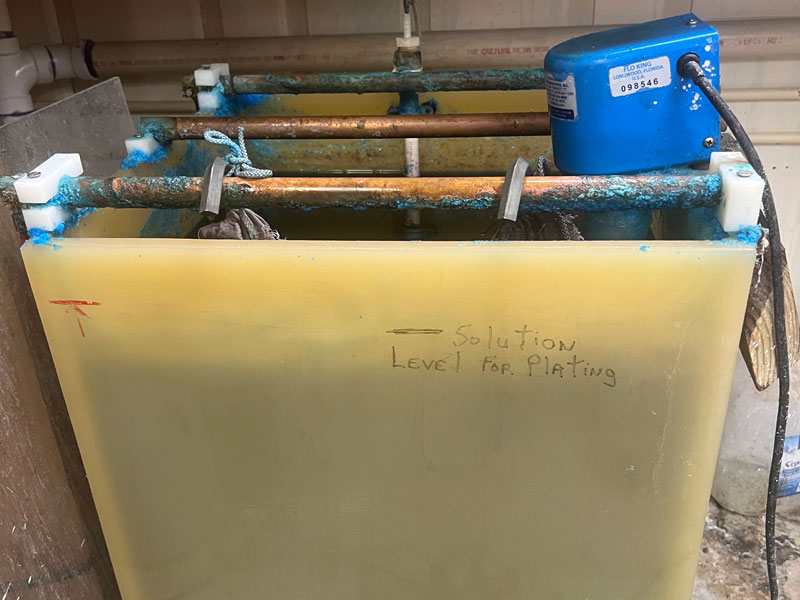
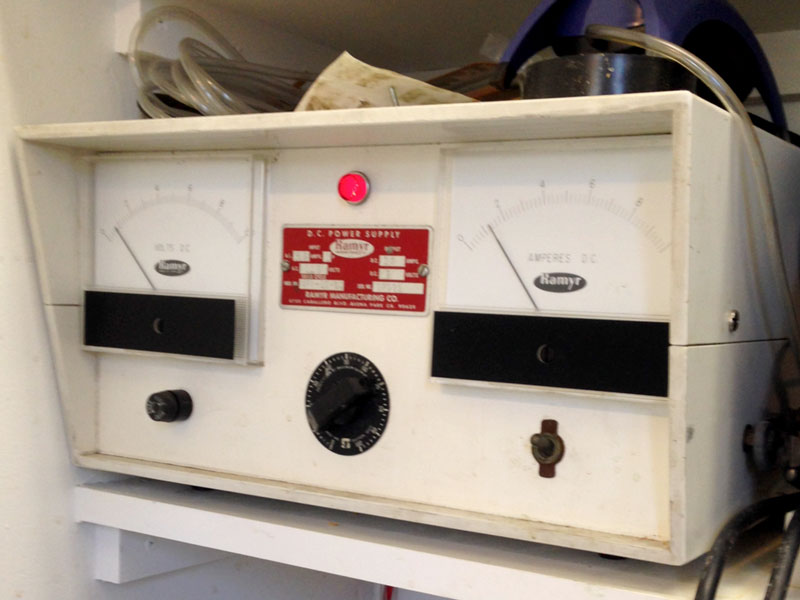
Shana Kroiz’s electroforming tank (L) and its power supply unit (R).
For example, Kroiz often sets her tank at around 0.5 amps and notes that it usually takes about four days to get a 24 to 22 gauge thickness on her pieces. “The longer you leave it in, the thicker it gets,” she says, but notes that the results will vary due to many factors—from the size and shape of the pieces to the amount of time in solution. One day the setting might get 30 gauge worth of metal, while the next day that same setting might get you 28 gauge.
According to Kroiz, trying to track the growing thickness is probably the hardest part of the process. “With the silver paint, you can see it go from silver to copper,” she says. But once the piece has formed a copper layer, it gets tougher to judge the thickness of that layer. Kroiz tries to keep track by measuring the thickness of her lead wire. By comparing the original thickness of the wire to the new thickness of the wire that has been electroformed, she can keep track of the growing thickness of the copper layer.
“If you’re doing something over and over again, you’ll just know what to do to get what you want out of it. You can get repeatable results,” says Burgard. “But it’s a little trying getting the process figured out. You have to have a lot of patience to dial it in.”
How Do You Ensure Electroforming Success?
While you’re electroforming your workpieces, Burgard recommends agitating the solution to ensure better results, as stirring it can help to keep the solution homogenous. “If you have a piece hanging in solution and there’s no movement, you’re going to pull just the copper right near the piece,” he explains. Since there may be more copper in the solution near the edges of the container, stirring it helps to circulate the metal.
Some electroplaters use more elaborate tanks that contain spinning devices at the bottom to circulate the solution. There are also electroforming kits offered with magnetic stirring systems for automating the process. If these are out of your price range, Burgard says a basic wooden chopstick to stir the solution occasionally will achieve similar results.
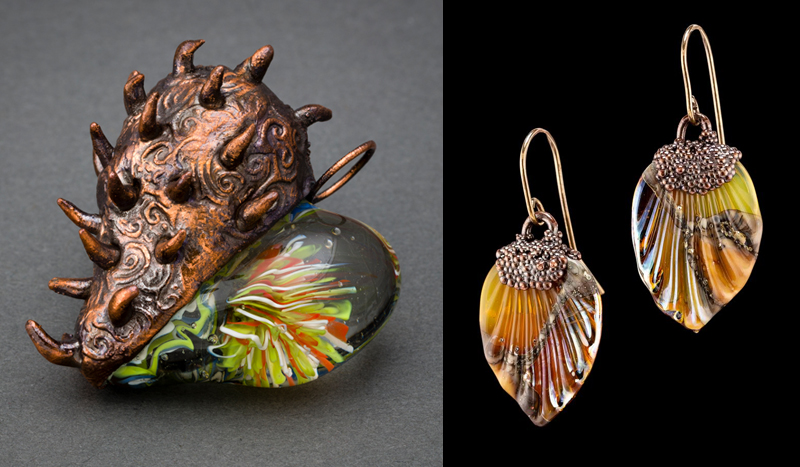
“You can take something from nature and turn it into something that looks like cast metal.”—Patty Lakinsmith
You’ll also want to keep an eye on your electroforming solution. Although it can be reused, the copper in the solution will eventually become depleted. When it does, you’ll start to notice that you don’t achieve as much coverage, the pieces have a matte finish, or it’s taking longer to get the same results as earlier. When that happens, you can add a copper brightener.
“In the beginning, when you’re starting with a new solution, everything will look shiny and new,” says Lakinsmith. “Over time, pieces will start looking dull.” She has noticed that her solutions tend to become ineffective faster when working with organic materials. When the solution does become ineffective, she adds the brightener. “If that doesn’t work, filter the solution.”
While there are professional electroforming filters you can use, many electroformers keep it simple by straining the solution through a coffee filter, which removes any loose particles floating in it.
How Do You Work with Electroformed Pieces?
Although electroformed jewelry pieces may have the look of fabricated or cast jewelry, they don’t behave the same way at the bench.
“The metal is really brittle,” says Kroiz. “It’s not flexible at all. You can’t bend it, shape it, or move it at all. Most metal things you can stretch, but not this.” She doesn’t recommend making rings since they can’t be sized (any sizing would have to be done prior to electroforming). If you make bracelets, they should be thick enough to withstand wear and tear.

A necklace and brooches by Shana Kroiz, created using the electroforming process
While you can solder an electroformed piece, Kroiz says it can be tricky. “You really can’t repair [most pieces],” she says. She notes that most jewelers do not like to work on electroformed pieces and will recommend that the damaged piece be taken back to the artist who created it. In the case of her own customers, if someone has a problem with one of her pieces, she simply replaces it.
However, there are many things you can do with electroformed pieces at the bench. If you want the look of silver or gold, the pieces can be electroplated. It’s also possible to add enamel to them.
Kroiz finishes many of her pieces with 24k or silver plating and enamel. If you’re going to plate a piece after electroforming, she recommends making sure the surface is clean and that there are no openings in the piece in which the plating solution could get trapped. “In general, it plates beautifully,” she says.
Are You Ready?
If all of this has you ready to try your hand at the technique, Kroiz recommends taking a class or finding someone who will demonstrate the process. And she speaks from experience: With the help of one book, she taught herself the technique while in graduate school. “It was a very slow way to do it,” she recalls. “It took me six months to learn what could be taught in a day! It’s much better to learn it from someone than to figure it out on your own.”
If you can’t find a class, you can rely on online tutorials to help you get started. Lakinsmith recommends starting out with a beginner’s kit, which is often geared toward students and will be less expensive than the professional kits. “If you’re daunted by the cost or wonder if you’ll like it, start with a kit like that,” she says. Then if you like it, “you can move up to a more professional setup.”
While experience with electroplating may make the electroforming process a bit easier to master, Burgard warns that the two techniques are ultimately still different, and that electroforming will be the tougher to learn.
“It’s more of a mystery than plating,” says Burgard. “Don’t think of it like plating. A lot of this is more of an art.”