

Beginner’s Guide to Cuttlebone Casting
Old School Casting
A step-by-step guide to cuttlebone casting for beginners
By Tony Deluca
Cuttlebone casting is an ancient casting technique that can create unique textures using the calcified remains of the cuttlefish. It can be used to create both simple and complicated designs, but most jewelers use the technique for the wonderful wood grain texture that’s imparted on the cast piece by the natural growth lines of the cuttlebone. While molds can be carved freehand, in this project I will demonstrate how to use a model to create the mold cavity.
For this project you will need some small to medium-sized cuttlebones (4 to 6 inches long), 1.5 mm thick brass sheet, a rough sanding surface, a selection of paintbrushes, and a method of melting and pouring metal. You may need other tools depending on your design.
Safety note: Cuttlebone dust is a fine particulate and a dust mask should be used during preparation, carving, and casting. Cuttlebone may also affect those with a shellfish allergy. It is recommended to work in a well-ventilated area during the entire process.
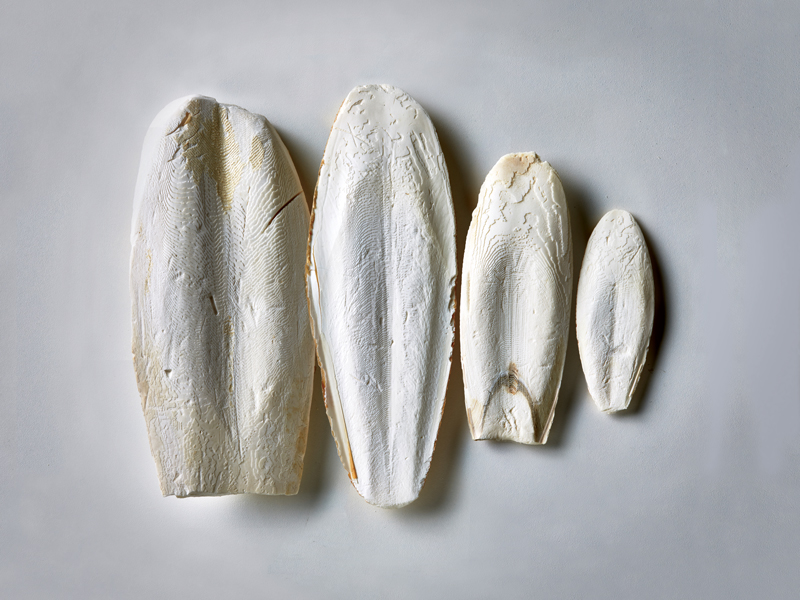
1. Cuttlebone comes in various sizes, from small to large. Here you can see how smaller cuttlebones usually have a tighter texture line while larger cuttlebones have a more coarse texture. After settling on a design, decide which cuttlebone would best suit the piece you’re making. Would a finer or coarser texture enhance or de-tract from the design? The choice is personal preference and practical experience, but as a general rule, use coarser lines from a larger bone on larger areas and finer lines from a smaller bone for smaller and more complicated areas. Whichever size you use, be sure to choose a cuttlebone that allows at least 1/4 inch of space between the carved area and any edges of the flattened area.
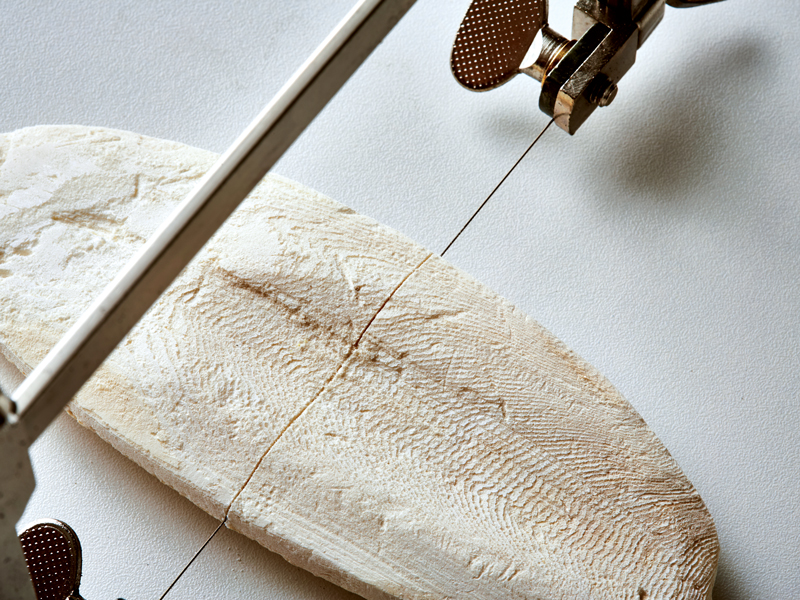
2. With the soft side of the bone facing up, use a jeweler’s saw with a fairly coarse blade to cut the bone in half, attempting to produce two equal portions. There’s no need to cut all the way through, as cutting three-quarters of the way through the bone will allow it to snap cleanly in half.
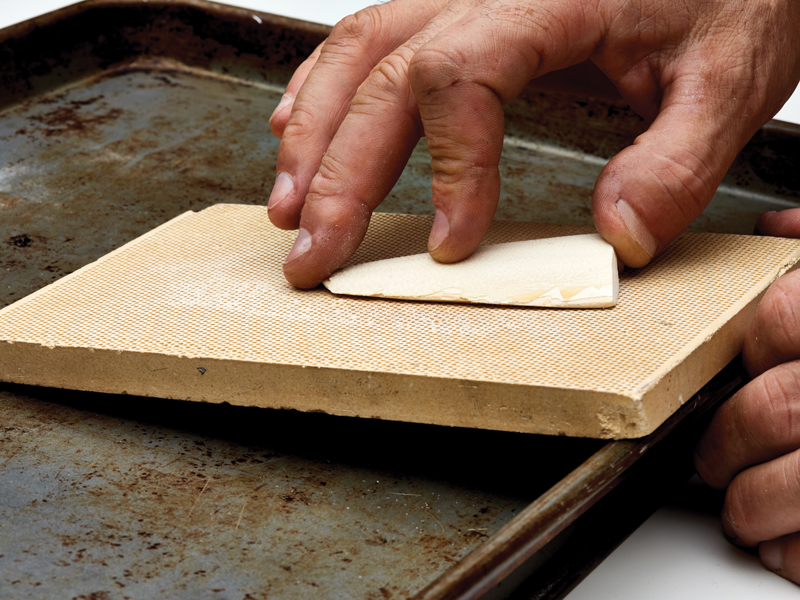
3a. Once you have cut the bone in half, the next step is to flatten the soft side so that the two halves fit tightly and will not allow casting material to flow outside the carved area. This is achieved most effectively by using a honeycomb soldering pad as a sanding surface. It is important not to sand the cuttlebone so much that the hard bone portion scores the soldering pad, which will create irregularities in the pad and no longer flatten the cuttlebone effectively.
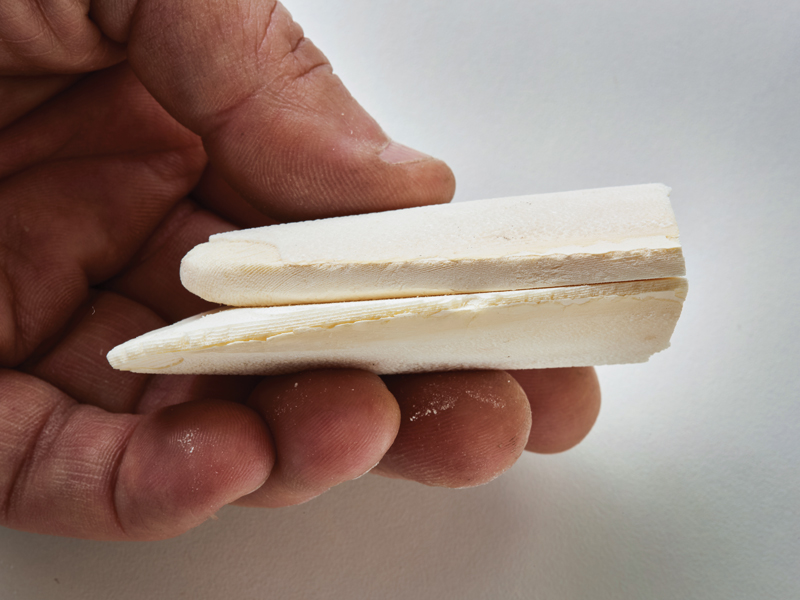
3b. The goal is to create two perfectly flat surfaces, one on either side of the mold. While sanding, be sure to check the progress regularly.
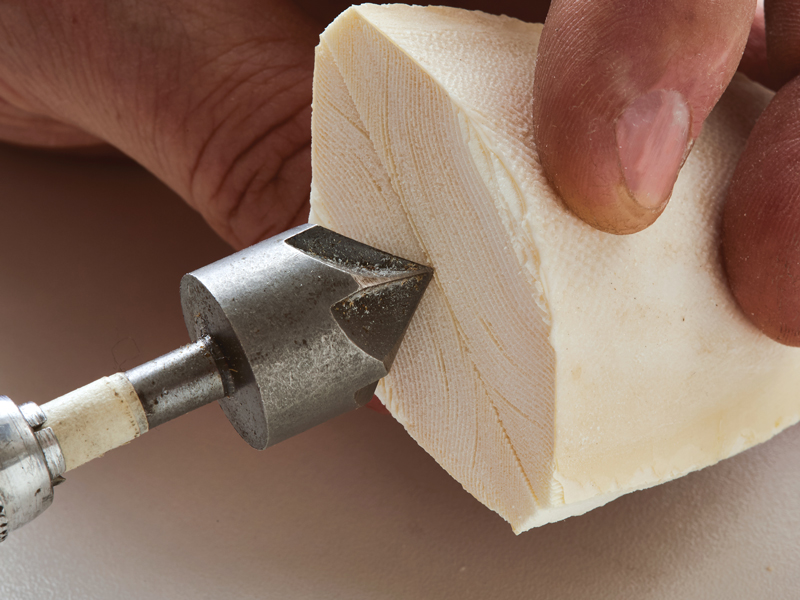
4a. Once both pieces fit tightly together, create the button or funnel into which the molten metal will be poured by in-serting a 1/2 inch countersink (or any other tool that will allow you to create a funnel shape) where the two mold halves touch.
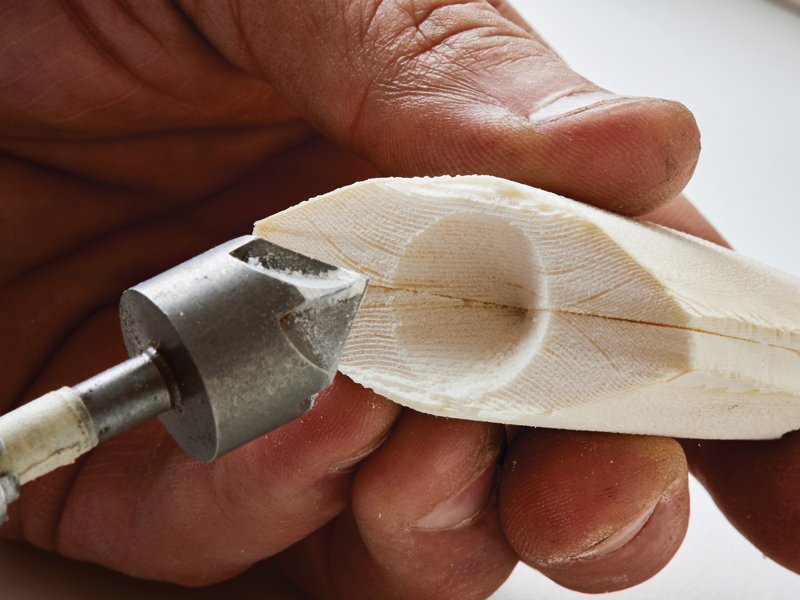
4b. Using a pushing and rotating motion, sink the tool into the two halves evenly and in a controlled manner. Try to get half the button equally carved on both sections of the mold. Be sure to carve the button before continuing your work.
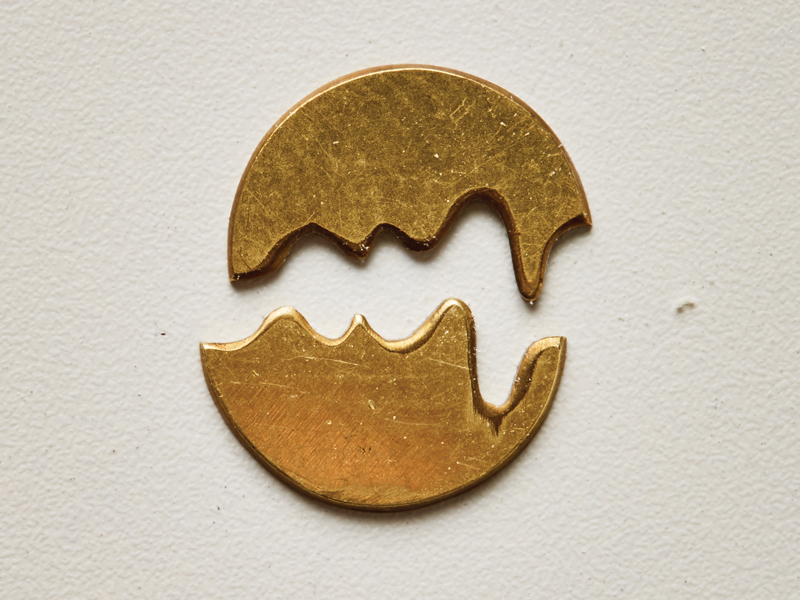
5. For many designs that are symmetrical or use multiple similar elements and re-quire precision, a low-relief model works well. Instead of freehand carving the design directly into the bone, transfer it onto plastic or metal that is at least 1 mm thick (anything thinner might reduce the success rate of the casting), cut it out using a jeweler’s saw, smooth the edges, and create any interior details as required.
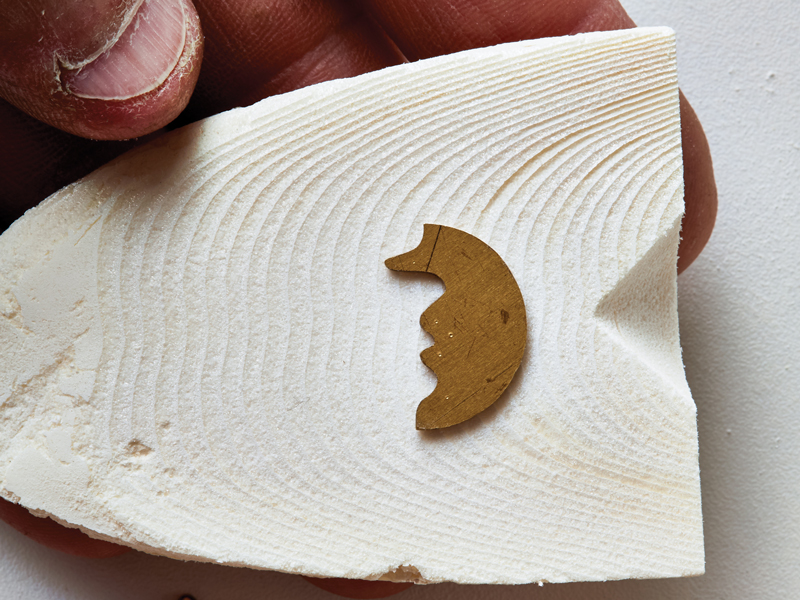
6. It is important that the model is placed below the button with a gap of 1/4 to 1/2 inch to allow for a sprue or sprues to join the button to the carved area. When positioning, you should consider how the metal will best flow and fill the carving. Place the model on the bone leaving the gap mentioned earlier and orient it so that the molten metal will flow with the least resistance into the carved area. Usually this means the largest area of the carving is placed toward the button.

7a. Using a bench block or a hardwood block, press the model evenly into the cuttlebone ensuring you support the bone with your fingers. If pressure is placed on the exterior edges of the cuttlebone as you attempt to push the model into the bone, the bone will likely break.
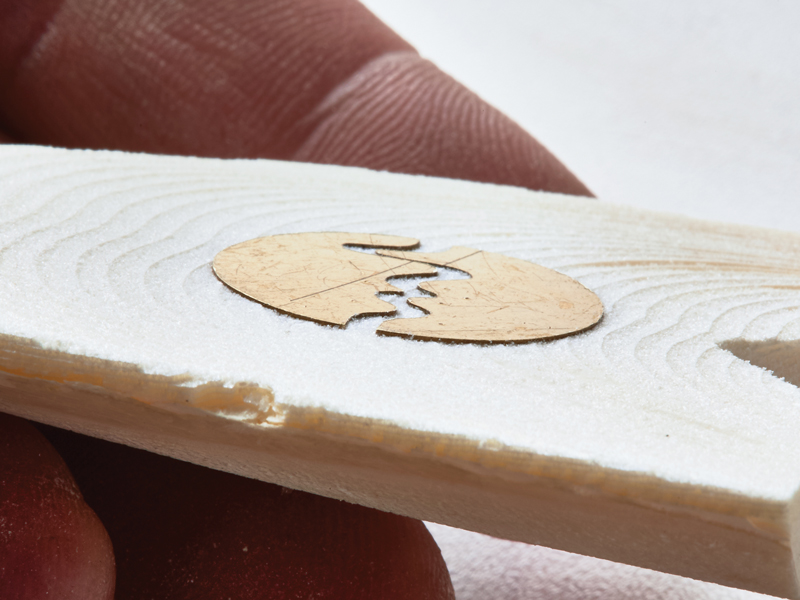
7b. Once all parts of the model are compressed completely into the bone, the model can be removed by turning the bone upside down and tapping it gently with a pencil. If the model is stuck, simply use a scriber or other fine tool to pry it free. If the model is thicker than 1.5 mm, push the model in partially, remove it, then use a paintbrush to brush away any debris before reinserting the model, continuing to push until it is completely flush with the surface of the cuttlebone.
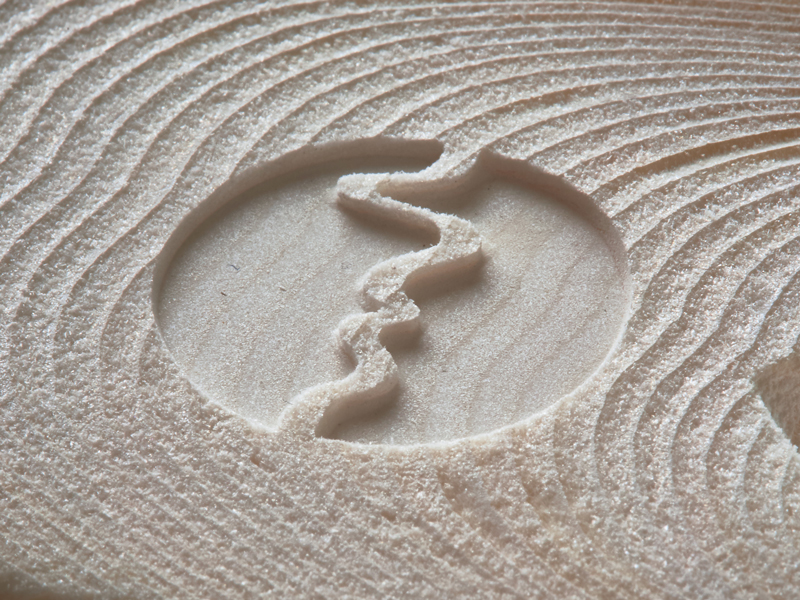
7c. A thicker model will require multiple stages of cleaning and reinserting and pushing. A thicker cuttlebone may also be required to accommodate the depth of the thicker model.
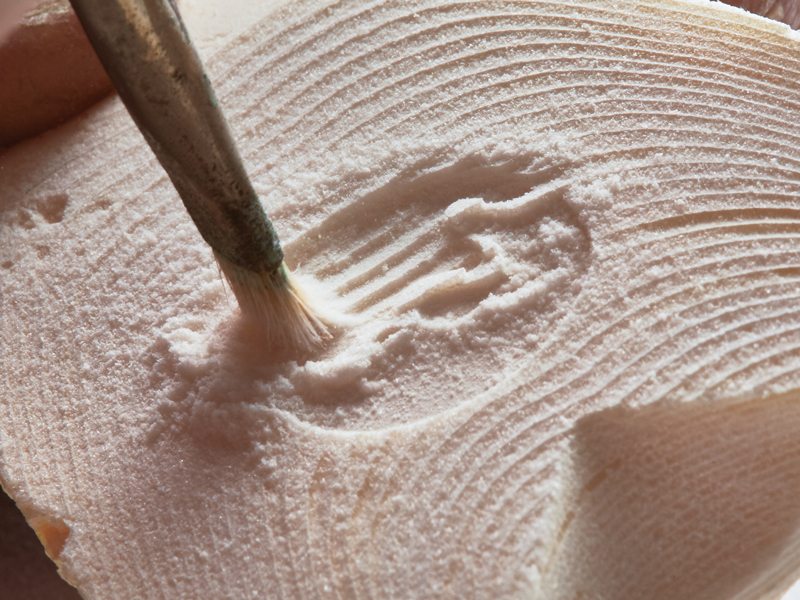
8a. During the carving process, use a paintbrush to gently clear the carving area of excess cuttlebone dust and debris. The removal of any debris during carving is very important, as the carved bone can be compressed into lower layers causing the ridges of the final casting to have irregularities that may manifest as imperfections in the texture. Also, it is important to realize that the paintbrush can be a carving tool if used too much or too vigorously. A good brush removes debris without damaging the ridges and helps accentuate the cuttlebone’s natural beauty.

8b. A selection of somewhat stiff 1 mm to 5 mm brushes is ideal and will give you the ability to clean large and small areas. Experiment with finding a brush that works for general removal and a few that are small for removing debris from different sized areas. Brush the back half of the mold so that the texture is well defined on both the front and back of your finished piece. This will also stop small particles from being carried into the mold cavity by the metal as it passes over the back into the design.
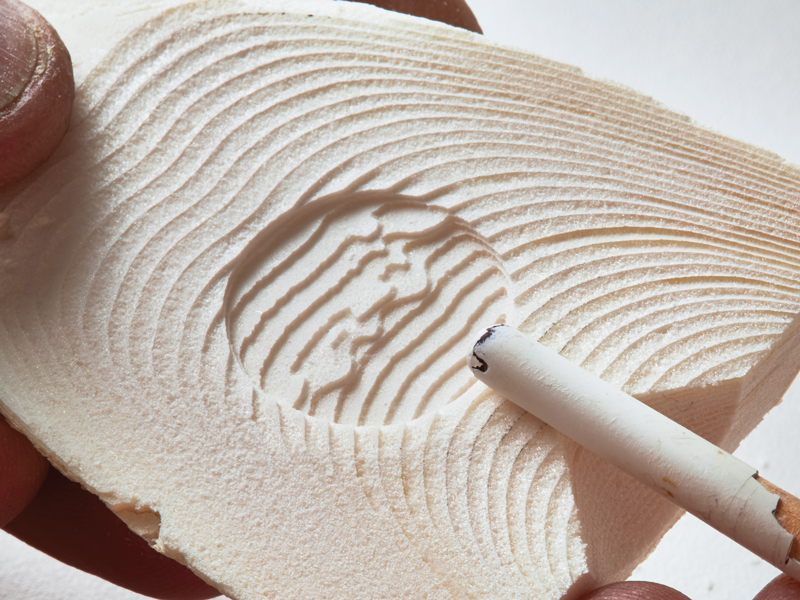
9a. A sprue joins the button to the casting area, allowing the molten metal to fill the casting cavity. Some designs may require multiple sprues while more simple de-signs need only one. The sprue can be carved with any cylindrical object, such as the reverse of a paintbrush or a dapping tool. Using your thumb and controlled pressure, angle the tool you are using for the sprues, from the button to the first layer of the design so that little damage occurs to the finished piece. The photo above shows a paintbrush being used to create the sprue on the front portion of the mold. I like to make the back sprue a little longer so that metal can flow more effectively into the mold while not affecting the design on the front. While it does cause some cleanup issues, it significantly increases the chances of casting success.
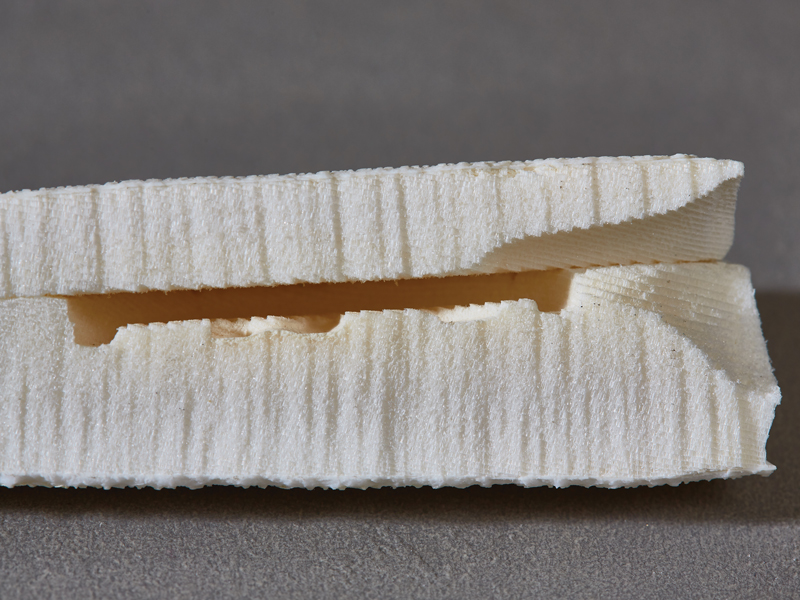
9b. This photo shows a mold cross-section: the back of the mold is on top and the carved area is on the bottom, with the button shown on the right of the image. Follow the path of the molten metal down the button (from the right to the left) through the sprue and into the mold. During layout and carving you should be thinking about the metal flow path so that you do not create areas of restriction.
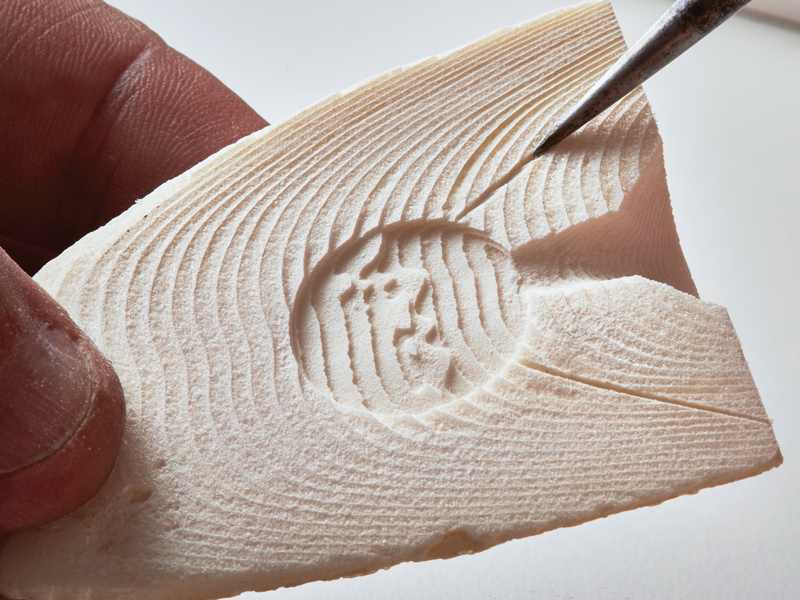
10. It is important that air vents are carved from the top edge of the design to the outer edge of the cuttlebone to allow trapped gasses to escape. Without adequate venting it is more likely that the casting will have undesirable deformations and not fill completely. On the carved portion, with the button facing up, use a scriber, needle, or other sharp object to draw a fine line from each area of the design that might trap gasses. As a rule, lightly brush the vents to be sure they are clean and allow for the maximum release of gasses. As the molten metal flows into the mold, the gasses will be forced out through the vents. Be sure that the vents break into only the first layer of the design at the edge. If vents are carved too deeply they will show up on the front of the finished piece. Brushing the back portion of the mold will give extra air ventilation and texture the back of the finished piece.
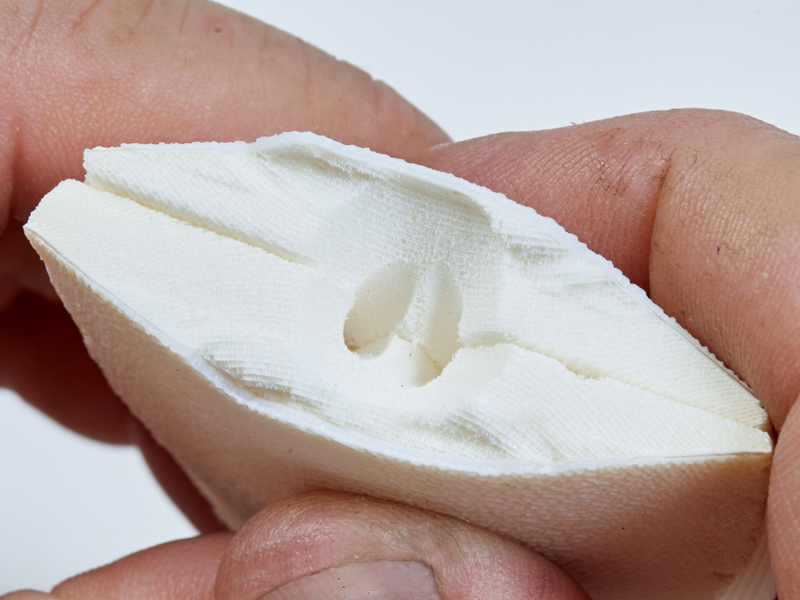
11. Place the two halves of the mold together, aligning the button and sprue as best as possible. Hold the mold up to a good light source and look into the button. It should be possible to see down the button and sprue directly into the carved area. There should be some lightness within the mold but it should be impossible to see through to the light source itself. If any direct light is seen, then the two mold pieces don’t fit well enough and the molten metal could flow directly through the mold and out the bottom, leaving nothing but a burnt bone, a mess, and the need to carve a new mold.
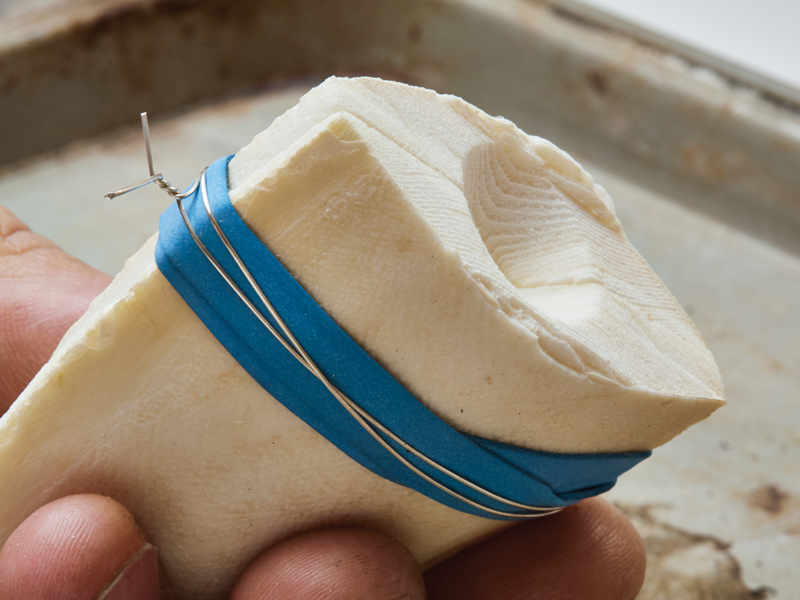
12a. After confirming the mold is ready to cast, use a heavy rubber band to compress the mold halves together, which will help give a finer mold line. Wrap binding wire over the bands to stop the mold from opening if the rubber band breaks due to heat or if metal is spilled on it. The binding wire used should match the material being cast so that any spilled material that hits the binding wire will be easily recoverable.
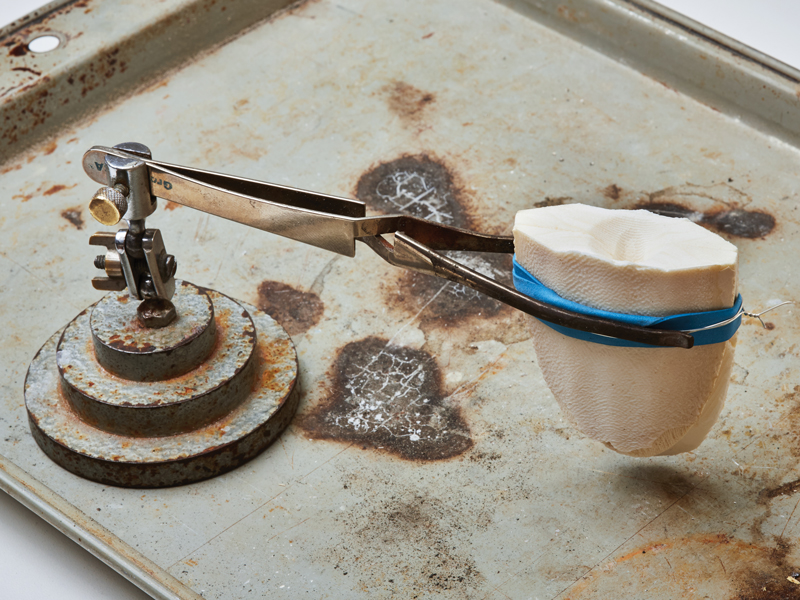
12b. Use cross-locking tweezers shaped to match the finished mold to not only hold the mold upright but to secure the rubber bands as well. Although sand is often used to support cuttlebone molds during the casting process, a third arm and cross-locking tweezers over a metal sheet works best. Setting the prepared mold onto the metal sheet will let any spilled metal be easily cleaned and used again, which would not be the case if the metal fell into sand or other porous surface.
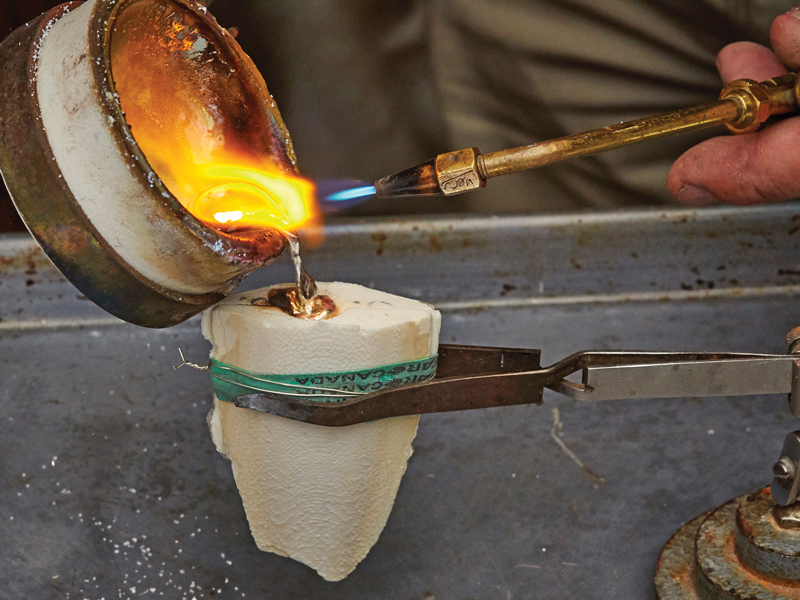
13. It’s now time to cast. Be safe: Casting with good ventilation, a respirator, and safety glasses will let you live longer. When casting silver or gold, you can either torch melt the metal in a ceramic crucible (as shown here) or use an electro-melt furnace with a carbon crucible. When melting the metal in a ceramic crucible, it is important that the crucible is fluxed evenly before use and that the metal is heated to its melting point but not over-heated. Once molten, the metal should be moved slowly in a circular motion to ensure that it is fluid throughout. Solid or lumpy areas in the metal may become trapped in the button or sprues, preventing metal from filling the mold. To keep the metal as fluid as possible, heat it as it is poured from the crucible into the mold’s button. The top of the cuttlebone may burn slightly but don’t be concerned, just don’t let it burn so much that charred bone gets pushed into the mold when the metal is poured.
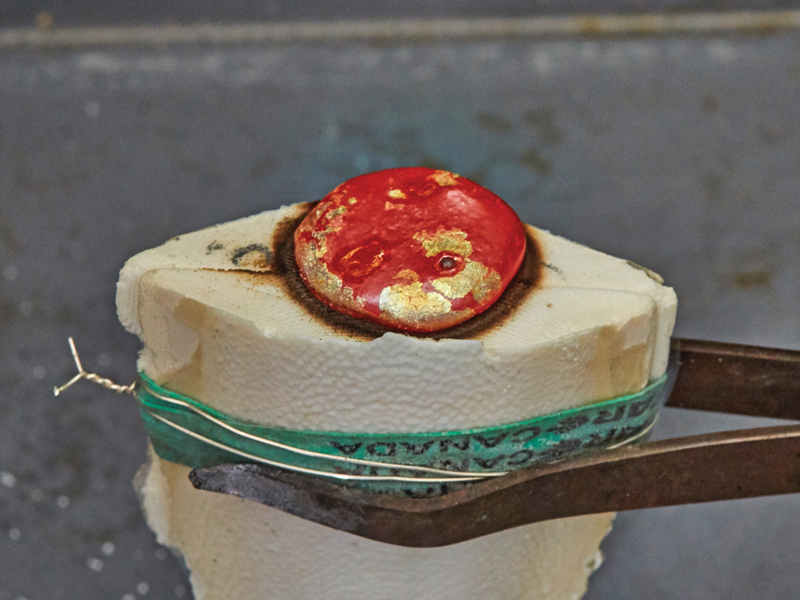
14. Solidification should occur within a couple of minutes but allowing three to four minutes will make sure it is not opened prematurely, reducing the chance of burning your hands on the hot bone.
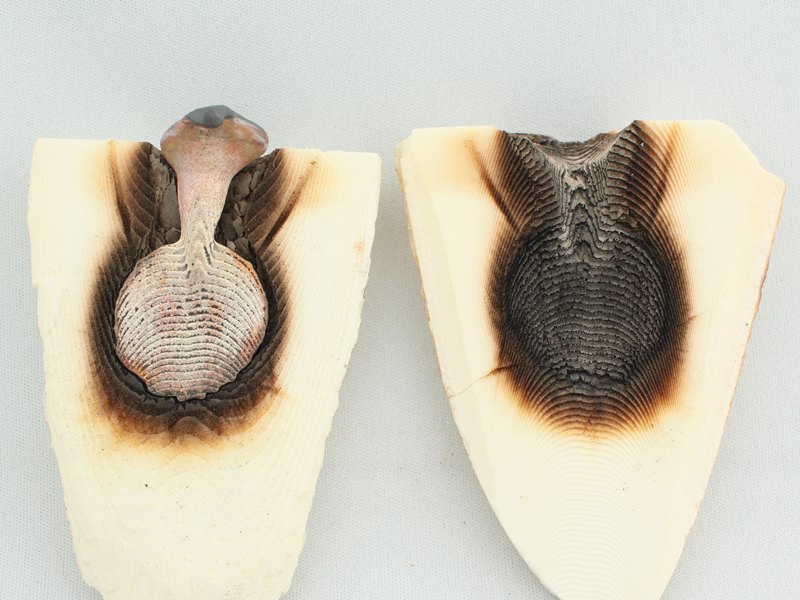
15. Once the mold is cooled it can be opened. Handle the mold by holding the edges and not the center where the carving is located, as this area is often very hot. It will be instantly evident if the casting was a success. Let the casting cool and brush loose cuttlebone off before placing the casting into warm pickle to clean any oxides. Use a jeweler’s saw to remove the sprue close to where it joins the design, but be sure to not cut into the design. To clearly determine where to cut, look at the finished casting from both the front and back. At times, it is easier to see the finished edge of the design from one side rather than the other, so it’s always a good idea to check both sides before cutting. Once the piece is cut from the sprue, it can be filed and sanded as any other casting, though take care not to destroy the texture as it is difficult to repair. A tumbler or a brass brush can be used to finish the piece, as they will not damage the texture. High-speed polishing and buffing can damage the texture of the cuttlebone casting.
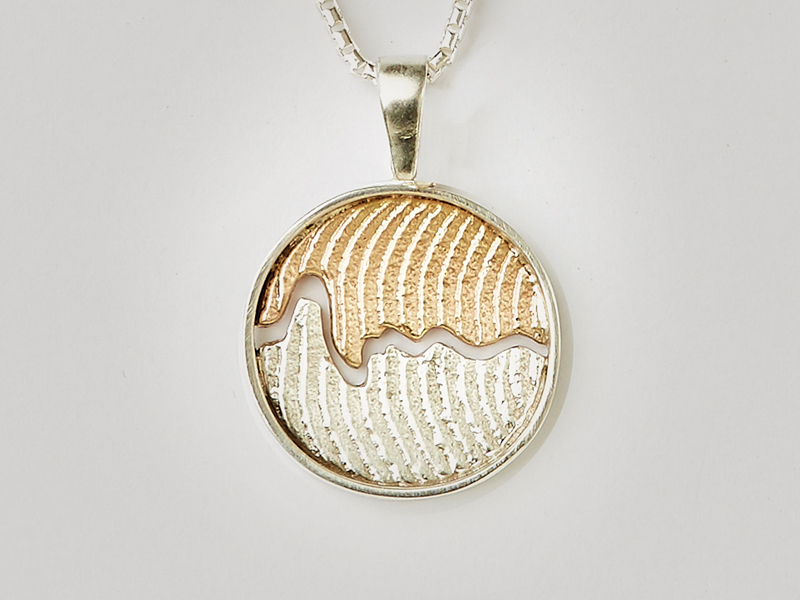
16. The finished piece incorporates both silver and gold, cast in two separate castings, surrounded by a flattened wire frame that helps to create a unified and interesting pendant.
Tony DeLuca is the owner of About Face Jewellery and an instructor at Georgian College in Barrie, Ontario, Canada. He is also the author of Cuttlebone Casting with Confidence, which can be ordered from his website, aboutfacejewellery.com.