

Shop Layouts
Shop Space
Three designers explain their shop layouts
Compiled by Shawna Kulpa
When setting up your jewelry studio, it’s crucial to consider not just your current needs, but also what changes might come down the road as you grow and evolve your line. Your tools and equipment should be organized for efficiency and flexibility.
In this article, we take a look inside the shops of three designers who keep their shop layouts practical, productive, and adaptable for any changes that may come.
Gregoré Morin | Elizabeth Garvin | Sarah Graham
One-of-a-Kind Operation
Gregoré Morin
Gregoré Joailliers
Santa Barbara, California
Many jewelers modify their studios to be more efficient. Gregoré Morin renovated his studio not only for efficiency, but also for beauty and tranquility. With walls only partially dry walled and a ceiling with no drywall and insulation hanging down, Morin found the juxtaposition between what he makes and where he makes it humorous. But he recently decided that enough was enough and that perhaps it was time to spiff up the place a bit. Here’s what he did:
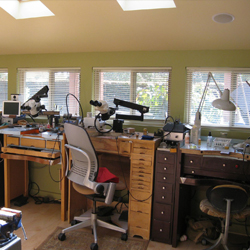
Natural light. Almost everything in his workshop is located for the best use of space or light. Within his 20-foot by 20-foot shop, Morin moved his benches along the wall with windows, giving natural light to the work area that is used the most. (He is usually working alone in the shop or with his wife Jennifer, a jeweler.) He also made sure he positioned the benches for the best views out the windows. The benches take up most of the wall, but relocating a bookshelf gave him a small nook that would allow him to move his compressor and soldering gasses closer to them.
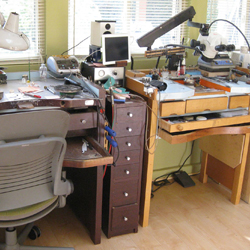
Bench organization. When creating the new layout for his shop, Morin gave the most thought to the workflow of his benches. He specifically placed his goldsmithing and setting benches side by side. Between the benches sits a stack of drawers that hold shared tools for use at both benches.
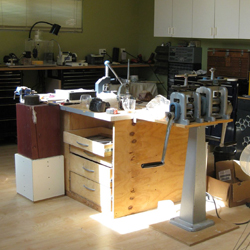
Rolling mill and draw bench island. A bench located in the middle of the room serves as a center island for two rolling mills and a draw bench. He set up the island to provide a central location to lay out projects and drawings of work, as well as to do forming and hammering. Storage under the island allows him to keep the tools (dapping blocks, hammers, bezel blocks, and mandrels) he uses for metal manipulation close by.
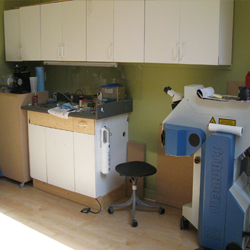
Laser welder. Morin’s laser welder was kept in place following the remodel because it is located in the only place he could get the 220 volts needed to operate it. Because this wall also holds the sink used for washing up, and he likes to keep all of the dirty things in one area of the shop, Morin also placed his ultrasonic and polishing system here. He modified the polishing system with wheels so it can be rolled to a new location in the event that he wants to move his stone-cutting center closer to the sink.
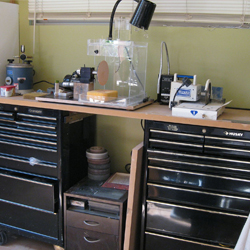
Stone-cutting center. A third wall in the shop contains Morin’s stone-cutting center. Initially, when he was planning the remodel, Morin wanted to install a warm water supply in the stone cutting area. He looked into several options, such as on-demand heaters, but the cost was not worth the time saved from walking to get warm water for the drip system that was already being used. If his business involved more stone cutting, he would have chosen to install a 1-gallon mini hot water heater, but he has that option in the future.
The stone-cutting center includes a saw and polishing arbor. A lack of workshop space precludes him from having a larger system with multiple wheels. Although Morin admits this slows things down a little, he has found the system to be flexible, allowing him to tackle even challenging cutting jobs. All of the stone-cutting accessories, such as extra diamond wheels, laps, and diamond grits, are located in drawers under the center so they are within easy reach for changing out to the next smoothest grit.
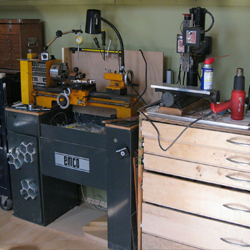
Lathe and mill. Morin keeps his machinist lathe and mill on the fourth wall of the studio, with the accessories for them kept within easy reach. The lathe is placed within a few steps of the stone-cutting center so that when stones need to be processed on both machines, the workflow is not interrupted too much.
Small Production Studio
Elizabeth Garvin
Elizabeth Garvin Design/Elizabeth Garvin Fine
New York City
Long, narrow, and shaped like a bowling alley, Elizabeth Garvin’s 750-square-foot studio wasn’t her favorite when she was shopping for a work space. But it was secure, had running hot water, and was just a 10-minute walk from home. Initially, Garvin operated Elizabeth Garvin Design from the studio, where she produced a moderate volume of production silver jewelry. When she transformed her business in 2011 and launched Elizabeth Garvin Fine, her shop needed a revamp. While her old company would continue its silver production, her new company produces much less volume but more labor-intensive work with gold, palladium, and silver. The additional business meant bringing in a significant amount of new equipment, including two rolling mills and a laser welder, while also maintaining the production capabilities and equipment for the silver production lines. There wasn’t enough room for each brand to have its own production area, so Garvin needed to find a way to organize the shop with detailed systems that her four bench jewelers could observe and maintain. Here’s what she did:
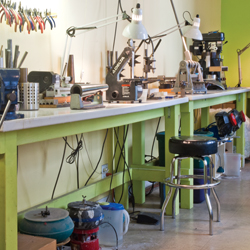
Communal workbenches. Lining one wall of the studio are communal workbenches for larger operations such as grinding, drilling, forming, drawing, and tumbling. They feature a combination of fluorescent and incandescent lighting because Garvin has found that while the flat light of a fluorescent unit is bright and clear for working with tools, it’s sometimes too flat. For example, when using a drill press to drill a precise spot, she feels you need the added directional light of an incandescent bulb to help your eye pinpoint the drill bit location.
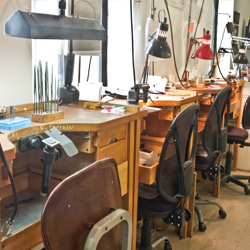
Individual benches. Each jeweler in the studio has his or her own workbench where most individual work is performed. Within the last year, each jeweler has had a GRS BenchMate plate installed. Each bench also has a clamp-on vise, which is often used to mount the flex-shaft for specialized techniques that Garvin and her team have developed. Otherwise, each bench is relatively uncluttered, containing no tools because the studio tools are communal. For example, small files are stored in a mobile block that is brought to a bench as needed.
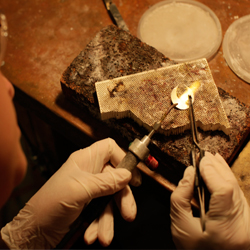
Dedicated soldering station. Unlike in many other studios, there are no soldering setups at any of the jewelers’ benches. After reading an OSHA pamphlet on jewelers’ shops and discovering that soldering flux was a carcinogen that could be absorbed through the skin, Garvin set up a communal soldering bench at the far end of the studio, keeping flux contamination limited to one location. When working at the soldering bench, her staff is required to wear rubber gloves while soldering and handling anything in the area. In addition, the fumes from soldering and from the heated pickle are collected and filtered by a unit designed to purify metal soldering fumes.
The bench is covered with an 18-gauge sheet of copper because it is fireproof, acid-proof, and easy to clean. Because it is a communal area, it regularly gets trashed, so every two to three weeks the whole surface gets washed down and all the chemicals are properly disposed of and replaced. Garvin believes this helps to prevent cross-contamination since her team is working with a wide variety of processes and metals.
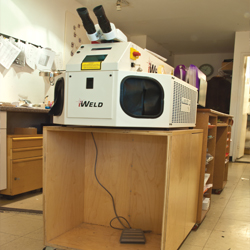
Laser welder. The one laser welder in the studio hovers in the middle of the quiet, clean office area. Garvin chose to purchase a bench top model and then built a rolling cart for it that would work well in the cramped space. Because the aisles on either side of the welder are high traffic areas, the welder’s foot pedal and the operator’s legs are tucked inside the cart, which insulates them from the surrounding activity. The cart has wheels, allowing the welder to be moved anywhere in the studio. It also features two storage areas that contain all of the laser-related books and maintenance supplies for the welder.
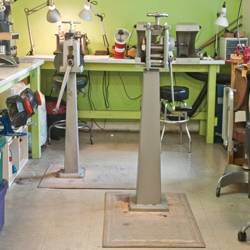
Rolling mills. Even though her studio really doesn’t have the room for them, Garvin requires two rolling mills and needed to find a way to make them fit. Since there is no ideal place to put them against a wall, they sit in the middle of the room at the far end of the studio with the least amount of traffic. Each mill is mounted to a 40-inch by 28-inch sheet of plywood with beveled edges, so if you accidentally walk over the plywood your foot glides up the slow incline rather than tripping over it. The mills are fairly easy to move; it generally takes about 10 seconds to move one in or out of working position. But once you step up to the mill and stand on the plywood mount, the whole unit is stabilized.
Soldering station photo by Alexander Berg.
Open Space
Sarah Graham
Sarah Graham Metalsmithing
San Francisco
Conveniently located along the Metro Line in the Dog Patch neighborhood of San Francisco, Sarah Graham’s studio offers something a bit rare in big cities: space…lots and lots of open space…fifteen-hundred feet to be exact. Graham considers the abundance of space a small luxury she can offer her six employees, and doesn’t mind the higher heating bills caused by keeping the big space (with its high ceilings and old drafty windows) warm and toasty. As she explains, “Being comfortable is imperative to being productive.”
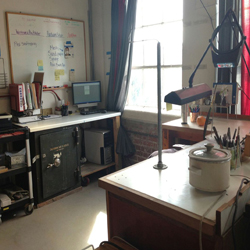
Office. In addition to supervising the studio staff, Studio Manager Rose Jaress also makes jewelry and manages the shop’s workflow. To do this efficiently, Graham built a small office within the studio. Measuring about 40 square feet, the office gives Jaress a place for her computer, a small auxiliary safe, and a wraparound jewelry bench with an extra large work surface. The space allows her to multi-task without having to move from the studio to the office. And, because the office is adjacent to the three other jewelry benches in the studio, she is always accessible to the staff.
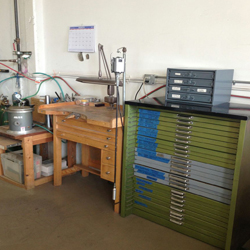
Wax Work Area. To keep metal shavings out of the waxes, Graham set up a separate wax area away from the jewelry benches. Truc Bui, the casting manager as well as a bench jeweler, spends much of his time here. On one side of the wax bench is a vintage printer’s cabinet where Bui stores all of his molds flat. On the other side of the bench is the wax pot, which sits on a table that expands to create an extra work surface where Bui can keep his casting order for easy reference. Just as with Jaress’s office, the wax area surrounds the worker, who uses a wheeled swivel chair so he has access to everything he needs without getting up.
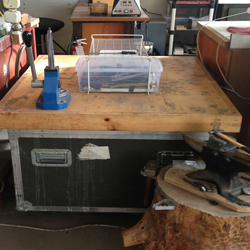
Bench Storage. Graham set up a large surface in the middle of the benches where she keeps the tools that everyone needs access to, but doesn’t necessarily need one of their own. Among the tools here are dapping tools, large nippers, rulers, gravers, files, and more. They are stored in clear boxes so the area stays neat but accessible. Graham stores just about everything in her studio in clear plastic boxes. “Jewelry studios are full of thousands of individual items and lots and lots of dust,” she says. “The combination makes for a tedious cleanup!”
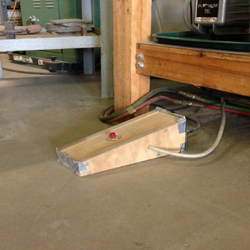
Casting Area. Graham does most of her own casting in her shop. Her casting process involves a lot of steps, many of which have to be done near simultaneously. “At the height of the casting process, you have gold to keep molten, a kiln to open, a vacuum pump to operate, and a raging flame to keep under control,” says Graham. “Some would call it a perfect storm.” To help manage the process, Graham made a foot pedal that turns the vacuum pump on and off easily. Its wedge shape makes it easy to operate and its size and weight keep it from moving around.
Table Space. With all of the open space her studio affords, Graham keeps several large tables set up around the studio. Cleared off periodically throughout the day as well as every evening, the tables allow her staff to spread out when they need to. The staff can use the space to organize jobs, count diamonds, allocate parts to orders, check in jewelry, prepare for shows, and organize inventory—all tasks that are easier to do when you have lots of space.