

This Piece Is a Beast
Casters identify the issues with CAD models that keep them up at night, and offer solutions that won’t give designers nightmares
By Shawna Kulpa
Computer-aided design (CAD) has revolutionized the way jewelry is made these days. No longer do jewelers have to spend hours carving a wax for casting (and then potentially hours more re-carving in the event of a casting failure). Now jewelers can simply fire up their computers and, in fairly short time, produce a design that can then be printed or milled for casting.
Although models created via CAD aren’t susceptible to any more casting problems than their carved brethren, the technology can make it easier to render designs that won’t cast well. It’s very easy to miss or overlook issues such as paper-thin pieces when the jewelry is blown up on a large computer screen.
“With all CAD designs, you can make it really beautiful on the screen when it’s huge, but we have to ask ourselves about the fine details and if they’re really necessary,” advises Joel Meltzer, director of manufacturing at TechForm Advanced Casting Technology LLC in Portland, Oregon. “Things still need to be structurally sound.”
Thankfully, casters are just as adept at catching these problems in CAD models as they are with their wax counterparts. While the flaws may not always be obvious to a jeweler, casters can easily identify any potential issues, often with just a glance at a CAD rendering.
To help jewelers learn how to identify specific issues that will interfere with casting, we showed casting experts a few problematic jewelry designs. They discussed the specific issues they saw, and identified simple solutions that could maintain the designers’ original visions while also allowing the pieces to be cast. Their advice is sure to have every jeweler giving their CAD renderings a second look.
The Delicate Flower
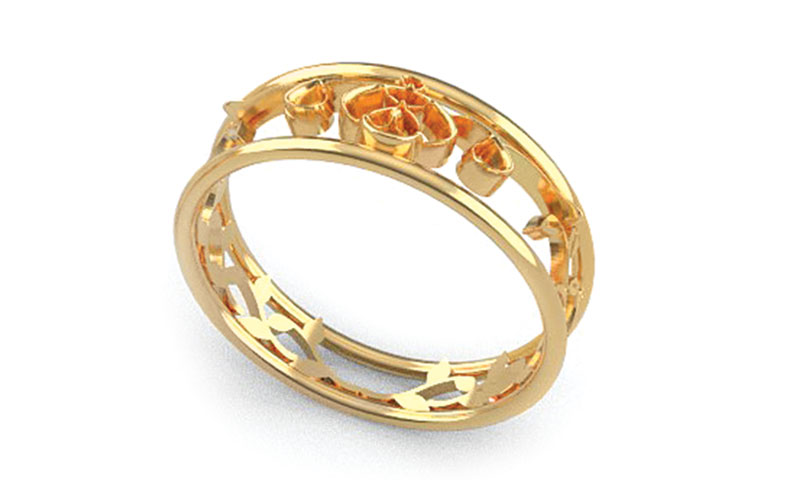
This ring design has a light and airy look thanks to the thinness of the interior portions. But those thin sections pose a couple of problems for the casting process.
First, there’s the matter of trying to invest the model—assuming that it could be milled or printed without those paper-thin sections falling apart. When designing a piece that’s going to be cast, Matt Feliksa, owner of Golden Sun Manufacturing in Plains, Montana, recommends thinking about the positive spaces in a design that will become negative spaces in the mold.
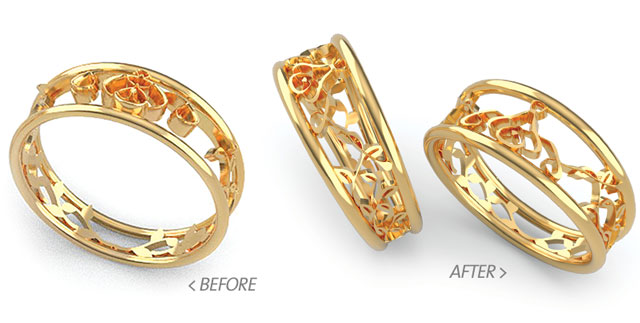
BEFORE: The original version of this ring featured thin detail work that would likely not fill with metal during casting. AFTER: The center section of the ring was thickened up to better metal flow to those areas and more contact points were added between the leaf pattern and the ring rails.
“As you’re designing, try to envision the negative space you’re creating in the mold,” says Feliksa. “Give second thoughts [to] a super fragile component in the mold be-cause it has to hold up to heat and metal during casting.”
When it comes to casting, thin equals delicate. And the thin, intricate design in the top center of this ring creates narrow spaces that will be more susceptible to damage. “Those areas are susceptible to breaking down in casting,” says Feliksa. “The mold will break off even if the metal is gently poured.”
Another problem posed by those thin areas is how they can impede metal flow.
“It’s too thin to flow metal into that space,” says Feliksa. “There’s a limit to the thinness that you can cast.”
In a perfect casting world, only one sprue would be needed to sufficiently fill a model. This reduces the chance of gas porosity occurring when multiple molten metal streams meet within a casting, and it also makes cleanup of the cast model easier (since there’s only one sprue that will need to be removed). But in order to have just one sprue, it has to be large enough to feed the entire piece.
That’s not an option with this ring’s current design. Even with multiple sprues, this ring still poses a problem.
“You have to feed enough metal at a fast enough rate to get to the inner design,” says Joe Lovato, technical sales manager of Legor Group USA in Albuquerque, New Mexico. “The outer edge would fill, but by the time the metal gets to the thinner area on the inside, it would be extremely difficult to keep the metal flowing enough to fill that area.”
One way to try to get the metal to stay molten long enough to reach those thin areas is to increase the metal temperature. But the temperature differential between the molten metal and the cooler flask introduces the risk of a reaction, which could cause surface issues such as roughness or gas porosity (both on the surface and embedded in the metal) in the cast model.
“The higher you go [with the metal temperature], the more reaction you could have,” explains Lovato. “Ideally, you want to cast a piece at the coolest possible temperature for both the flask and the metal, so everything remains homogenous. If it’s too cool, you won’t fill the piece. In this piece, you need to keep the temperature high to get the metal to flow into the thinner areas.”
But the higher the metal temperature, the greater the chance of other problems occurring. Plus, you run the risk of significant shrinkage as the hot molten metal pulls away from the cooler mold cavity, particularly in the thinner areas.
“Increasing the temperature could potentially fill all the parts, but then you have the shrinkage problem,” says Lovato.
Even assuming that by some miracle the piece was successfully cast, it likely wouldn’t survive long in the real world.
“Even if you could cast it, it would break, like foil,” says Feliksa. “It’ll get destroyed in polishing.”
But that doesn’t mean that this design is impossible or should be scrapped en-tirely. Casting experts point out that a few minor changes to the design will greatly increase the piece’s chance at casting success.
The first fix is to address the center design section.
“The center cluster design and curly areas look like they’re paper thin,” says Meltzer. “They need to be thickened up.”
How much to thicken them is up to the designer, but according to Meltzer, “you don’t want any feature less than 0.5 mm, and even then, they shouldn’t be too long.”
In addition to making the thin parts of the top design thicker, Lovato recommends giving another look to the connections between the inner design and the ring rails.
“I think there should be more contact between that whole design and the outer rails,” he says. “Otherwise, it would almost not be possible to get enough metal to flow into the design. Beefing up the center and adding more contact points could possibly do it.”
In addition to thickening up the interior design, Feliksa would also consider changing the way the leaves and vines interact with the rails on the bottom half of the ring. “I’d possibly add another leaf or vine into that so it’s not so free floating in the air,” he says. He also recommends changing some of the leaves on the vines and the way they angle into the rails to better the metal flow during casting.
“A piece like this is a concept, but it needs to be thought through and developed with these casting issues in mind,” says Feliksa.
Round and Round
In addition to being mesmerizing, the repeating oval shape in this ring gives it a dainty yet substantial appearance: It would look good on nearly any woman’s finger. However, upon closer examination, one major design flaw begins to stand out: skinny ring rails.
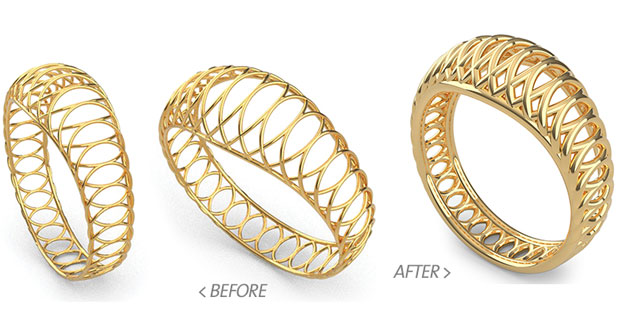
BEFORE: The initial design of this ring featured skinny ring rails that would be insufficient to feed metal to the interior spiraling design. In addition, the thinness of the piece would likely make it too delicate to survive the manufacturing process. AFTER: In order to successfully cast the ring, the designer thickened up the ring rails and added a little height to them as well. The designer also beefed up the interior wirework to add strength to the ring, allowing it to withstand the manufacturing process.
“The rails are ridiculously thin and not practical,” says Feliksa. Not only would they make feeding metal into the piece difficult, they’re not likely to withstand much wear and tear in the real world, assuming the piece could successfully be cast as-is. “They have no strength. The arches add some strength to the piece, but not much.”
To help designers understand how metal flows during casting, Feliksa likens the process to the human body with its network of arteries and veins transporting blood.
“You have to have a main artery to feed the smaller veins,” he says, noting that this piece currently lacks such an artery. In this design, the rails, which should serve as the main arteries, are too thin to properly feed all of the arched veins on the inside.
You could try casting the piece with multiple sprues feeding into both rails, but that can be risky, says Lovato: “When you have sprues feeding the piece from multiple directions, you can create turbulence.” When the metal flows meet, they may meld together nicely, but because they’ll be cooling at different rates they could also “bump” apart. Because the metal wasn’t homogenous as it cooled, separations or weak spots could develop.
Even if the metal flows did successfully meld and cool properly, there’s the matter of having to detach all of the sprues after casting.
“You’d have to be very careful clipping them off,” says Feliksa. And since the piece lacks strength, you’d run the very real risk of bending and damaging the piece during the sprue removal process. “There’s only so much you can sprue a piece before you destroy it.”
It’s also not as simple as attaching just one sprue to each rail.
“The sprue can’t be bigger than the part,” says Lovato. “If we ran a sprue into one rail [and] pinched it down to fit into the sidewall of the wire, how much are we restricting the metal flow as it’s entering the piece?”
Restricting the flow of metal would lead to an incomplete fill as the metal slows and starts to cool.
“Imagine you have a solid mass of metal and you’re trying to feed it with a tiny needle,” explains Lovato. “You’d never get enough metal from the needle because it’ll cool down and never get to the piece. The smaller the sprue, the faster the cooling.”
In this situation, he continues, “the first reaction is to increase the temperature, but alloys have so many different materials in them that break down at different rates. For example, zinc will vaporize at certain temperatures. When that happens, you lose alloy composition stability. Raising the temperature creates so many other issues that you lose the effectiveness.”
Luckily, the fixes to make this design castable are fairly simple. They start with plumping up the ring’s arteries.
“Thicken up the two rails,” says Feliksa. “I’d add a little height to them and [at least] double their thickness.”
If thickening the rails is not an option for the designer, Lovato offers a second solution that could render the model castable.
“Maybe the last oval link at the bottom of the shank could be filled in,” he says. “That would create a possibility to cast it if you have enough of an area for the main sprue to feed the piece enough. You’d lose some of the openness of the ring, but it would give you a shot at filling it.”
Switchbacks
For casters, projects like this bracelet immediately set off alarms.
“This piece is a beast,” says Lovato. “The outer frame looks fairly robust, so that could be cast relatively easy. The honeycomb is the issue. There are so many changes in direction and sizes of metal in this piece. You’re going from thick to thin to thick to thin to thick. There’s so much wrong here.”
When designing a piece with casting in mind, jewelers should consider the linear distance metal will have to flow to fill a piece. “A straight road is a lot faster than a windy road,” says Feliksa. The honeycomb structure of this piece increases the linear distance the metal has to flow to reach the center bezels significantly, which decreases the chances of casting success. “If there were straight bars going to the bezels, it would be easier to cast.”
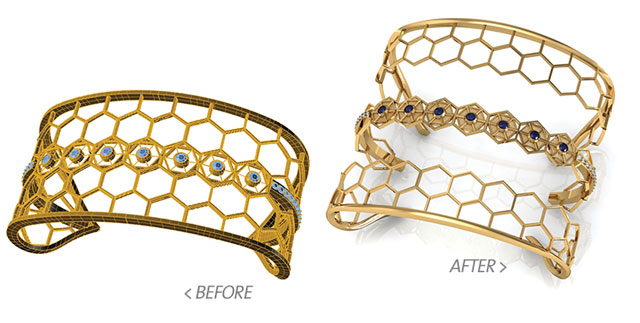
BEFORE: This beast of a bracelet attempts the Herculean task of trying to force molten metal to flow from thick to thin to thick to thin to thick areas during casting. Failure is all but guaranteed. AFTER: After thickening the inner spokes, filling in the center honeycombs, enlarging and rounding off the ring rails, and breaking this into separate components, the bracelet stands a good chance of casting success.
Those bezels at the center of the bracelet are also at the center of the problems with this piece.
“The biggest problem are the bezels held together by human-hair–thin spokes,” says Feliksa. “You’re not going to fill those bezels with them.”
Simply put, assuming the metal actually reached the center honeycombs, there’s little chance that enough of it will successfully be fed through the narrow spokes to fill the bezels. Luckily, the casters see a few possible solutions to this casting conundrum.
Lovato believes it might be possible to achieve success by breaking the bracelet down into three parts and casting them separately. “Basically, take the left side of it, the right side of it, and the center strip,” he says, “then solder or laser them together.” Even then there’s no guarantee that the center bezels will fill: Although you’d be decreasing the distance the metal needs to flow to reach the bezels, it’s still being fed through tiny spokes.
“The first thing I would do is make solid all of the setting holes in the center,” says Meltzer. “That will give us a place to sprue inside the piece. It’s a large piece so there’s not a lot of opportunity to break it down into smaller sections. You’d have to sprue yourself out of the problem.
“Another option would be perhaps putting a skin inside each of the honeycombs that would have to be pierced out after casting,” he continues. “A 0.25 mm skin would help carry material through there. But I could see how that would not be a good option for a jeweler.”
Alternatively, Feliksa says, you could make the small inner wires thicker with a flatter geometry. “Or you can cast the bezels separately, but you’ll probably still want to make the spokes thicker.”
Lovato concurs that casting the bezel-set honeycombs separately might be the best solution.
“You could remove the bezels [from the CAD file], cast the bracelet, and then [manually] set the bezels in place,” he says. “Each of the spokes would be hard to weld because of how small they are. I would increase the size of the spokes so they don’t melt when you’re welding or soldering them in place.”
It’s not just the center bezels that the casters would adjust to ensure casting success of this piece.
“The outer rails need to be thicker,” says Feliksa. “You have to think about the wearability of a piece and not just meeting a price point. The honeycomb will help with strength, but not by much. The rails need to be thicker to give [the bracelet] any type of strength to survive manufacturing.”
In addition to bulking up the outer rails of the bracelet, Feliksa recommends rounding them off as well.
“The rails should be softened,” he says. “Right now, they have a hard, rectangular profile. Any time you have a sharp edge, it can be a problem. A lower profile would help with investing, get the metal to flow better, and it’ll look better, too. Sometimes you have to think about what design compromises you’re willing to make.”