

Fill in the Blanks
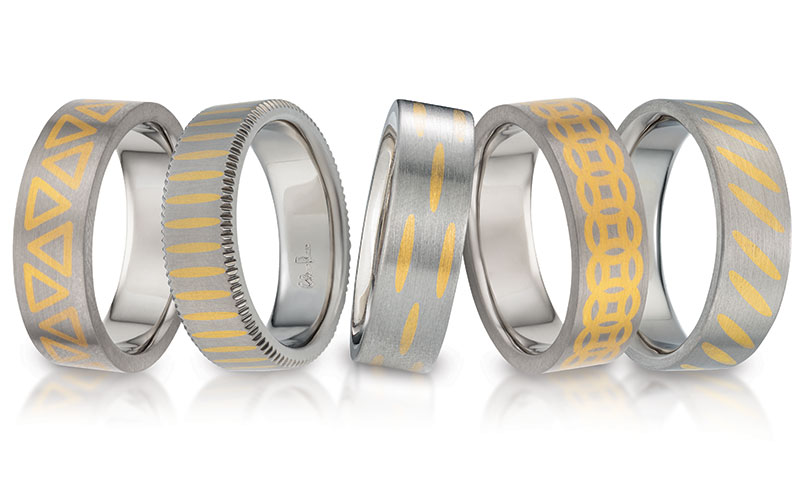
Developing a modern technique using a traditional rose engine
By Chris Ploof
Editor’s Note: This article is excerpted from “Practical Applications of a Rose Engine in the Modern Shop,” a paper by Chris Ploof that was published in the proceedings of the 2019 Santa Fe Symposium on Jewelry Manufacturing Technology.
It was love at first sight.
In February of 2016, I met my first rose engine and ornamental lathe. I was teaching a class with James Binnion of James Binnion Metal Arts on mokumé gane at Rio Grande in Albuquerque, New Mexico. One evening, Binnion and I joined master gem cutter and goldsmith Phil Poirier for an evening together at Eddie Bell’s shop. We walked in, and there was one of the most beautiful machines I had ever seen—brass and wood assembled together into a machine that looked worthy of appearing as an extra in a Jules Verne or H.G. Wells story; it was the Armbruster MK II rose engine.
As beautiful as these machines are to look at, the real beauty is in what they do. After fitting a piece of African blackwood into the chuck, Poirier quickly fired up the rose engine, and for the second time in minutes, I was completely involved in the moment. The whole barrel of the lathe started to revolve and gently rock back and forth. This was no lathe as I knew them—it was immediately obvious that this was a machine with tremendous complexity.
Poirier walked us through the use of this machine and described what was happening. The rubber, a Delrin block affixed to a guide, was running along the bumps (lobes) of the rosette, causing the spindle to rock back and forth in a regular pattern. The African blackwood was rotating and rocking, and the pattern was being transferred to it by the action of the cutter working on the face of the wood. A rosette with five lobes made a five-lobed design in the wood, and so on.
It was a life-changing few minutes for me. Very quickly, though, I learned how truly versatile this machine is. Poirier was quick to point out that you could “layer” pattern on top of pattern; there was no reason to just use one rosette when you could use two, three, or more rosettes. Another amazing component on this lathe is the carrier that holds the Delrin rubber. This device allows the amplitude of the rosette to be adjusted between 100 percent and 20 percent of its actual travel, which allows for a large difference in cut depth.
As we played and became more familiar with the rose engine, Poirier threw a few more curveballs. Not only does the lathe rock back and forth (front to back from the point of view of the operator), but it can also be set to pump along the spindle axis (left to right from the operator’s point of view). It is designed to not just cut along the face of the workpiece but to also work the sides of the object being held. The rose engine can be equipped with tools other than the replaceable carbide fly cutter. The fly cutter orientation can be changed, allowing you to cut parallel or perpendicular to the spindle or anywhere between. Drill frames can be used horizontally or vertically. The lathe also allows the offsetting of the rosette pattern around the item you are working on. There is also a dividing wheel and pin tool that allow you to lock the headstock of the lathe and make plunge cuts with the workpiece held stationary. All of this, in combination with interchangeable rosettes, means this single machine can cut thousands and thousands of unique patterns.
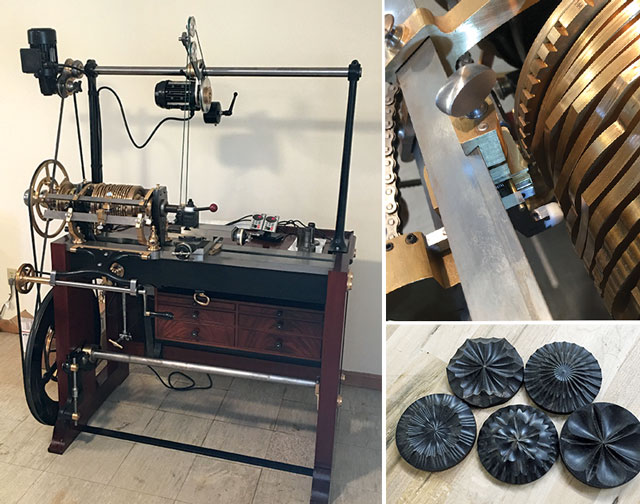
The Armbruster MK II rose engine (left, above) features a white Delrin rubber block (right, top) that is affixed to a guide. When the lathe is running, the rubber runs along the bumps of a rosette, causing the lathe’s spindle to rock back and forth in a regular pattern. It results in the rosette’s pattern being transferred to the material being cut (right, bottom).
Perhaps most important, when I asked Poirier if you could cut directly into metal he said, “Yes!” That was all I needed to hear; at that moment I decided I would own one of these beautiful machines. Naturally, my mind immediately went to rings since my company sells them. My excitement was at a peak, and I asked Poirier where I could find one of these machines.
We began a conversation about ornamental lathes in general and the rarity of these particular machines. Fewer than thirty of them were built by Dr. Fred Armbruster, and they rarely come into the secondhand market. When they do, there is an informal “list” of interested parties. I also learned that they are expensive and that I should start saving. As excited as I was, this wasn’t going to be a simple matter of buying a lathe today and using it tomorrow.
Luckily, a few months later, Poirier let me know that an Armbruster MK II was going to be offered for sale. Thanks to his generosity and connections to the ornamental turning world, I was able to work the phone and become the new owner of Armbruster MKII, serial number 2.
It was a few months before the machine made the journey from its home in a private airplane hangar 60 miles north of Las Vegas to my studio in central Massachusetts. Dr. Armbruster was generous enough to drive down from southern Maine in August of 2016 to help us assemble the machine, which appeared to have never been put under power. After assembly, I immediately made a few adjustments to work-holding devices by adapting a wood-turning chuck with a 1 inch stud as well as expanding mandrels for ring making and for other metal objects.
Direct Metal Inlay
We love palladium 500 (50Pd48Ag2Cu). Unfortunately, it can be a bit hard to come by in mill products, but there are a few manufacturers willing to offer it as sheet, wire, and seamless ring blanks. It’s a beautiful gray color, and it bonds well and offers great contrast when included in mokumé gane. 500Pd engraves and sets beautifully and is easily formed and soldered. Hardness and workability are similar to 14k palladium white gold. It polishes well and looks wonderful with a matte finish, which can result in an almost purple hue when viewed in direct sunlight.
But one of its best features is its machinability. Unlike its parent, palladium, and the more common alloy palladium 950, it cuts easily with carbide cutters and doesn’t feel gummy. It was a logical choice for making our rose-engine rings.
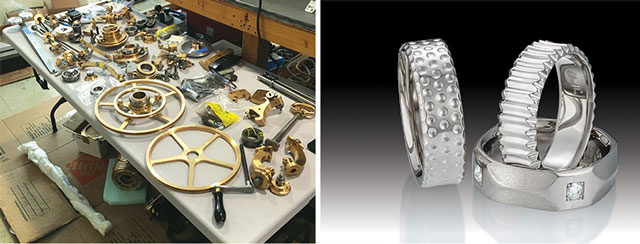
After acquiring an Armbruster MK II rise engine, Ploof was lucky enough to have the original builder come to his shop in Massachusetts to help assemble its many parts. Once the machine was setup and running, Ploof and his team were anxious to get started experimenting with it to discover some possible patterns they could create on their rings.
We began using the lathe with our 500Pd ring blanks, selecting a rosette based on what we wanted to accomplish. We kept notes and samples (our recipes) along the way so we could duplicate designs. A typical recipe references several variables and a few constants and has been written as a reminder to the experienced operator but also so a new operator can follow it. We have a whiteboard mounted next to the rose engine, and the current recipe we are working on is written on the board for reference.
While we were cutting rings, I started to think about how many of the patterns would look fabulous with inlaid metal. I knew a traditional inlay would be nearly impossible: The patterns are not undercut, since they are made with a triangular replaceable carbide cutter (which is 60 degrees). And attempting to go back into 36 or more precise cuts and try to undercut them simply wasn’t an option.
As an experiment, I decided to try to use plumb 18k yellow gold solder and flow it into the cuts made by the rose engine. It did not yield great results; it was very hard to control with closely set cuts. Additionally, it required a few pickling/fluxing/heating cycles to cover a whole ring. I also found that it was quite difficult to get the temperature exactly right, which resulted in overheated, porous solder, especially in larger cross-sections. The melt versus the flow temperature made it very difficult.
These early experiments weren’t satisfactory but had me intrigued and trying to figure out a faster method that would yield excellent results. I started to think about a key feature that 500Pd shares with 950Pd and its sister metal platinum.
Like platinum alloys and 950Pd, 500Pd does not need to be fluxed while annealing. We heat the 500Pd to an orange color with an oxygen propane torch and hold for 30 seconds to anneal, followed by either air cooling or quenching in water. As with 950Pd, 500Pd can have a slight oxide layer form on it while annealing that is purple to green in color as it cools. And, just like 950Pd, this layer is easily removed by playing over the surface with a propane/oxygen reducing flame. Another advantage is that 500Pd has a high melting temperature, above that of gold and silver. I’m not sure exactly why I thought of it, but I decided to try melting pure gold and silver into the grooves. This also gives an advantage over using solder, as the pure metal melts and flows at the same temperature. And best of all, it makes a very durable bond.
The Process
To begin, we cut a ring on the rose engine and then gave it a 15-minute ultrasonic bath. We used Citranox in our ultrasonic, heated to 55°C (130°F).
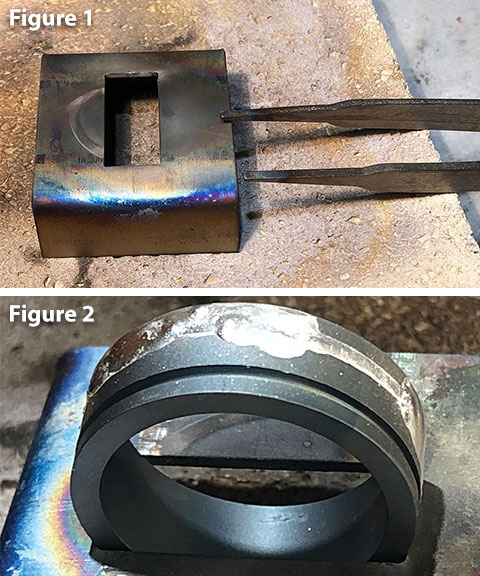
Once the ring was prepared, we got our work area ready. We work on a high-heat refractory surface using titanium tweezers and fixtures (Figures 1 and 2). Work holding can be a bit of a challenge, but the small titanium ring holders made on our water jet make it much easier. We have tried other methods of holding, but materials other than titanium or ceramic don’t stand up adequately to the level of heat we use.
We used a Smith LittleTorch fed with propane and oxygen, adjusted to a slightly reducing flame. The ring was clamped in cross-locking titanium tweezers or put into a custom titanium ring holder. The 500Pd was heated to orange, and the gold wire was stick-fed directly into the cut areas. Early attempts to apply the wire before the ring was up to temperature were quite interesting—the tip of the wire would stick directly to the 500Pd even without any visible melting to the naked eye. Diffusion seemed to be very rapid and occurred across a fairly wide temperature range. Once the ring was at the proper temperature to melt the pure gold (1,062°C/1,943°F) or, later, the pure silver (961.8°C/1,763°F), it flowed easily, following the patterns cut into the ring.
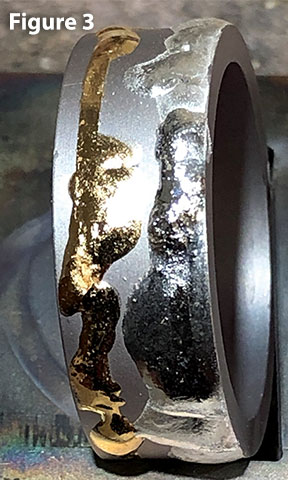
I tend to work just behind the flame and take the precaution to not overheat the inlay metal. A small section of the ring was worked at a time, and as I finished a section, I used the tweezers to rotate the ring to the next section, working my way around it. I applied more metal than was necessary, making certain the pattern was filled beyond the surface of the ring (Figure 3).
Due to the 100°C (180°F) difference in the melting temperatures of the gold and silver, we are able, with planning and careful application, to combine both gold and silver inlays right next to each other on the same ring. Inlaying a single ring with a single metal takes less than two minutes. Applying gold and then silver is under four minutes. Once the ring was adequately filled, we placed it aside to air cool.
After the ring was cool, we burnished the inlaid material with a rotary tool. This is a fast way to ensure there are no voids in the inlays. Of our first several rings, we found only one small void, but adding this burnishing step has removed that potential flaw.
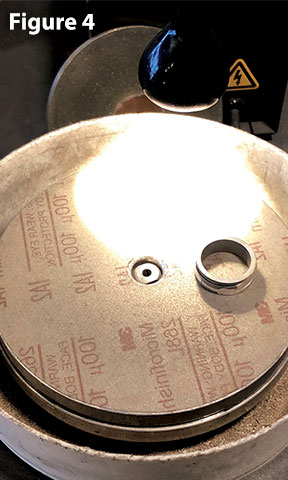
Once the melt inlay had been burnished, we visually inspected the sides of the ring. If any metal had flowed over the sides, we flat lapped the ring on abrasive paper (Figure 4). Then we used the lathe to remove the excess material that was on the surface of the ring.
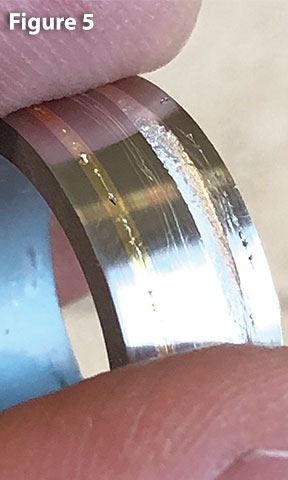
If the inlay wasn’t complete, it was readily apparent and easily corrected (Figure 5); we just went back to the torch and applied more material.
Once we removed the material above the surface of the 500Pd, we used standard jewelry-finishing techniques and matte the surface with Scotch-Brite or other methods, such as sand blasting, fiberglass brush, etc. Additionally, in the case of silver inlays, we etched the silver to create topography.
Experimentation with stretching and reducing rings is positive, with the ability to go up or down a size without disturbing the inlay. However, large amounts of manipulation such as bending a flat blank into a ring after inlay will cause separation. Upon noting this, I spoke with Stewart Grice, vice president of mill and refining at Hoover & Strong inNorth Chesterfield, Virginia, who offered to see if what we are creating is actually a metallurgical bond.
Grice looked at both the 24k gold and fine silver inlays. Cross-sections were taken of each, and after polishing and etching, he discovered a few things.
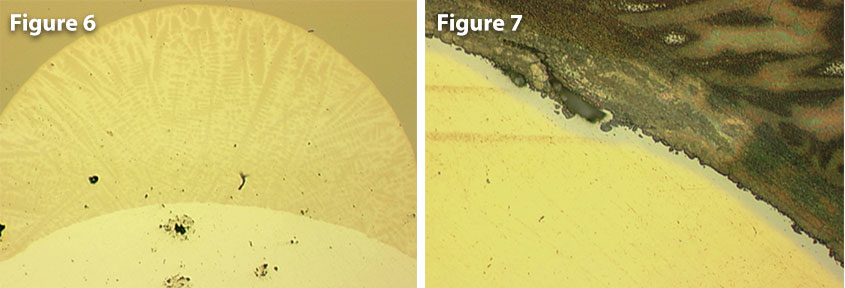
In the 500Pd sample with inlaid silver (Figure 6), there is a very large diffusion zone. Black spots are present, which indicate possible voids from the melt process. It actually is more of a micro-alloy than a diffusion bond that has developed. In the photographs, the darker color is the 500Pd, and the lightest color is the fine silver. The middle color is the actual area where diffusion has occurred. Note that it is nearly twice the depth of the inlay.
In the 500Pd sample with 24k gold (Figure 7), the diffusion zone is present but much smaller (light gray line between the gold and darker gray of the 500Pd).
Both of these inlays were accomplished by hand, without timers or benefit of accurate temperature measurements, but what we can say is that there is a metallurgical bond, whether by micro-alloying or diffusion or both. Another fact is that the silver diffuses much more readily than the gold, so for the same amount of time and heat we can expect to see a much larger diffusion zone with the silver and 500Pd combination.
In addition, inlays with straight sides seem to have diffused less readily than inlays with angled sides. Of the samples sent to Grice, most were cut on the rose engine using a 60-degree indexable carbide insert, but we did include samples cut using a 1 mm grooving tool with straight sidewalls.
More work could be done to further characterize the type and strength of the bond, but the question of whether or not this is a metallurgical bond has been answered with a “Yes!”
Conclusion
You can get lost in a rose engine. It has been great fun discovering a small fraction of what this machine is capable of and we look forward to much more discovery. This machine is capable of producing beautiful items without the need for using CAD/CAM. The cost of these machines, however, can make CNCs seem affordable.
The direct inlay technique we have discovered using samples cut on this machine shows promise for further exploration. It is fast and easy to accomplish a look similar to mokumé-style rings with far less skill required. The color palette is limited, but creating inlay patterns is virtually limitless.
We believe that the techniques of ornamental turning and the care of the machines are important to preserve as it is possible to use these machines and techniques to create unique, saleable styles of jewelry for the modern market.