

Tips for Taking in Repairs
Best practices for creating your own repair guidelines
Compiled by Shawna Kulpa
The key to taking in repairs is good communication. To help ensure that the information passed along the communication chain is accurate and clear, savvy jewelers advocate using an explicit set of guidelines that apply to every repair order, from inspection to documentation to pricing. The following is a collection of tips to help you create your own guidelines for taking in repairs.
• In many shops, it is often a sales associate who takes in items for repair. Therefore, it’s important that everyone on staff knows the language of the bench and can identify jewelry features and repairs. You can facilitate this by creating a glossary of terms for the staff to learn, offering training sessions for your sales associates, and keeping parts catalogs on hand for reference.
• To avoid confusion, many jewelers keep a basic price list for the typical jobs they perform. How do they arrive at their prices? Many use Geller’s Blue Book to Jewelry Repair & Design, written by consultant David Geller in Atlanta. Geller uses a basic pricing formula that doubles the time a bench jeweler thinks a job will take, multiplies it by $65 an hour, adds component costs, and multiplies it by triple keystone to get a repair price. (The $65 an hour factors in taxes, health insurance, workers compensation, vacation and sick days, downtime, and free services.)
• When you take in any repair job, you take on liabilities. Whatever preventive measures you can take to protect yourself from being wrongfully accused of damaging, switching, or eliminating elements in a piece of jewelry is to your advantage. It also provides peace of mind to the customer, and puts everyone on a level playing field.
• White metal jewelry needs to be identified before any work can be done on it. Rather than just guessing on a piece’s contents, grab a bottle of iodine for this quick and easy identification test that Teresa Fryé of TechForm Advanced Casting in Portland, Oregon, picked up from Mark Mann of GIA. “Place a drop of iodine on the white metal piece and let it dry,” says Fryé. “If it dries clear, you’ve got a platinum piece. If it dries black, you’re working with palladium. And if it dries a brownish color, it’s white gold.”
• Just because any yellow metal jewelry you take in for repair is mostly likely gold doesn’t mean it shouldn’t be identified, too. Alan Revere of the Revere Academy in San Francisco has a great quick and easy trick for testing gold to determine a piece’s gold content: Rub the samples in question against a black test stone leaving metallic streaks. Then carefully spread an acid across the samples, revealing the relative purity. Alloys with a higher gold content will be more resistant, and their rubbings will stand out more against the stone. Lower fineness samples will brown out or disappear. While nitric acid can be used, it can be slow-acting. So, after spreading a nitric acid stripe over the rubbings, sprinkle a bit of cigarette ash onto the liquid. The ashes will sizzle and speed up the process so the results are immediate. Just rinse to view.

• Chris Grisaffe in Jacksonville, Florida, recommends discussing the cost of each repair as an individual procedure, and then totaling the cost of all repairs. Even if the cost of repair is above the cost of replacement, some customers will still opt for the repair, so make sure you don’t miss anything. If the customer feels that the repair cost is too high, suggest scrapping the item and using the credit toward a new item, or offer to combine it with any other scrap they have and create a custom piece.
• For customers who don’t want to do any repair you suggest other than what they came in for, Grisaffe recommends photocopying or quickly sketching the piece and making notes on the copy with the customer, indicating where the work is to be done and the cost of each potential repair. Summarize the condition of the piece, noting the stone quality of any potential jumpers. Then advise the customer of your warranty policy on the specific repair that you perform. You don’t want to inherit repairs for which you are not responsible, such as a customer returning time after time claiming that another stone you tightened fell out.
Note: The following series of nine take-in tips were adapted from the MJSA Press book At the Bench Vol. 1 by Gregg Todd and Greg Gilman. To order a digital copy of this title, click here.
1. Every piece brought in for repair should be thoroughly inspected in the presence of the customer. During the inspection, every key feature and needed repair should be spoken out loud to ensure the customer understands what will be done.
2. After the initial inspection, the piece should be cleaned, as dirt and other soils could have obscured critical defects. Rather than using an ultrasonic, which could further damage the piece, use a soft bristle brush and mild detergent in lukewarm water to clean the piece. (Pearls should be cleaned with a soft, damp cloth.)
3. Perform a second inspection in a systematic fashion to avoid overlooking any defects. Begin by looking at the whole piece for obvious defects, then move on to a detailed examination. If the piece has mounted gemstones, check them for damage or defects such as chips or fractures. Then look at how the stones are secured. Is the method by which the stones are secured in need of repair? Also, note any observed defects in the metals (such as breaks, cracks, and thinly worn areas), and look for karat and hallmark stamps.
4. When inspecting a piece, don’t use a 10x lens, which can make everything look in need of repair. Instead, stick with a 2x or 3x lens.
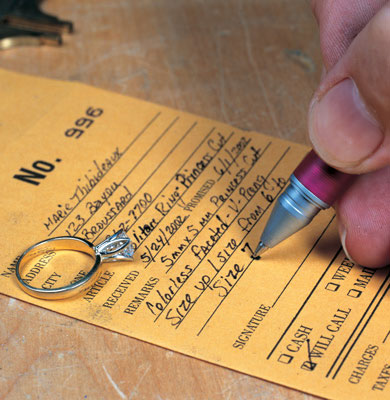
5. Be sure to print clearly on the job envelope. Because everything on the job envelope becomes legal, when writing down the description of the piece, make sure you write what you know, not what you think you know. For example, instead of writing, “1 ct. diamond solitaire in 14k yellow gold ring,” write “yellow solitaire stamped 14k with 6.5 mm clear faceted stone.” (Stone sizes, when set, should be expressed by dimension. Loose stones should be both measured and weighed.)
6. When recording what work is to be done, also write down any work that you advised to be done but was declined by the customer. For example, “Size ring up one size from 6 to 7, prongs thin—customer does not want prongs re-tipped at this time.” Most repair envelopes include only a few lines for instructions so if more space is needed, simply write, “See attached,” and include a separate sheet of paper. In addition, it’s a good idea to create multiple copies of repair orders and store separate files in case of fire and theft.
7. When taking in a ring for sizing, use the mandrel to double-check the measurement as determined by the ring sizer since ring sizers and mandrels aren’t always calibrated. On the job envelope, note the mandrel measurements for the original as well as the intended sizes. (For example, “Size ring up one size, from 6 to 7.”) When indicating ring sizes that fall between standard measurements, use fractions to designate a desired size. Stating a size as 6 1/8 leaves little room for misunderstanding.
8. Since there is a difference between the terms “repair” and “replace,” it is important to determine during take-in whether an item can be repaired or must be replaced. The amount of wear is the primary factor for metal parts. Once the wear reaches 50 percent of the original, it becomes a candidate for replacement. However, the location and type of problem are also important to note. Prong tips that have 50 percent wear on the ends, for example, could simply be re-tipped, while the same amount of wear on the side facing the girdle would call for rebuilding the prong or replacing the head.
9. To help avoid any customer confusion, provide a basic list of the typical jobs that your shop performs. If the customer knows immediately what to expect, there will be no surprises when the repaired piece is presented.