

The Whole Picture: Part 2
Tips for photographing jewelry
By Matthew Perosi
Editor’s Note: This is the second column in a three-part series that provides tips and guidance for photographing jewelry. Read Part 1 and Part 2.
Product photography takes time, especially when you don’t know the basics of lighting and lenses. It doesn’t matter if you are taking photos with your smartphone or with your DSLR camera, you should have a basic understanding of lighting temperature, aperture, ISO, and lenses. Even though the information I provide here references settings on the typical DSLR camera, this is basic knowledge that every amateur photographer should learn.
Lighting
Choosing the right lighting is the most important aspect of jewelry photography. Although we might not perceive it, artificial light bulbs shine with different colors, just as the sun’s colors are different throughout the day. Artistic photos for social media can be shot under any type of light, at any time of day. But when you need a true representation of your jewelry on a white background, it’s easier to get results using light that’s as close to pure white as possible.
Figure A: Kelvin Color Temperature Scale
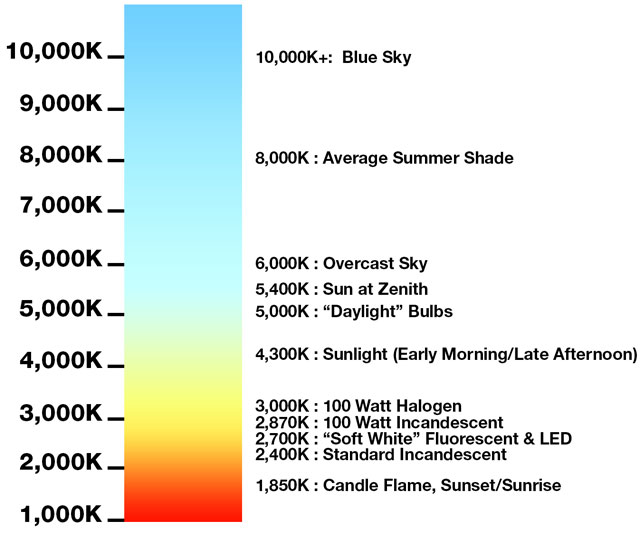
The color of a light is measured on the Kelvin temperature scale as shown in Figure A. Every morning and night we see beautiful sunrise and sunset colors that are around 1,850K, while most of the rest of the day we see sunlight around 4,300K. Pure white sunlight only occurs between an hour before and an hour after when the sun is at its daily zenith; that temperature is about 5,400K. Overcast days produce a softer 6,000K color, which is considered pure white.
Standard incandescent light bulbs are around 2,400K, and even “soft white” and “natural” color light bulbs are less than 3,000K. Those are all in the yellow and red end of the color spectrum. Most hardware stores will carry “daylight” bulbs that give off 5,000K color, which is the closest you can get to pure white without paying for professional-grade light bulbs. Professional-grade bulbs can be found on Amazon in the 5,500K to 5,800K range.
Given enough time, you can color- correct any photo using a program such as Photoshop, but it takes more time to color-correct jewelry that wasn’t taken in the 5,000K to 5,500K temperature range.
Your best options for jewelry photography lighting are either outside when the sun is at its zenith, inside under steady lights in the 5,000K to 5,800K range, or inside using flash units. Using anything else will always make getting a perfect final image more time-consuming.
I find that it’s easier to shoot outside on sunny days than on overcast days because the light is brighter and I can capture a sharper picture. To be specific, overcast days are when there is a thin layer of white clouds. Avoid shooting on partially cloudy days because the constant change of bright sun to overcast will yield different results with every photo you take. It’s better to shoot in direct sunlight than in any shadow even though direct sun might seem too bright for your photography.
Lighting Enclosures and Setups
There are four very different setup approaches to jewelry photography, and each one requires specific equipment.
The best and most versatile method involves shooting outside in direct sunlight. For my outdoor shoots, I use an inexpensive white material enclosure known as a “light tent” or a “light shed” that I found on Amazon. The white material acts as a light diffuser that helps prevent “hot spots” in photos. This type of tent is collapsible and comes in different sizes to fit your needs. Every size will work just as well in direct sunlight. And, best of all, the light tent and your camera are the only two pieces of equipment you need for shooting outside.
If outdoor shoots are not an option, the next best solution is indoor flash photography. Using flash photography isn’t as simple as turning on your built-in camera flash; the flash setup you need requires at least two remote flashes that are “fired off” by your camera when you press the button. Each of my remote flashes is attached to a gooseneck light stand, which allows for total control of where I need to position the lights. With a two-light flash setup, I position one behind the jewelry subject and one next to my camera. I also use a small or medium-sized light tent with flash photography.
The third setup approach is indoor photography using a small light tent enclosure with several steady lights. You’ll need five or more 150W (or equivalent) bulbs of 5,000K or higher. This setup is very cumbersome and can take up a lot of space in your studio. I generally don’t recommend it for jewelers, as the steady light setup often isn’t adequate enough (even with five bulbs).
Another indoor approach is to use a self-contained light box with built-in steady lights. There are many companies that make these types of boxes; most of them use LED strips but some have LED, fluorescent, and halogen bulbs. These self-contained boxes are very popular, but I’ve found that they don’t yield the results you would expect from an expensive box.
Aperture and Depth of Field
The aperture setting is also known as an f-stop. This is a physical setting on your camera lens that controls the internal iris diaphragm and the resulting depth of field of your photo. This setting is the main factor in dictating how much of your jewelry will be in focus; it’s also one of the most difficult settings to achieve on your camera because you need extremely bright light for the best results. Direct sunlight or flash photography is generally what’s needed to capture the greatest depth of field.
Figure B shows the relationship be-tween the f-stop and the depth of field. The right side of Figure B shows an f-stop of 3.5 and the corresponding iris diaphragm. Notice how wide open the iris is with a lower number than with a higher number, as shown on the left side. Also notice that the ruler is less in focus with a lower f-stop and more in focus with the larger setting.
Figure B: F-Stops and Depth of Field
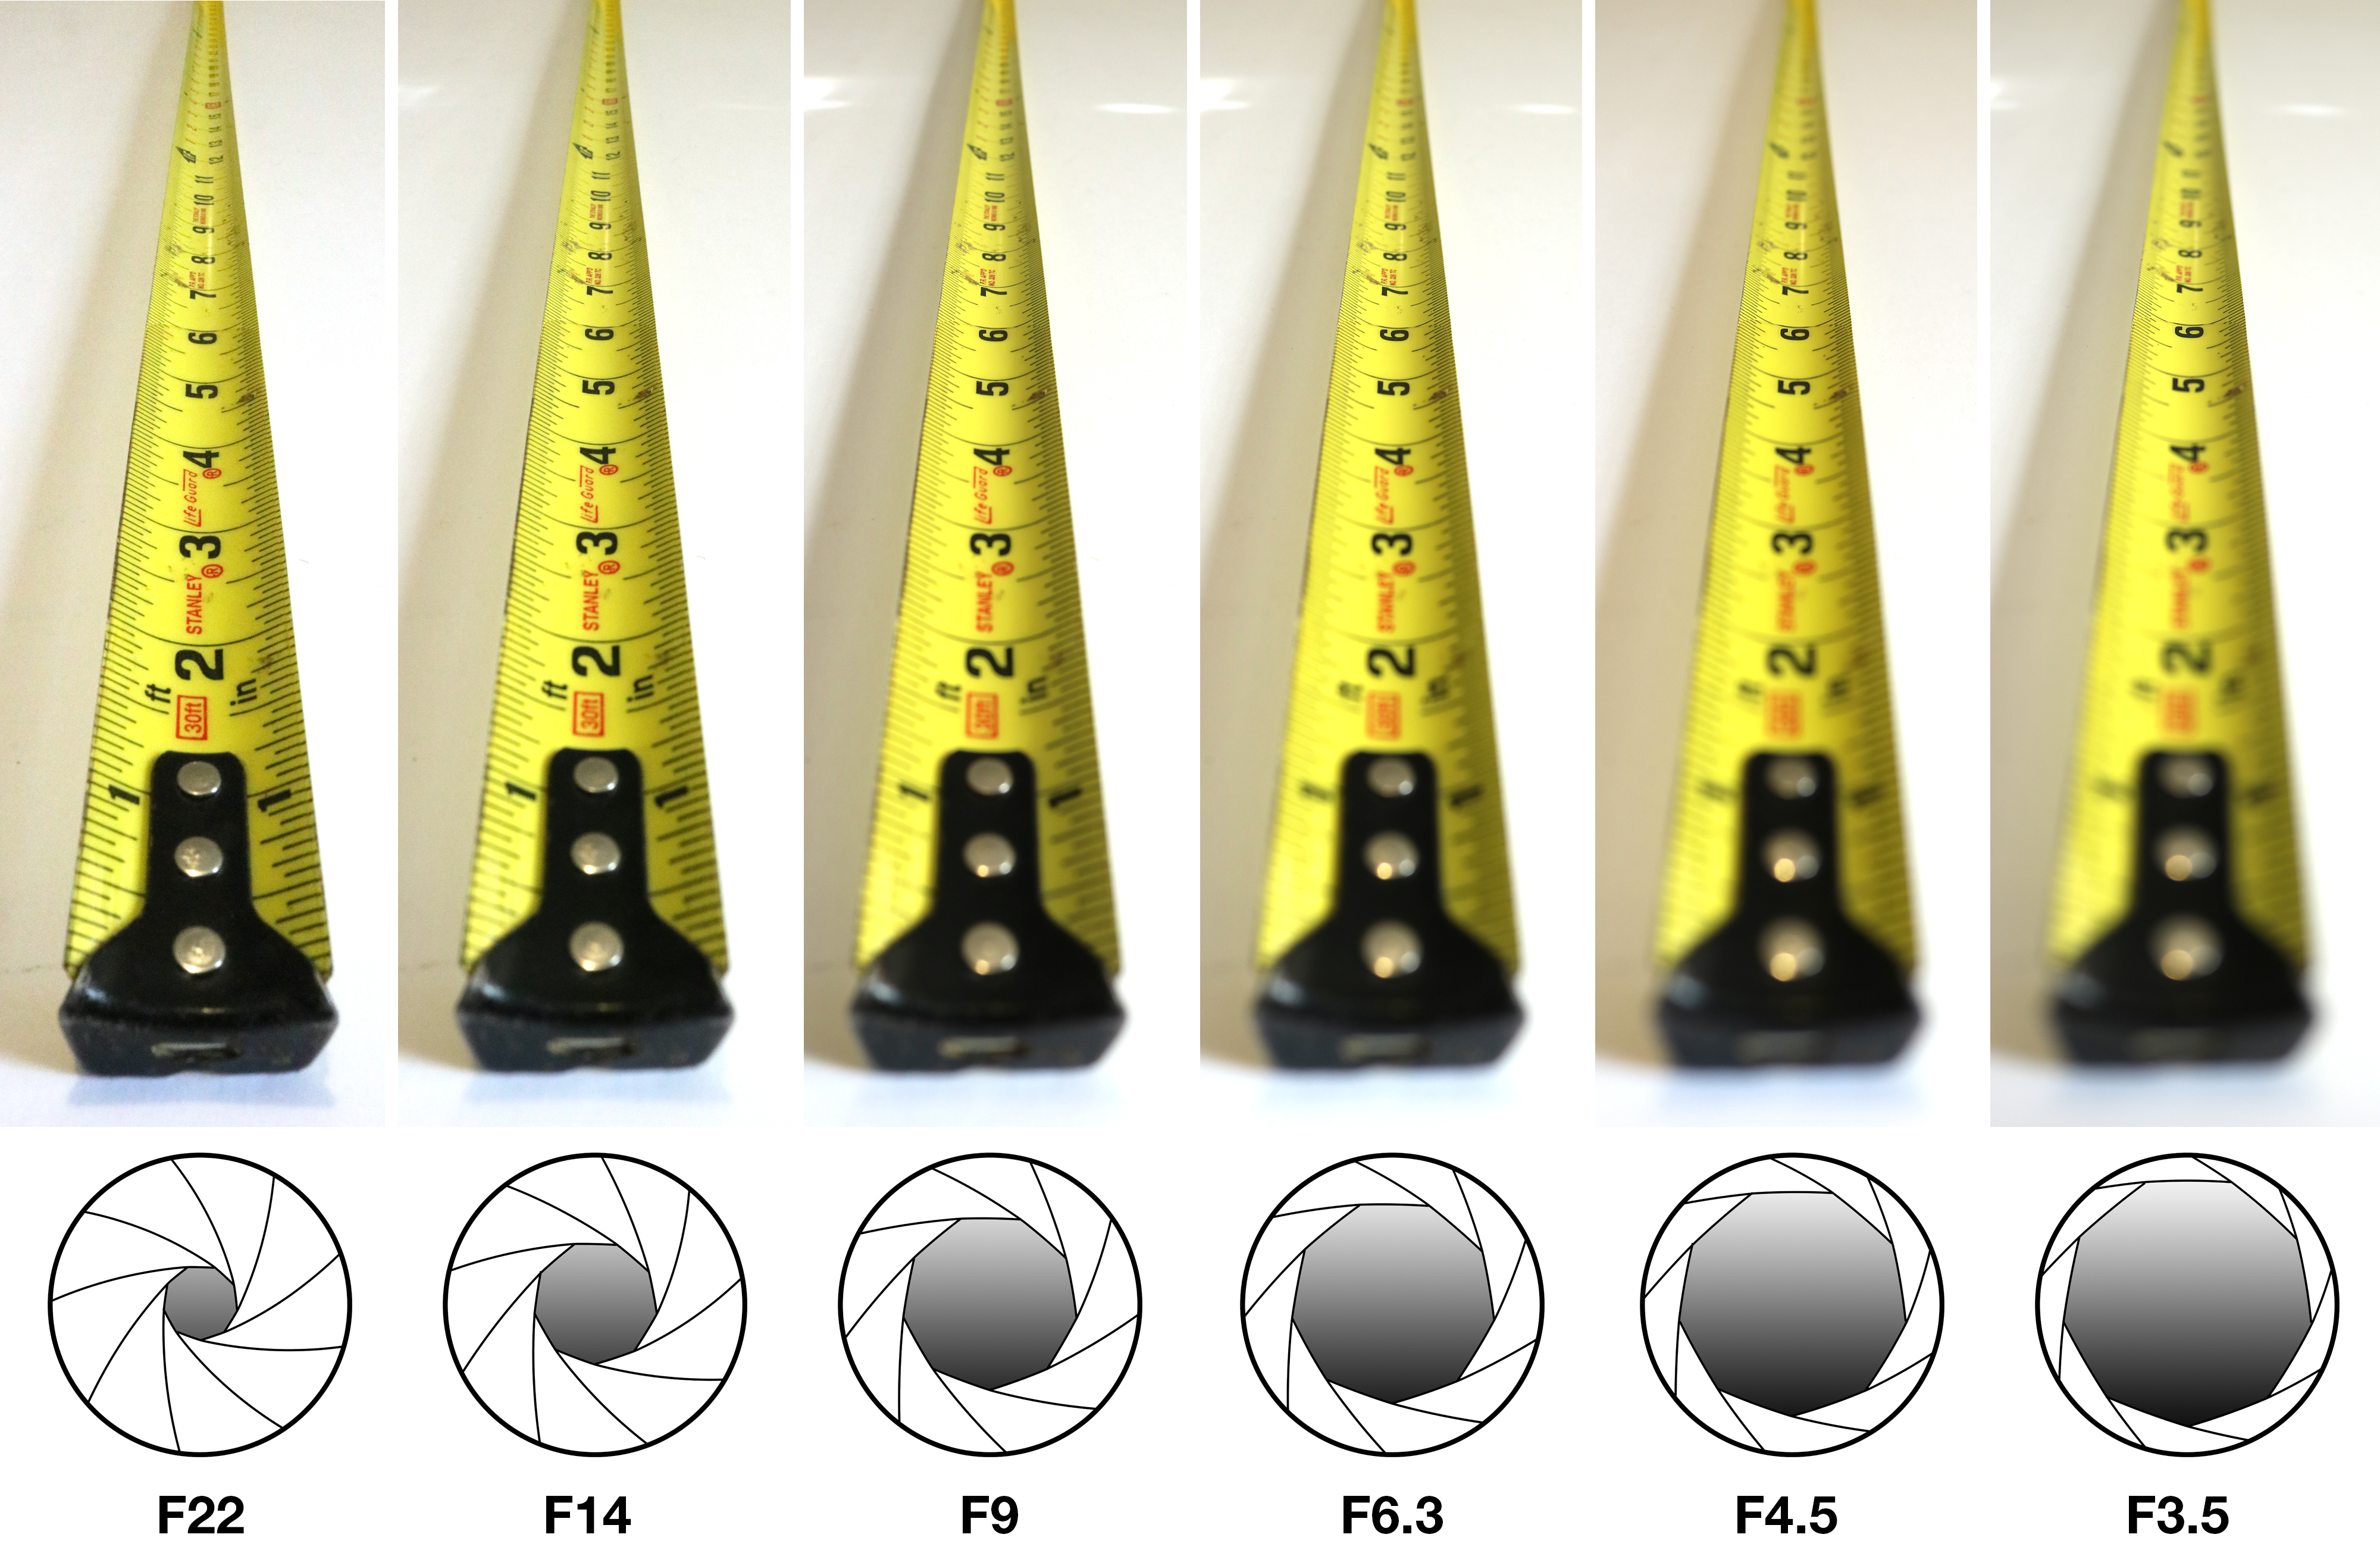
Higher f-stops will produce jewelry photos that are fully in focus, while lower f-stops might allow for only one diamond to be seen clearly. Notice how the opening of the iris is much smaller at the higher f-stop numbers than it is at the lower numbers—a lot less light gets through those smaller holes, so you’ll need to have much brighter lights to begin with. You should always strive for an F16 or greater, but now that you can see the relationship between the iris and the brightness of the light, you can better understand why it’s so difficult to get your jewelry in focus without high f-stops and bright lights.
Camera Angle and Depth of Field
The angle at which you take your pictures is another important factor that will affect your depth of field and lighting requirements. Figure C shows where you would place your camera if you’d like to have a “top down” shot with all your diamonds in focus.
In this situation, you need to set your f-stop to 16 or greater and focus on the shank of the ring rather than on the top. The larger depth of field would allow for the entire ring to be in focus.
Figure C: Top-Down Shot

Figure D shows the placement of your camera at about a 45-degree angle in order to show the inside details of the ring. In this situation you could set your f-stop between 13 and 16 and get the entire ring in focus. Your focal point will still be along the sides of the ring rather than the top.
Figure D: 45-Degree Angle
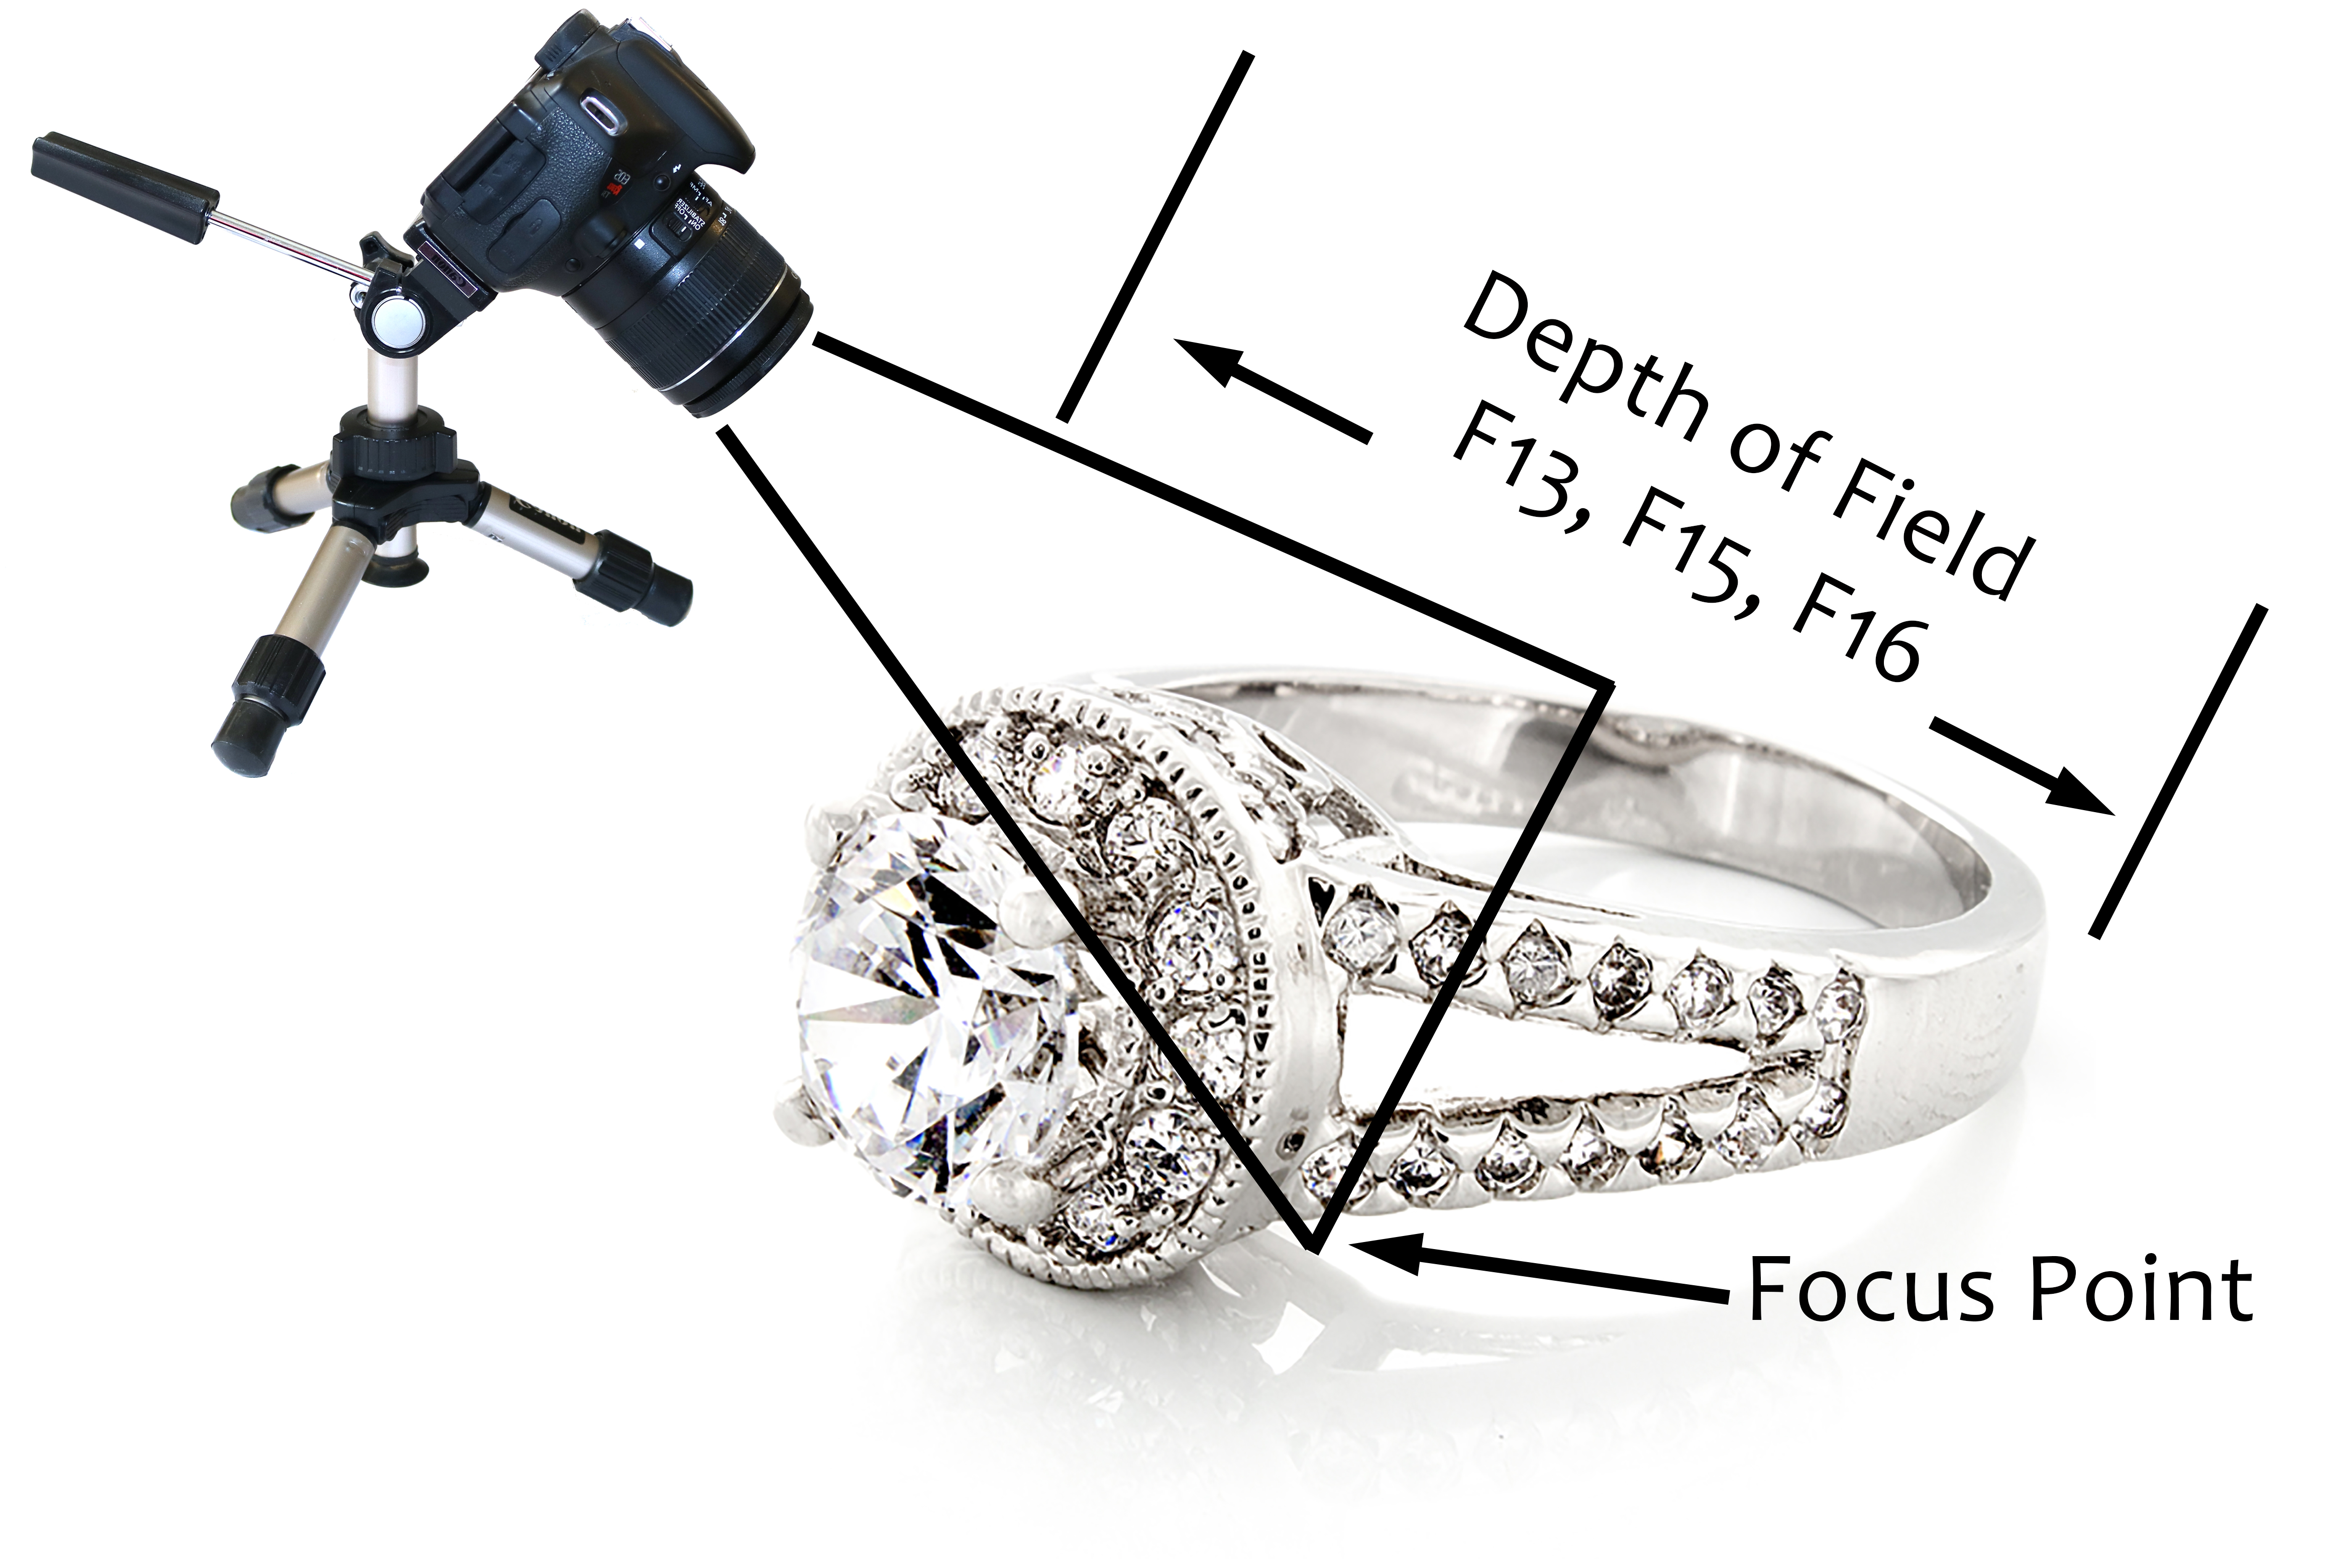
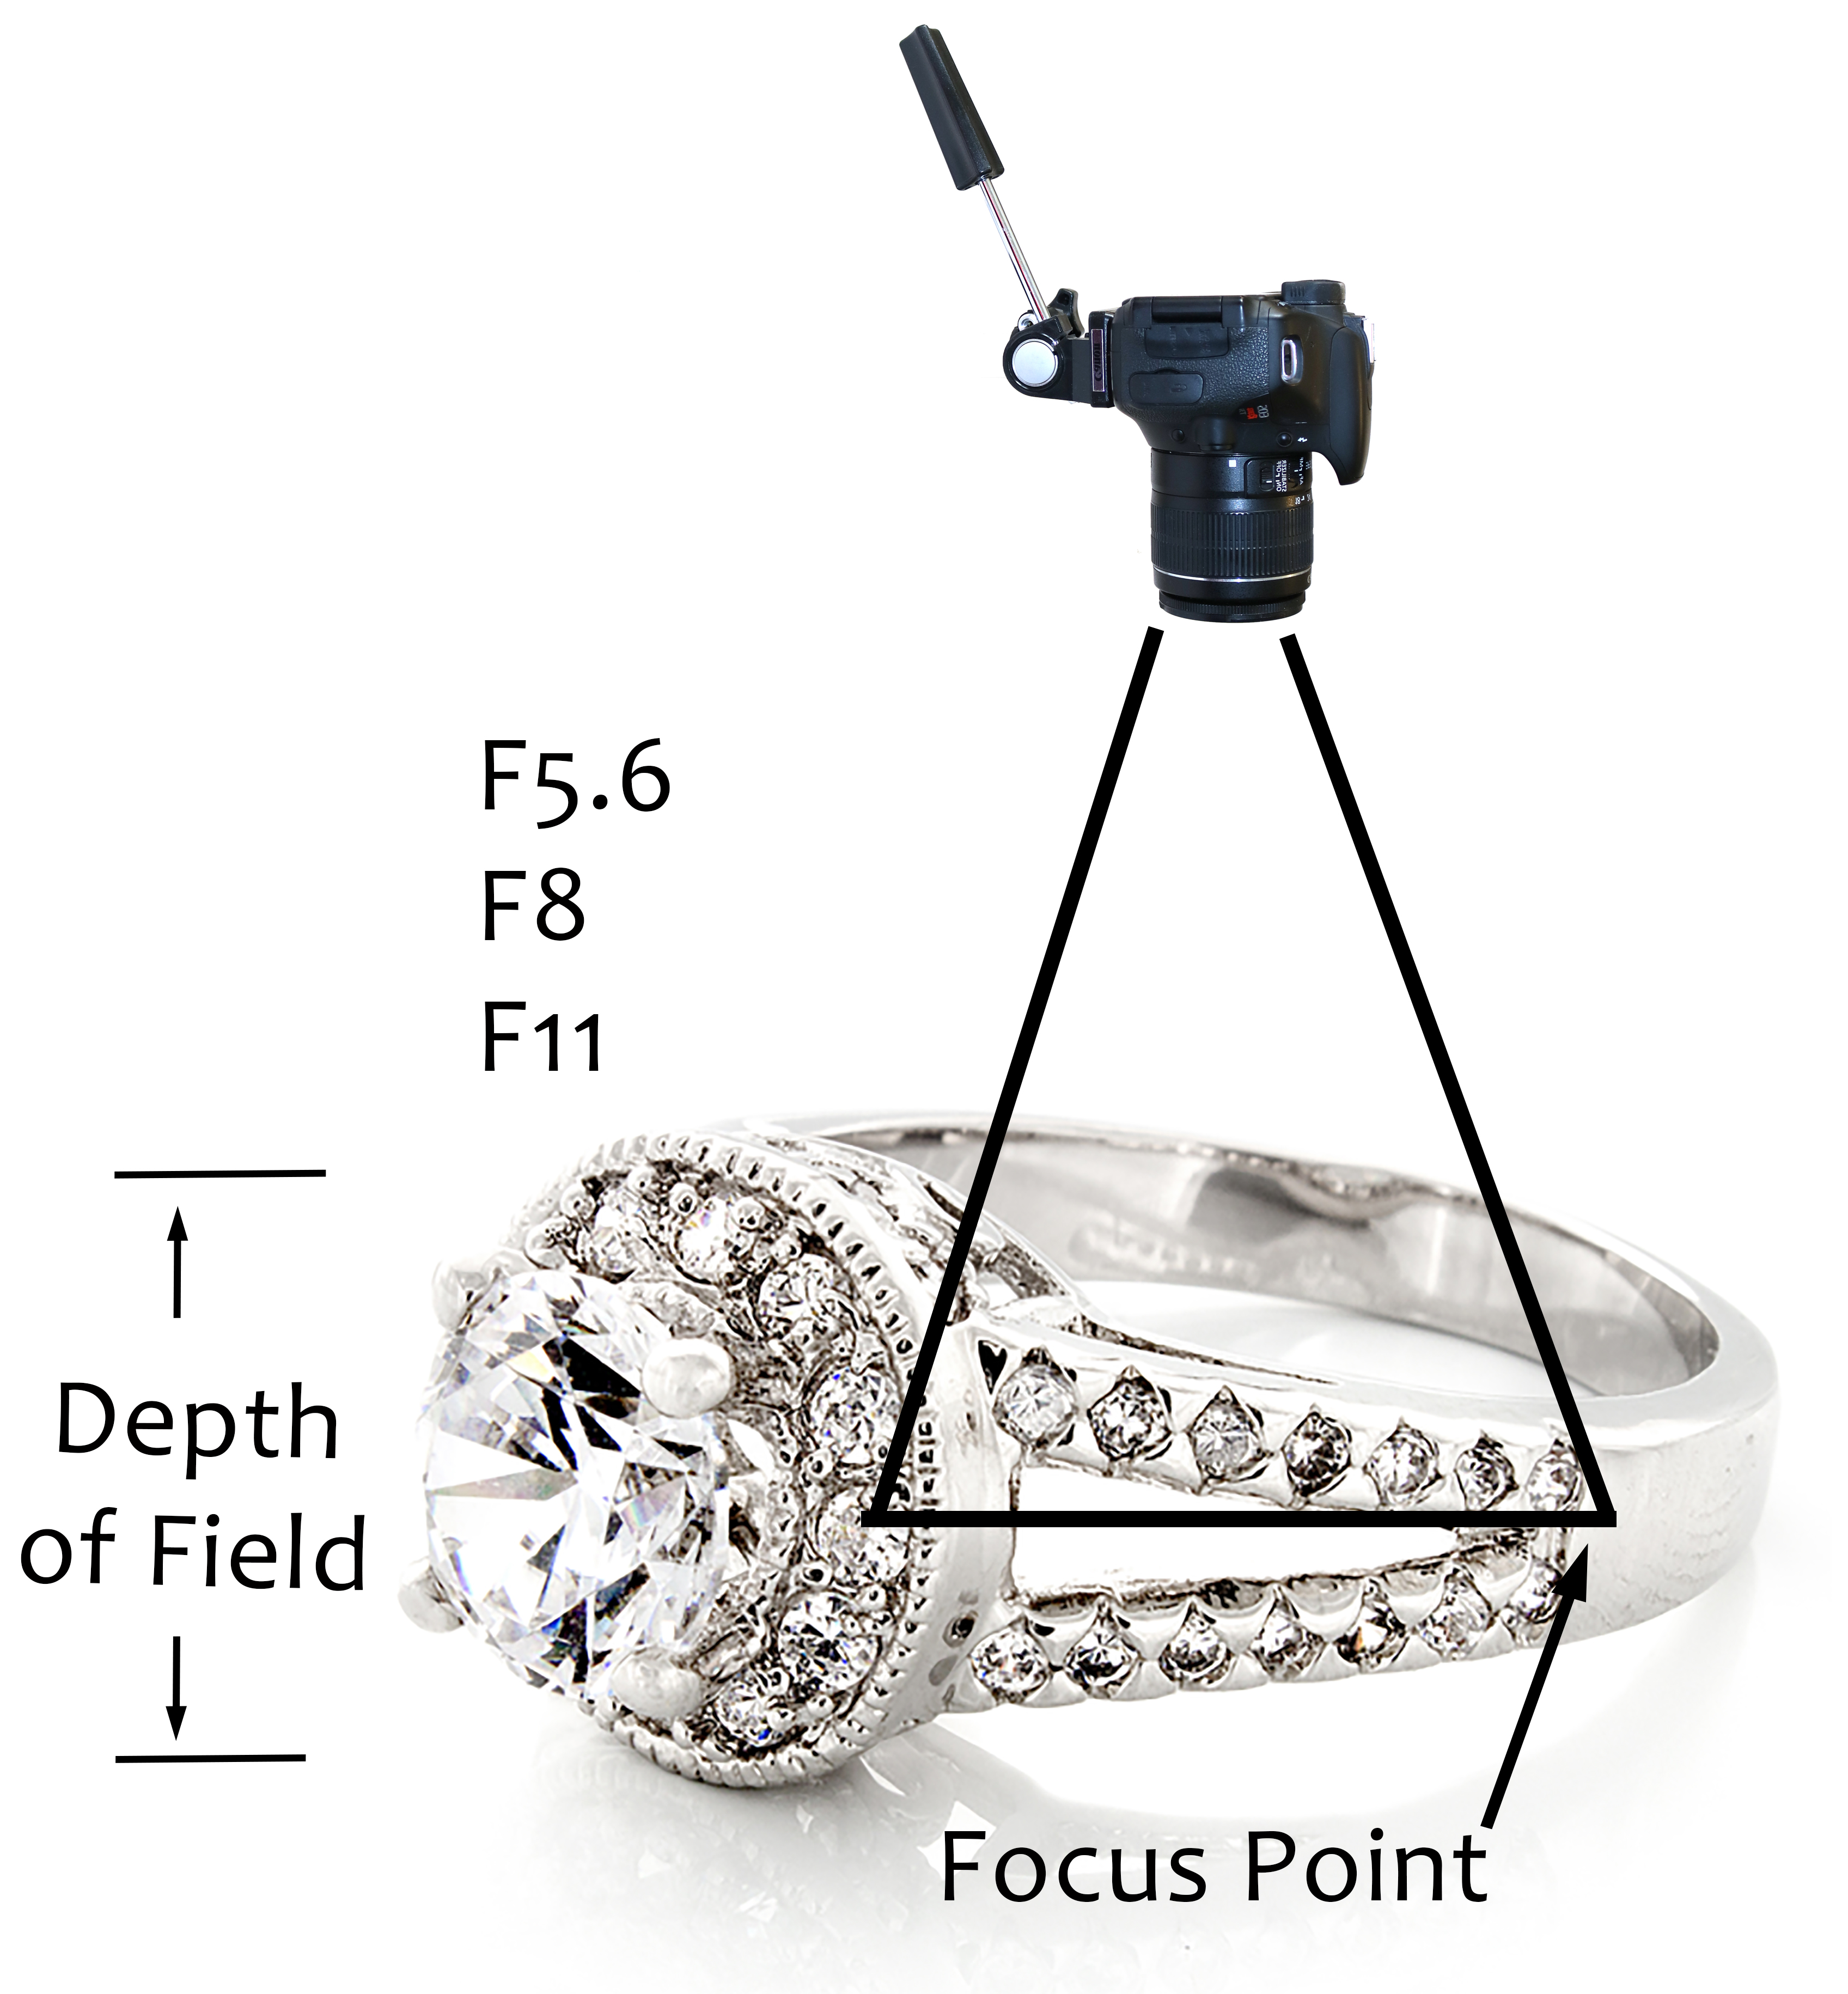
Figure E shows the placement of your camera at 90 degrees if you want to get a profile photo of a ring. In this situation, your depth of field requirement is shallower than the others, so you can use a lower f-stop between 5.6 and 11. Shooting at this angle, with a lower f-stop, also allows you to use less light. All of the steady light boxes designed for jewelry photography have only a few lights inside, which are not bright enough for f-stops higher than 11. You’ll notice that all of these boxes have holes in the top for this 90-degree camera position, and their directions will recommend this placement.
Figure E: 90-Degree/Profile Shop
Film Speed
Film speed refers to the sensitivity of a given film emulsion to light and is represented by “ISO” followed by a number. Although digital cameras don’t have actual film in them, the functionality is the same. Lower ISO numbers are less sensitive to light and have higher image resolution, while higher ISO numbers are more sensitive to light and have lower image resolution.
Setting your camera to an ISO of 100 or 200 will always ensure that your photo will be the sharpest and of high enough quality for use in print media or on billboards. Settings of ISO 400 or more will never capture the fine detail of your product needed for print, but it will be good enough for social media and maybe even for your website.
I’ve seen directions from a few of the light box companies that suggest using ISO 800 along with F22 in order to achieve the needed depth of field in low lighting. Although these settings will work, the quality of the image is often very poor, making the photos best suited for social media. You might be able to use them on your website, but you’d have to see if the resulting photos have enough of the very fine details that most customers expect to see when zooming in.
Smartphones don’t have the ability to adjust your ISO in the basic photography apps. There are quality photography apps that you can purchase for your smartphone that will allow you to change the ISO. I recommend the 645 Pro app on iPhone and the Manual Camera app on Android.
Macro Lenses
Macro lenses were invented for purely scientific and educational purposes so people could see things that couldn’t be seen with the naked eye. Some of their earliest uses were to study flower pollen and insects. Flower photography is still one of the most popular uses for macro lenses today, which is why so many cameras have a flower symbol next to all the macro settings.
By their nature, macro lenses have powerful magnification with an extremely small depth of field. They are best used for capturing artistic photos of a single pavé diamond or a single facet on a 1-carat diamond, for use on social media. They are not good for the general jewelry photography that’s needed for print ads or e-commerce since they don’t allow for getting your entire jewelry item in focus. Instead, I recommend using an 18-55 mm lens.
Pulling It All Together
The simplest approach to jewelry photography is to get an inexpensive light tent and shoot outside when the sun is at its zenith. This will allow you to capture a high-quality, in-focus shot of your jewelry while using F22 with ISO 100 and an 18-55 mm lens on your camera. Achieving a large depth of field requires a high f-stop and a lot of light, which is why your least expensive solution is to use direct sunlight.
If outdoor photography isn’t an option, then I suggest using flash photography indoors because it is bright and able to produce the correct color temperature light. I use two remote flashes with the same inexpensive light tent that I use outside. Flash photography is the most convenient method to use year round and all day long.
Steady light and light box photography have their drawbacks. While you can use them for shooting your jewelry at 90 degrees, they are simply not bright enough when you want to shoot your jewelry at an angle and still need the higher f-stop for that better depth of field.
Good luck, and don’t be afraid to play around to get your best results.