

A Touch of Gold
Jayne Redman adds elegance and value with keum-boo
By Shannon L. Brown
Art meets engineering when Jayne Redman of Jayne Redman Jewelry Inc. in Portland, Maine, applies keum-boo, the ancient Korean technique of bonding 24k gold foil to another metal surface, usually silver. Her nature-inspired, sculptural silver jewelry is brought to life by this touch of gold.
But keum-boo is more than just a beautiful accent. Redman has found that it gives her jewelry a high-end look without a high-end price tag, elevating her silver jewelry above the category’s usual perceptions. “If a fine jewelry store wants to include a lower-price-point line, they can show this to a customer who might not buy silver jewelry,” she says. “Because of the gold decorating the surface, it is perceived as an article of gold jewelry.”
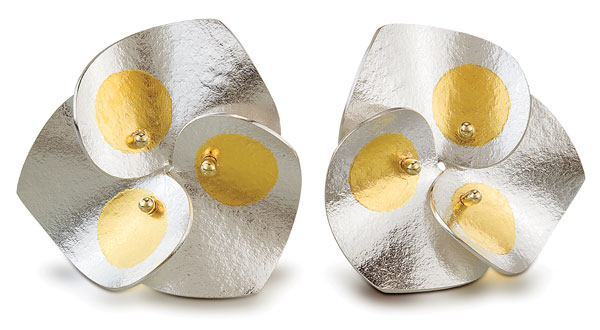
After learning the technique from a friend, she perfected her skills during the late 1980s while she was also teaching jewelry-making classes at the Maine College of Art. In her previous development of a heavy cast silver jewelry line, she discovered two key directions for her business: Keep production in-house to avoid relying on others to meet deadlines, and have a lower price point to expand the customer base. “When I started using keum-boo, I thought it was an interesting way to add gold to my sterling pieces without adding a lot of cost,” says Redman. “I put out a new little line of jewelry with keum-boo in the mid ’90s. It was holiday time and it just flew out the door. That collection is the one that I’m still working on today.”
Materials
• Gold foil. To make her own 0.02 mm 24k gold foil, Redman starts with a 2.5 inch square of 30 gauge sheet and rolls it in her rolling mill until it’s 10 inches long and 0.06 to 0.07 mm thick. “The thickness is a little bit different each time, depending on whether or not the original metal was a tight 30 gauge or a little looser, so it’s never perfectly accurate,” she says.
For the first few passes the gold is annealed and rolled twice before annealing again, then for the last four or so passes (however many are needed) the gold is annealed after each roll. She cuts the gold into four 2.5 inch squares and sandwiches each between two 3 inch squares of 20 gauge copper in preparation for another 13 to 15 passes through the mill. She has found that this gauge of copper will not curve or ripple throughout the process of making the foil. Both metals are annealed before each pass through the rollers.
When the foil is complete, she cuts out the shapes she needs, using the scrap pieces for mosaic patterns in certain designs.
• Silver. Redman uses sterling silver in her work—an excellent metal for jewelry, but one that poses a problem for keum-boo. “The pure gold I use as keum-boo foil will not attach to the sterling because of the copper content, so I need to manipulate the metal to form a top layer of fine silver, which is conducive to bonding with the gold.” To bring up the fine silver and remove the copper from the surface, she heats the silver with a torch for about 20 seconds, lets it cool for a minute, quenches in water, and places it in the pickle pot. After three rounds of this treatment, the result is a white, pure silver surface.
Technique
The gold foil is attached through a process called diffusion bonding, a method of joining metals that involves applying heat and pressure until they diffuse into each other. “You actually force the atoms from one metal to swap places with atoms from the other where they come in contact,” says Redman. Her method of heating is a standard hot plate with a round coil in the center.
She begins by placing the silver pieces—up to six at a time, depending on size—onto a 6 inch square of 16 gauge red brass, being careful to keep the silver within the heating area of the hot plate. To easily position the pieces, she keeps the brass on a 5 inch square piece of PVC board that she’s screwed onto a lazy Susan. She can spin it around to position and access the various pieces of silver. (Note: The brass square is larger so she can easily grab it when it’s time to put it on the hot plate.)
Using an artist’s paintbrush, Redman spreads a thin layer of water, which will act as a lubricant, on the silver pieces. She then picks up a piece of gold foil with the brush and lays it carefully on the silver, moving it into the desired position.
Once all the gold foil is in place and the water has dried, she lifts up the brass and carefully transfers it to the hot plate, which has been preheating on high. Wearing thin leather gloves to protect her hands from the 800°F to 900°F (426°C to 482°C) heat, she checks the metal’s temperature by touching the tip of an agate burnisher—she has several so as one heats up she can trade it for a cool one—to one of the pieces of gold to see if it sticks to the silver. If it does, she turns down the heat to medium.
Using self-locking tweezers with tips she’s rounded so they don’t mark the silver, Redman presses down on the center of each silver piece to hold it in position, then touches the burnisher to the center of each gold foil, tacking it down. She repeats this with all of the gold foil on the hot plate, ensuring everything is tacked down before she moves onto the next step of rubbing it into place. “I don’t want to be rubbing the surface of one shape while gold pieces on adjacent shapes are not tacked because I run the risk of moving other gold out of place,” she says.
Going back to each gold piece, she starts in the middle and rubs it with the burnisher, applying pressure from the center outward, trying to remove all the air so no air bubbles are trapped beneath the gold. “When the gold bonds it’s bright on every bit of the surface,” she describes. With the bonding complete, she picks up the square of red brass with two pairs of self-locking tweezers and slides the silver pieces off into cold water.
For pickling, the pieces of silver are layered between pieces of plastic mesh cut to fit in the pickle pot, often three layers deep so she can pickle around 30 pieces at a time for about 5 minutes. If a piece is going to be cold connected, it is put in a magnetic finisher now. If it will be soldered, that is done first, followed by magnetic finishing.
Applying the Principles
Keum-boo’s light, airy effect is ideally suited to the natural shapes Redman brings to her jewelry. A flower or leaf form is often captured in one of her three-dimensional pieces, which usually have the complicated engineering she loves. “My real passion is the engineering and pattern development,” she says. “Keum-boo allows me to decorate that surface.”
Though Redman once had five employees, she has fine-tuned a system where she can produce tens of thousands of a style with the help of only one employee and a Bonny Doon hydraulic press. “This is production jewelry that I’m making, so I had to think about a way to keep the time down,” she says. “I had to figure out a way to cut these pieces out in multiples.”
Her designs begin as test patterns cut out of oak tag paper (also known as manila tag paper) and assembled with double-sided tape. This is the time to experiment. “I create more of a curve here, less there, make a width different,” she describes. When she arrives at a pleasing design, she makes a copper model. “Very often I hit on something that works correctly the first time so I only have to saw one blanking die for the shape. It’s a very lovely thing when that happens.” When she decides to put the design into production, she again reaches for copper to test the pattern in her blanking die. This thin copper is the same that is used to sandwich the 24k gold as it is rolled into foil.
Redman then applies a texture to the 26 gauge silver sheet she uses for her jewelry—the weight chosen because of its flexibility—before raising the pure silver to the surface (as described earlier). To texture it, she puts a sheet of oak tag paper on each side of an annealed silver sheet and runs it through a rolling mill with enough pressure to make a good impression, sometimes rolling it twice to get the right pattern. After raising the silver, she cuts the metal components for the design using her hydraulic press and blanking dies she saws from tool steel, which enables her to accurately cut from one to three pieces at a time on the press’s 6 inch by 6 inch platen.
She then sands and polishes the edges, drills needed holes, and hallmarks the piece (.925/18k) before applying the gold. The process of keum-boo requires a clean surface and the metal might now have hand oils or polish on it, so she raises the silver one more time before applying the gold foil, which takes on the texture of the embossed metal beneath it.
She then bends and shapes each piece of silver to fit the design, using steel rods and cone shapes modified to suit her needs. The diffusion-bonded gold so permanently attaches that it just moves with the silver. She presses the silver against a metal tool with the flat end of a wooden dowel—the top is rounded so it’s comfortable to hold—switching tools as the design requires, until the silver takes on the desired form.
The result is a wearable piece of jewelry that is as unique as it is affordable. “The whole concept of a two-toned item with gold and silver involved makes that piece really versatile,” says Redman. “It’s the perfect balance.”
Keum-boo At a Glance
The technique of keum-boo involves attaching 24k gold foil to a silver surface through a process called diffusion bonding, a method of joining metals that involves applying heat and pressure until they diffuse into each other. “You actually force the atoms from one metal to swap places with atoms from the other where they come in contact,” says Redman. Her method of heating is a standard hot plate with a round coil in the center.
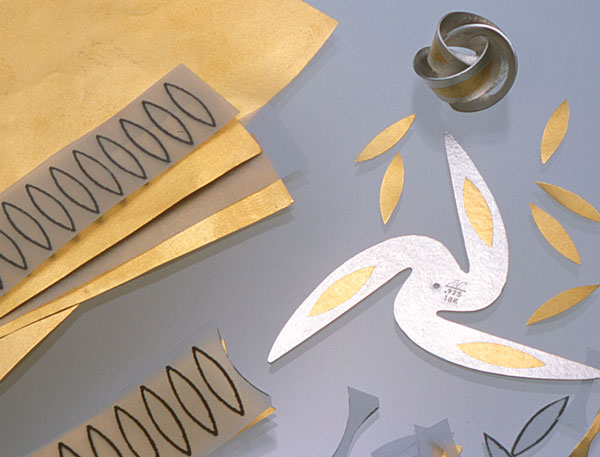
1. After making her own 0.02 mm 24k gold foil, Redman prints her desired gold pattern on a piece of vellum. She cuts out rows of shapes—leaves are shown here—and creates stacks as follows: printed vellum, sheet of gold foil, piece of tracing paper, and another sheet of gold foil. Using Joyce Chen kitchen shears, she cuts each leaf out, which results in two gold leaves per cut. (She’s found attempting to cut more than two pieces at a time results in inaccuracy.) There is no waste: She cuts the scraps from between the leaves into smaller pieces and applies them as a mosaic on other designs.
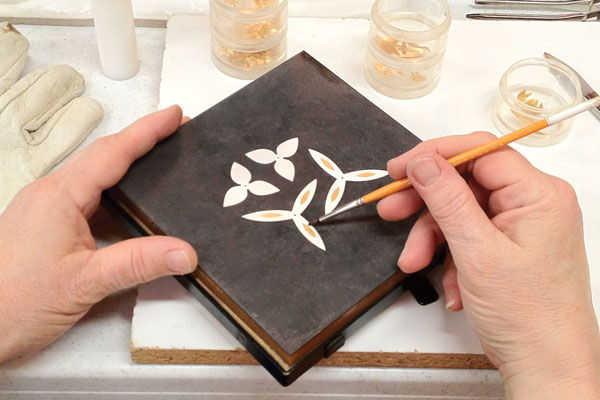
2. Redman begins by placing the silver pieces—up to six at a time, depending on size—onto a 6 inch square of 16 gauge red brass. Using an artist’s paintbrush, she spreads a thin layer of water, which will act as a lubricant, on the silver pieces. She then picks up a piece of gold foil with the brush and lays it carefully on the silver, moving it into the desired position with the brush.
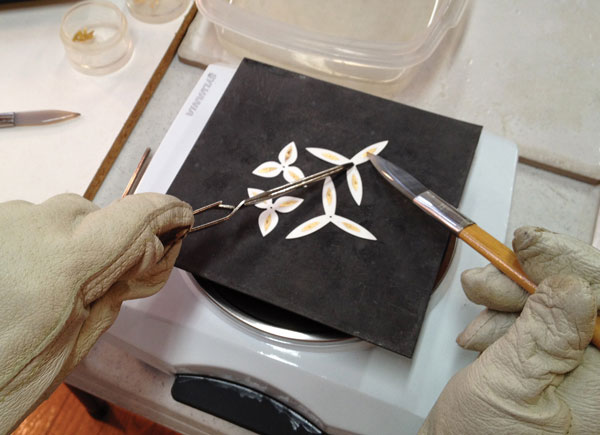
3. Once all the gold foil is in place and the water has dried, Redman lifts up the brass and carefully transfers it to the hot plate. Using self-locking tweezers with tips she’s rounded so they don’t mark the silver, she presses down on the center of each silver piece to hold it in position, then touches the burnisher to the center of each piece of gold, tacking it down. She repeats this with all of the gold foil on the hot plate. Going back to each gold piece, she starts in the middle and rubs it with the burnisher, applying pressure from the center outward to permanently fuse it to the surface.